Get Started with RAI in a Snowflake Notebook
Snowflake has two ways to use notebooks, the Warehouse runtime and the Container runtime.
The relationalai Python package is supported in both.
Choose a Notebook Runtime
Section titled “Choose a Notebook Runtime”When you create a new notebook, you’ll be prompted to choose a notebook runtime. Here’s a quick comparison of the two runtimes:
| Warehouse runtime | Container runtime |
|---|---|
|
|
Refer to the Snowflake docs for more information about the two notebook runtimes.
Set Up Notebook Resources
Section titled “Set Up Notebook Resources”Snowflake notebooks require a Snowflake schema for storing the notebook, a compute pool or warehouse for running the notebook’s Python kernel, and a warehouse for executing SQL queries from the notebook.
Follow these steps to set up the resources that your notebook will use:
- Create the database and schema where the notebook will be created:
CREATE DATABASE <my_db>;CREATE SCHEMA <my_db>.<my_schema>;
- Create a Snowpark Container Services compute pool for your the notebook’s kernel and Python runtime:
CREATE COMPUTE POOL <my_notebook_compute_pool>MIN_NODES = 1MAX_NODES = 1INSTANCE_FAMILY = CPU_X64_XS;
- Create a Snowflake virtual warehouse for executing SQL queries from the notebook:
CREATE WAREHOUSE <my_query_warehouse> WITH WAREHOUSE_SIZE = 'XSMALL';
- If you’ll be using a different Snowflake role to create the notebook than the role used to create the resources, then you must grant access privileges to the role that will be used to create the notebook:
-- Grant USAGE, CREATE NOTEBOOK, and CREATE SERVICE privileges on-- the database and schema where the notebook will be created.GRANT USAGE ON DATABASE <my_db> TO ROLE <my_role>;GRANT USAGE ON SCHEMA <my_db>.<my_schema> TO ROLE <my_role>;GRANT CREATE NOTEBOOK ON SCHEMA <my_db>.<my_schema> TO ROLE <my_role>;GRANT CREATE SERVICE ON SCHEMA <my_db>.<my_schema> TO ROLE <my_role>;-- Grant USAGE privileges on the notebook compute pool and query warehouses.GRANT USAGE ON COMPUTE POOL <my_notebook_compute_pool> TO ROLE <my_role>;GRANT USAGE ON WAREHOUSE <my_query_warehouse> TO ROLE <my_role>;
- Create the database and schema where the notebook will be created:
CREATE DATABASE <my_db>;CREATE SCHEMA <my_db>.<my_schema>;
- Create a Snowflake virtual warehouse for your notebook to use:
CREATE WAREHOUSE <my_notebook_warehouse> WITH WAREHOUSE_SIZE = 'XSMALL';
- Create a Snowflake virtual warehouse for executing SQL queries from the notebook:
CREATE WAREHOUSE <my_query_warehouse> WITH WAREHOUSE_SIZE = 'XSMALL';
- If you’ll be using a different Snowflake role to create the notebook than the role used to create the resources, then you must grant access privileges to the role that will be used to create the notebook:
-- Grant USAGE, CREATE NOTEBOOK, and CREATE SERVICE privileges on-- the database and schema where the notebook will be created.GRANT USAGE ON DATABASE <my_db> TO ROLE <my_role>;GRANT USAGE ON SCHEMA <my_db>.<my_schema> TO ROLE <my_role>;GRANT CREATE NOTEBOOK ON SCHEMA <my_db>.<my_schema> TO ROLE <my_role>;GRANT CREATE SERVICE ON SCHEMA <my_db>.<my_schema> TO ROLE <my_role>;-- Grant USAGE privileges on the notebook and query warehouses.GRANT USAGE ON WAREHOUSE <my_notebook_warehouse> TO ROLE <my_role>;GRANT USAGE ON WAREHOUSE <my_query_warehouse> TO ROLE <my_role>;
Create a Snowflake Notebook
Section titled “Create a Snowflake Notebook”- Log in to your Snowflake account at https://app.snowflake.com.
- Create a new notebook:
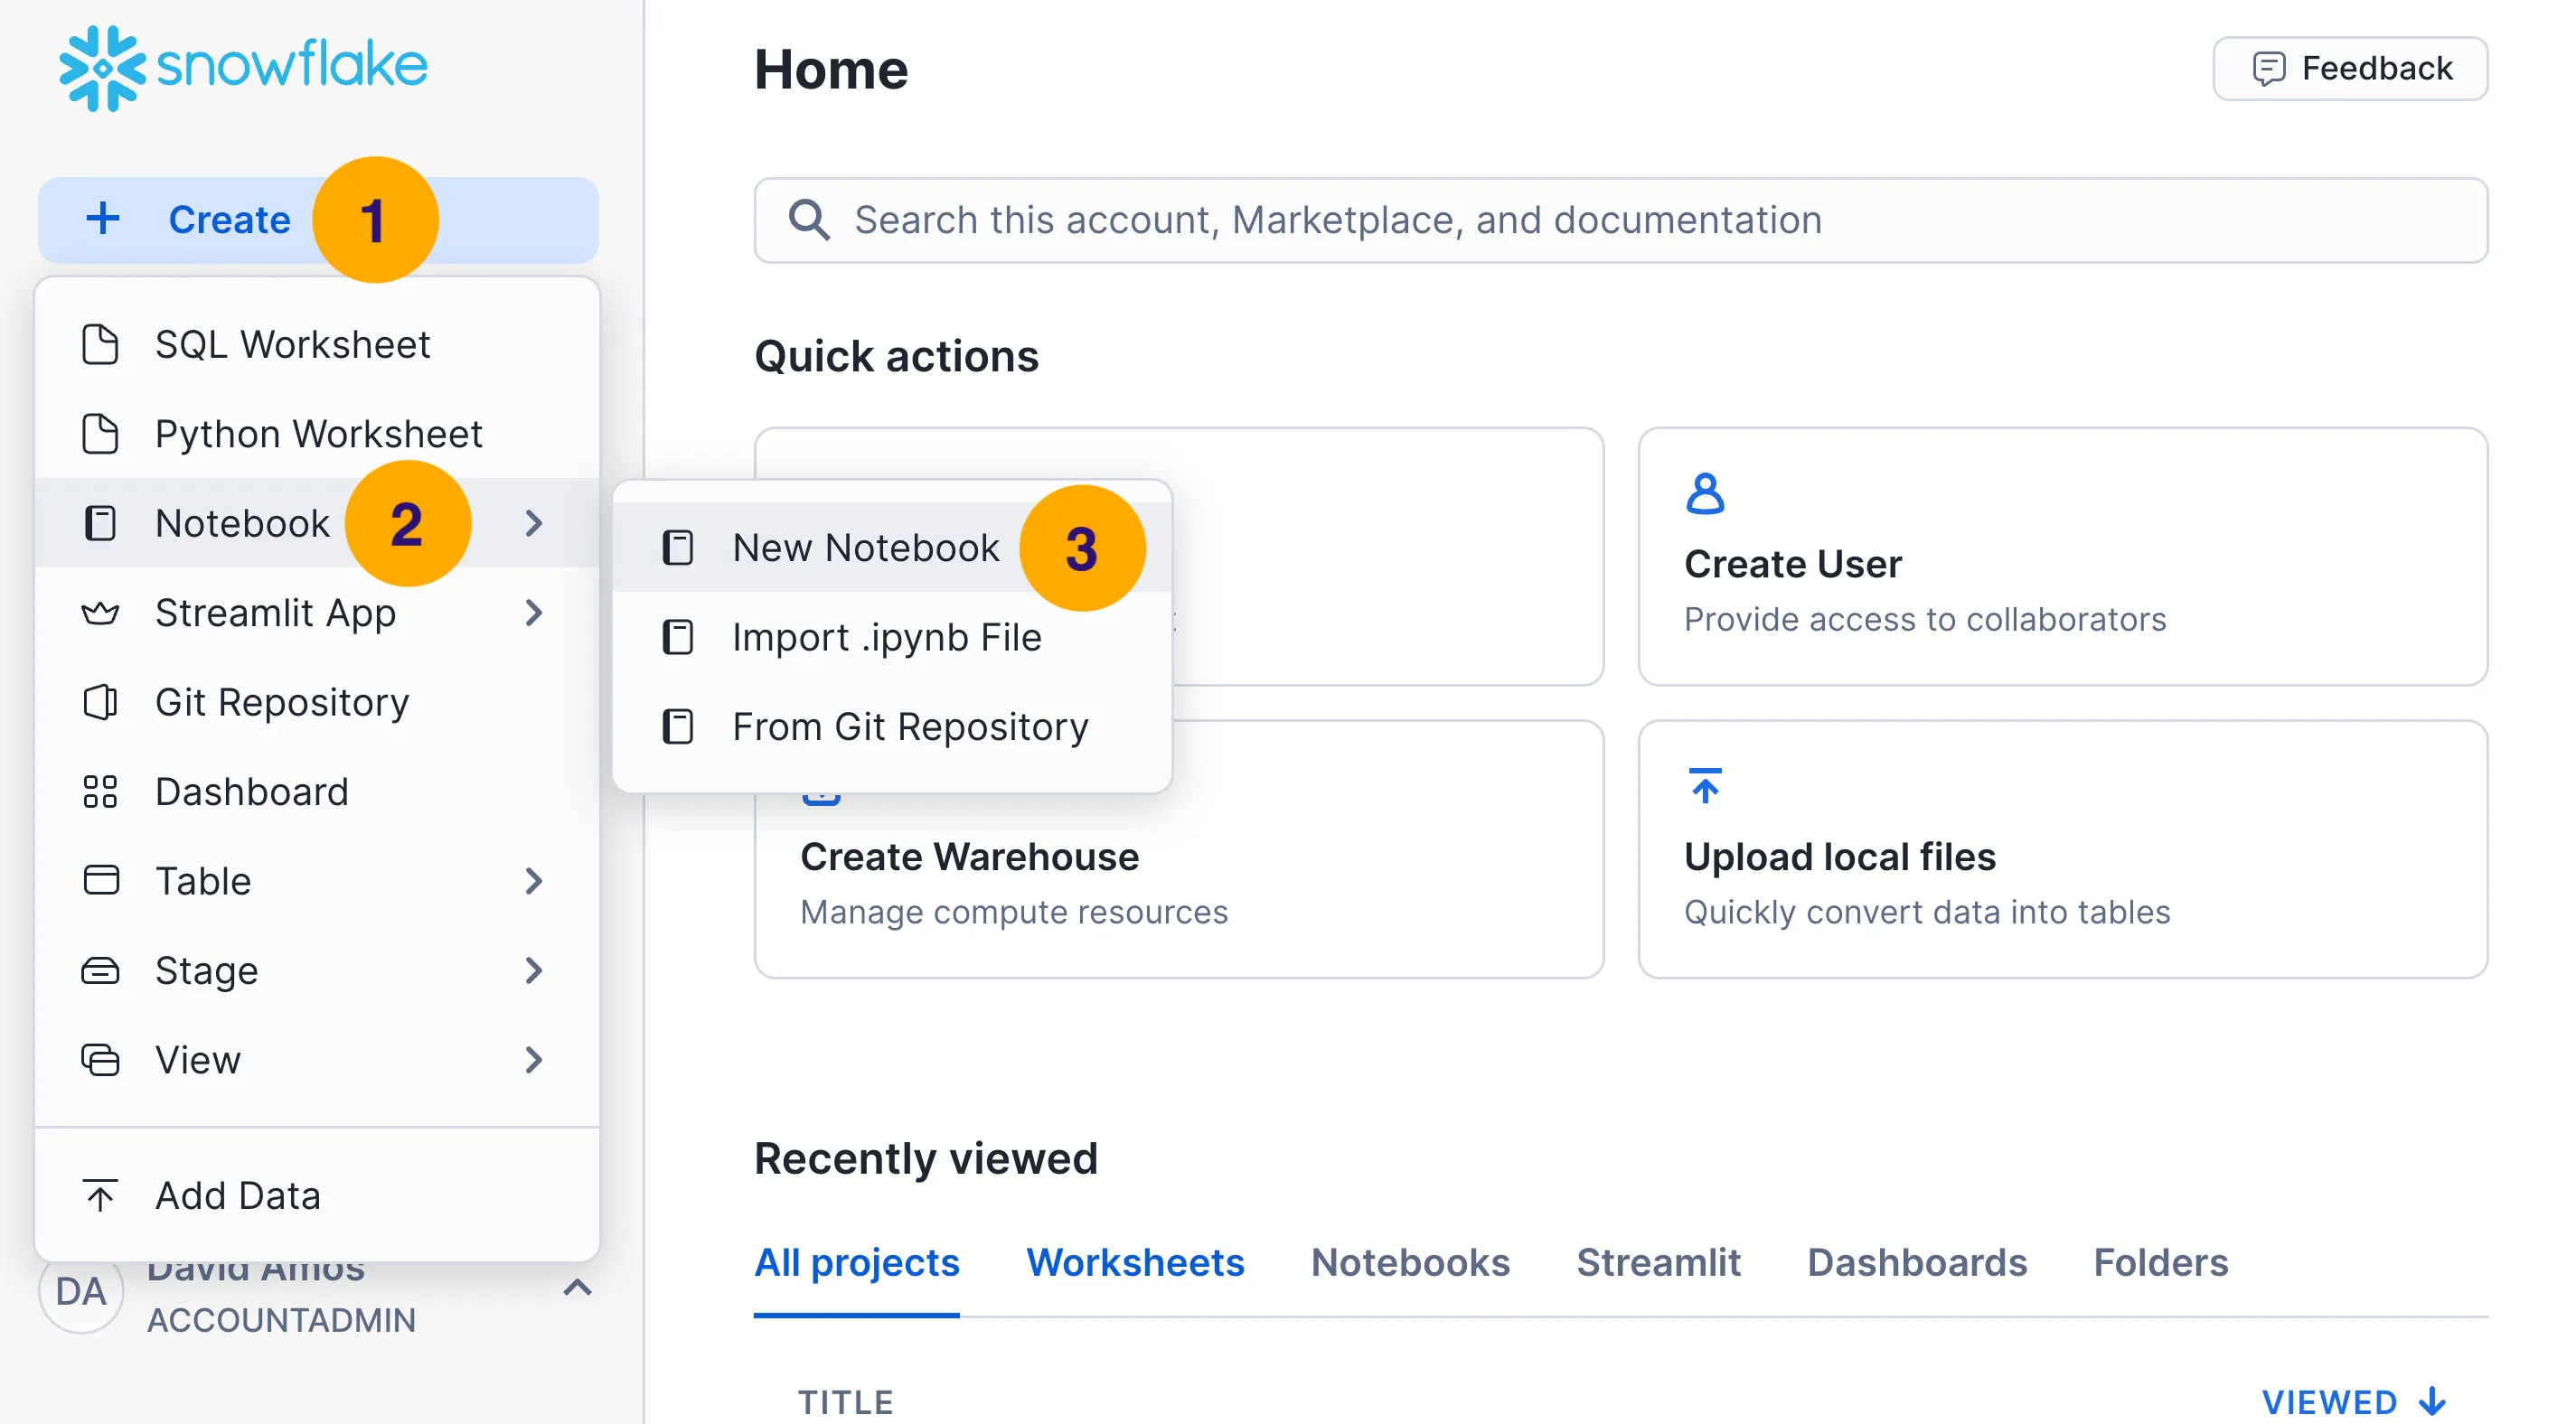
- Click on + Create in the top-left corner of the Snowflake window.
- Hover over Notebook in the list of options.
- Click on New Notebook in the pop-out menu.
- Fill out the modal with the information for your new notebook and then click Create:
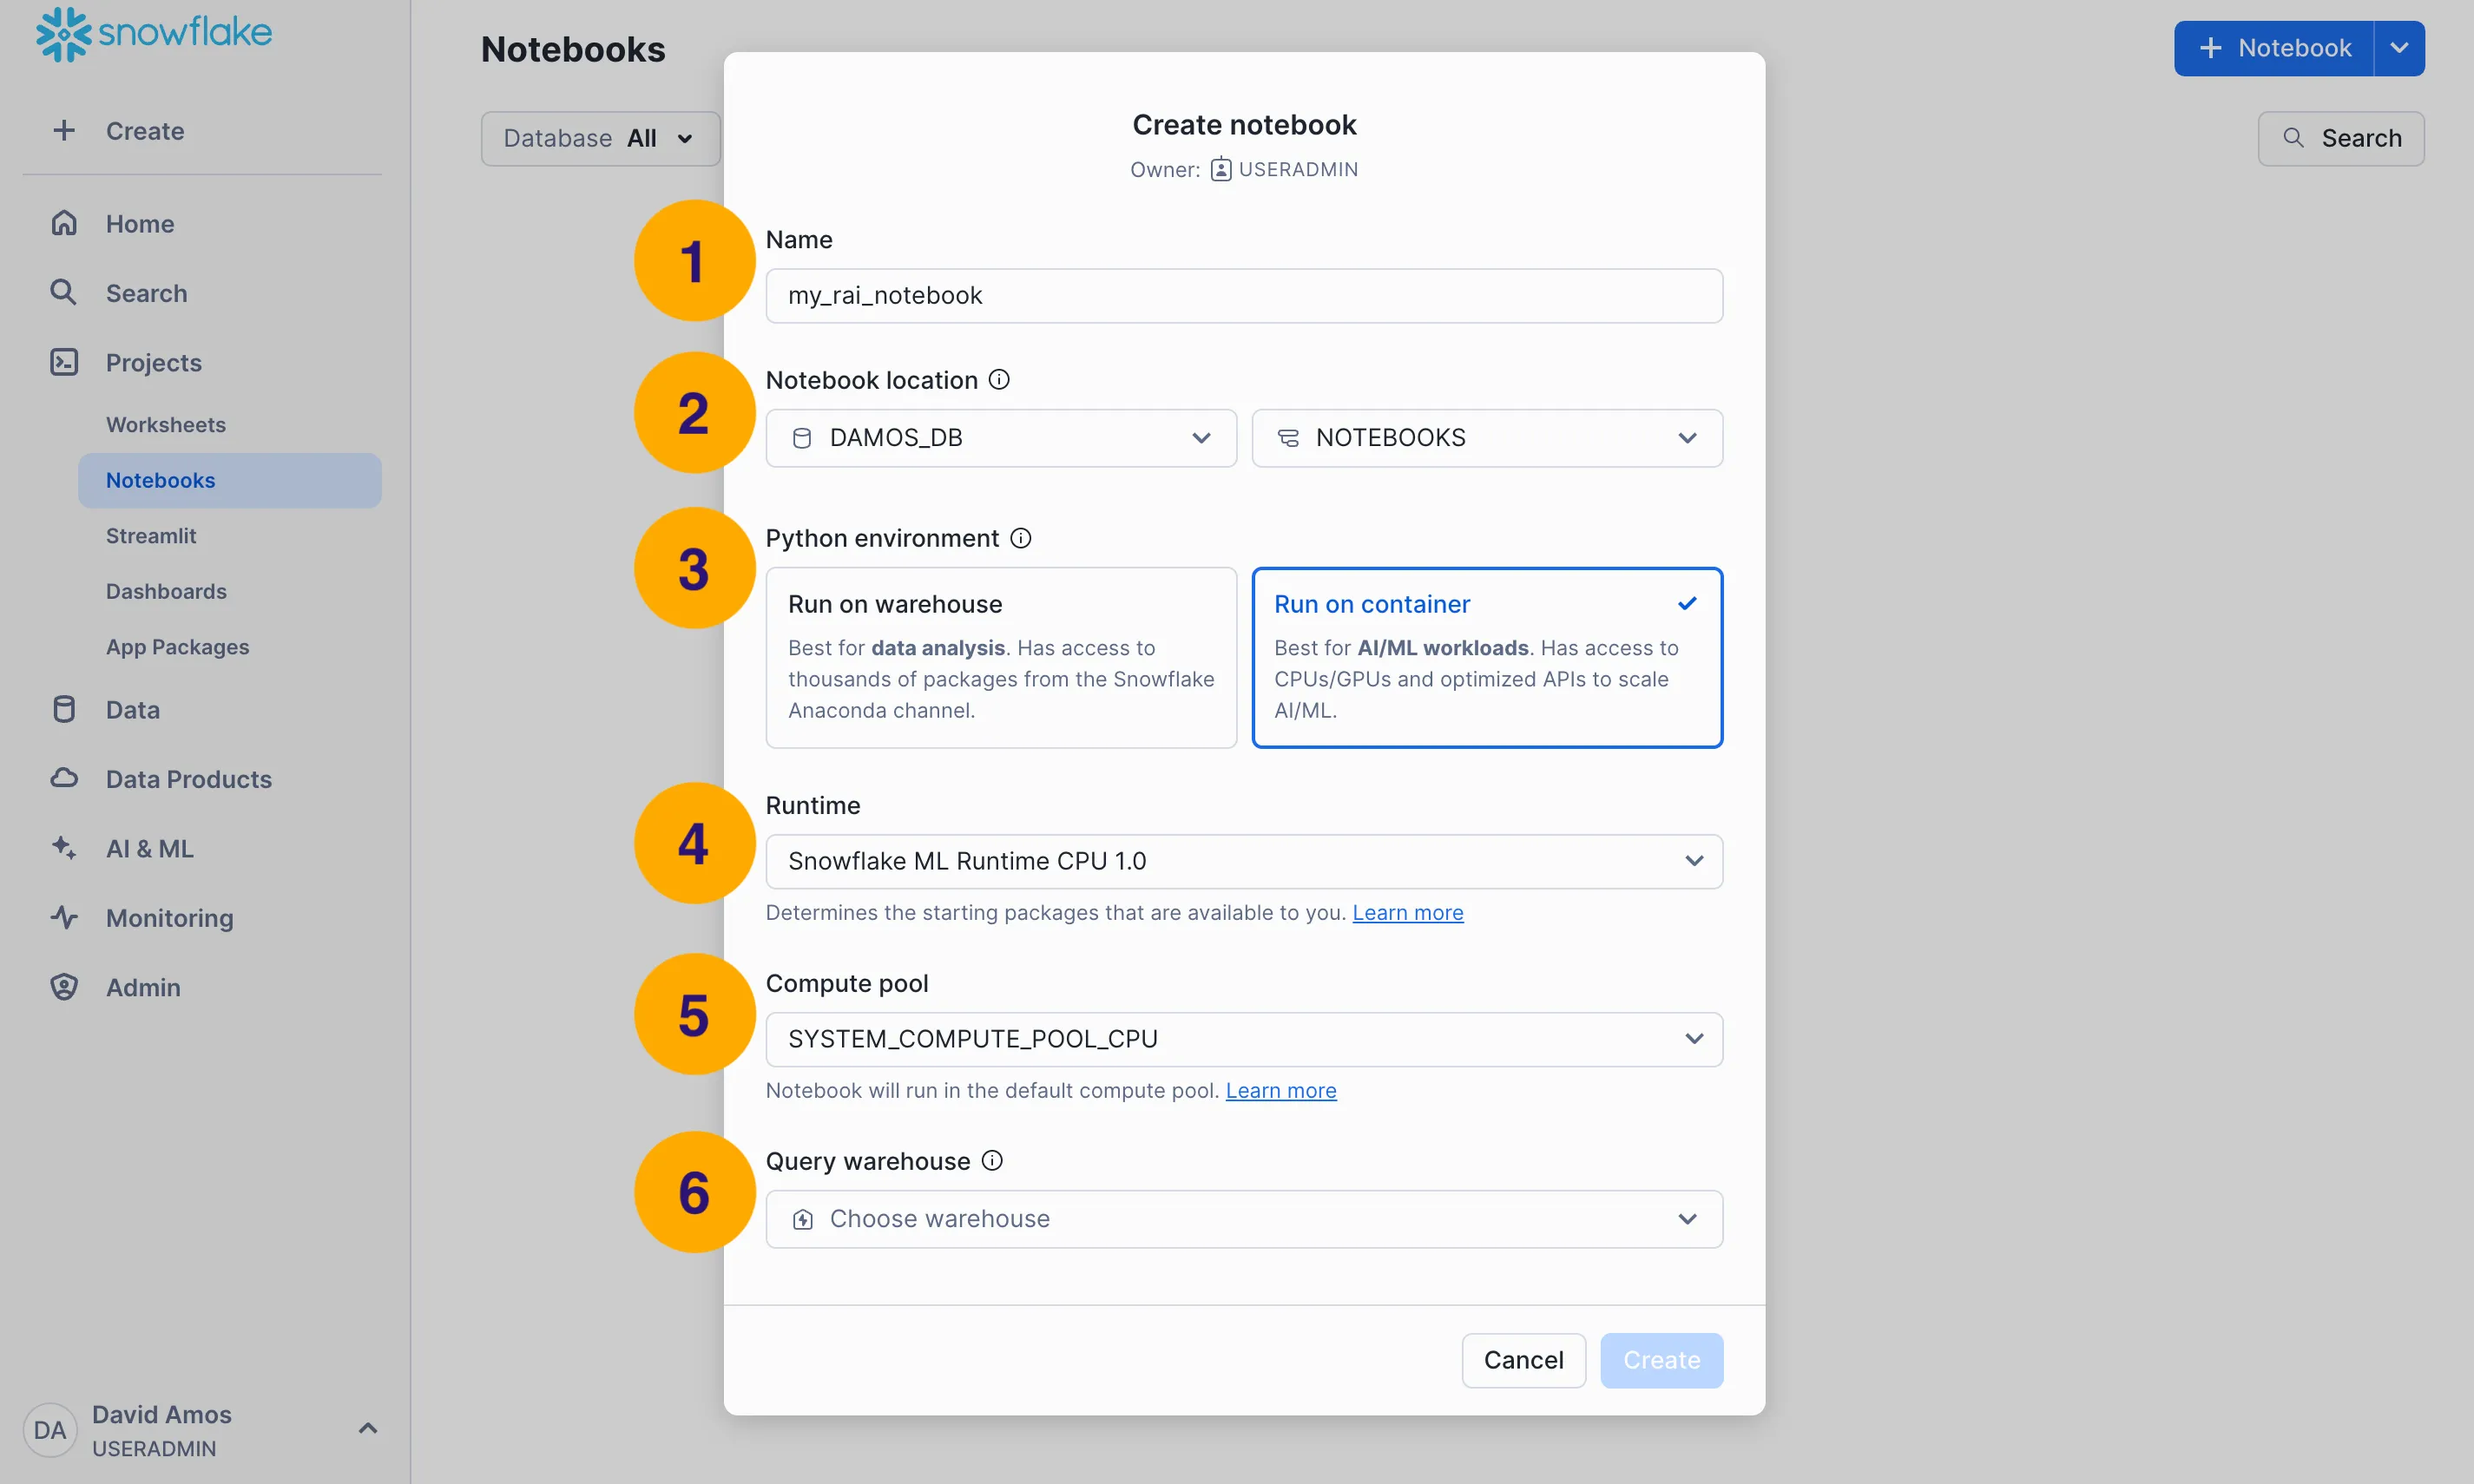
- Name: Give your notebook a name.
- Notebook location: Choose the database and schema for creating the notebook.
- Python environment: Choose the Run on container option.
- Runtime: Choose CPU or GPU.
- Compute pool: Select the compute pool that executes the notebook’s Python kernel.
- Query warehouse: Select the warehouse for executing SQL queries.
- When the notebook opens, delete the sample code cells that Snowflake creates for you:
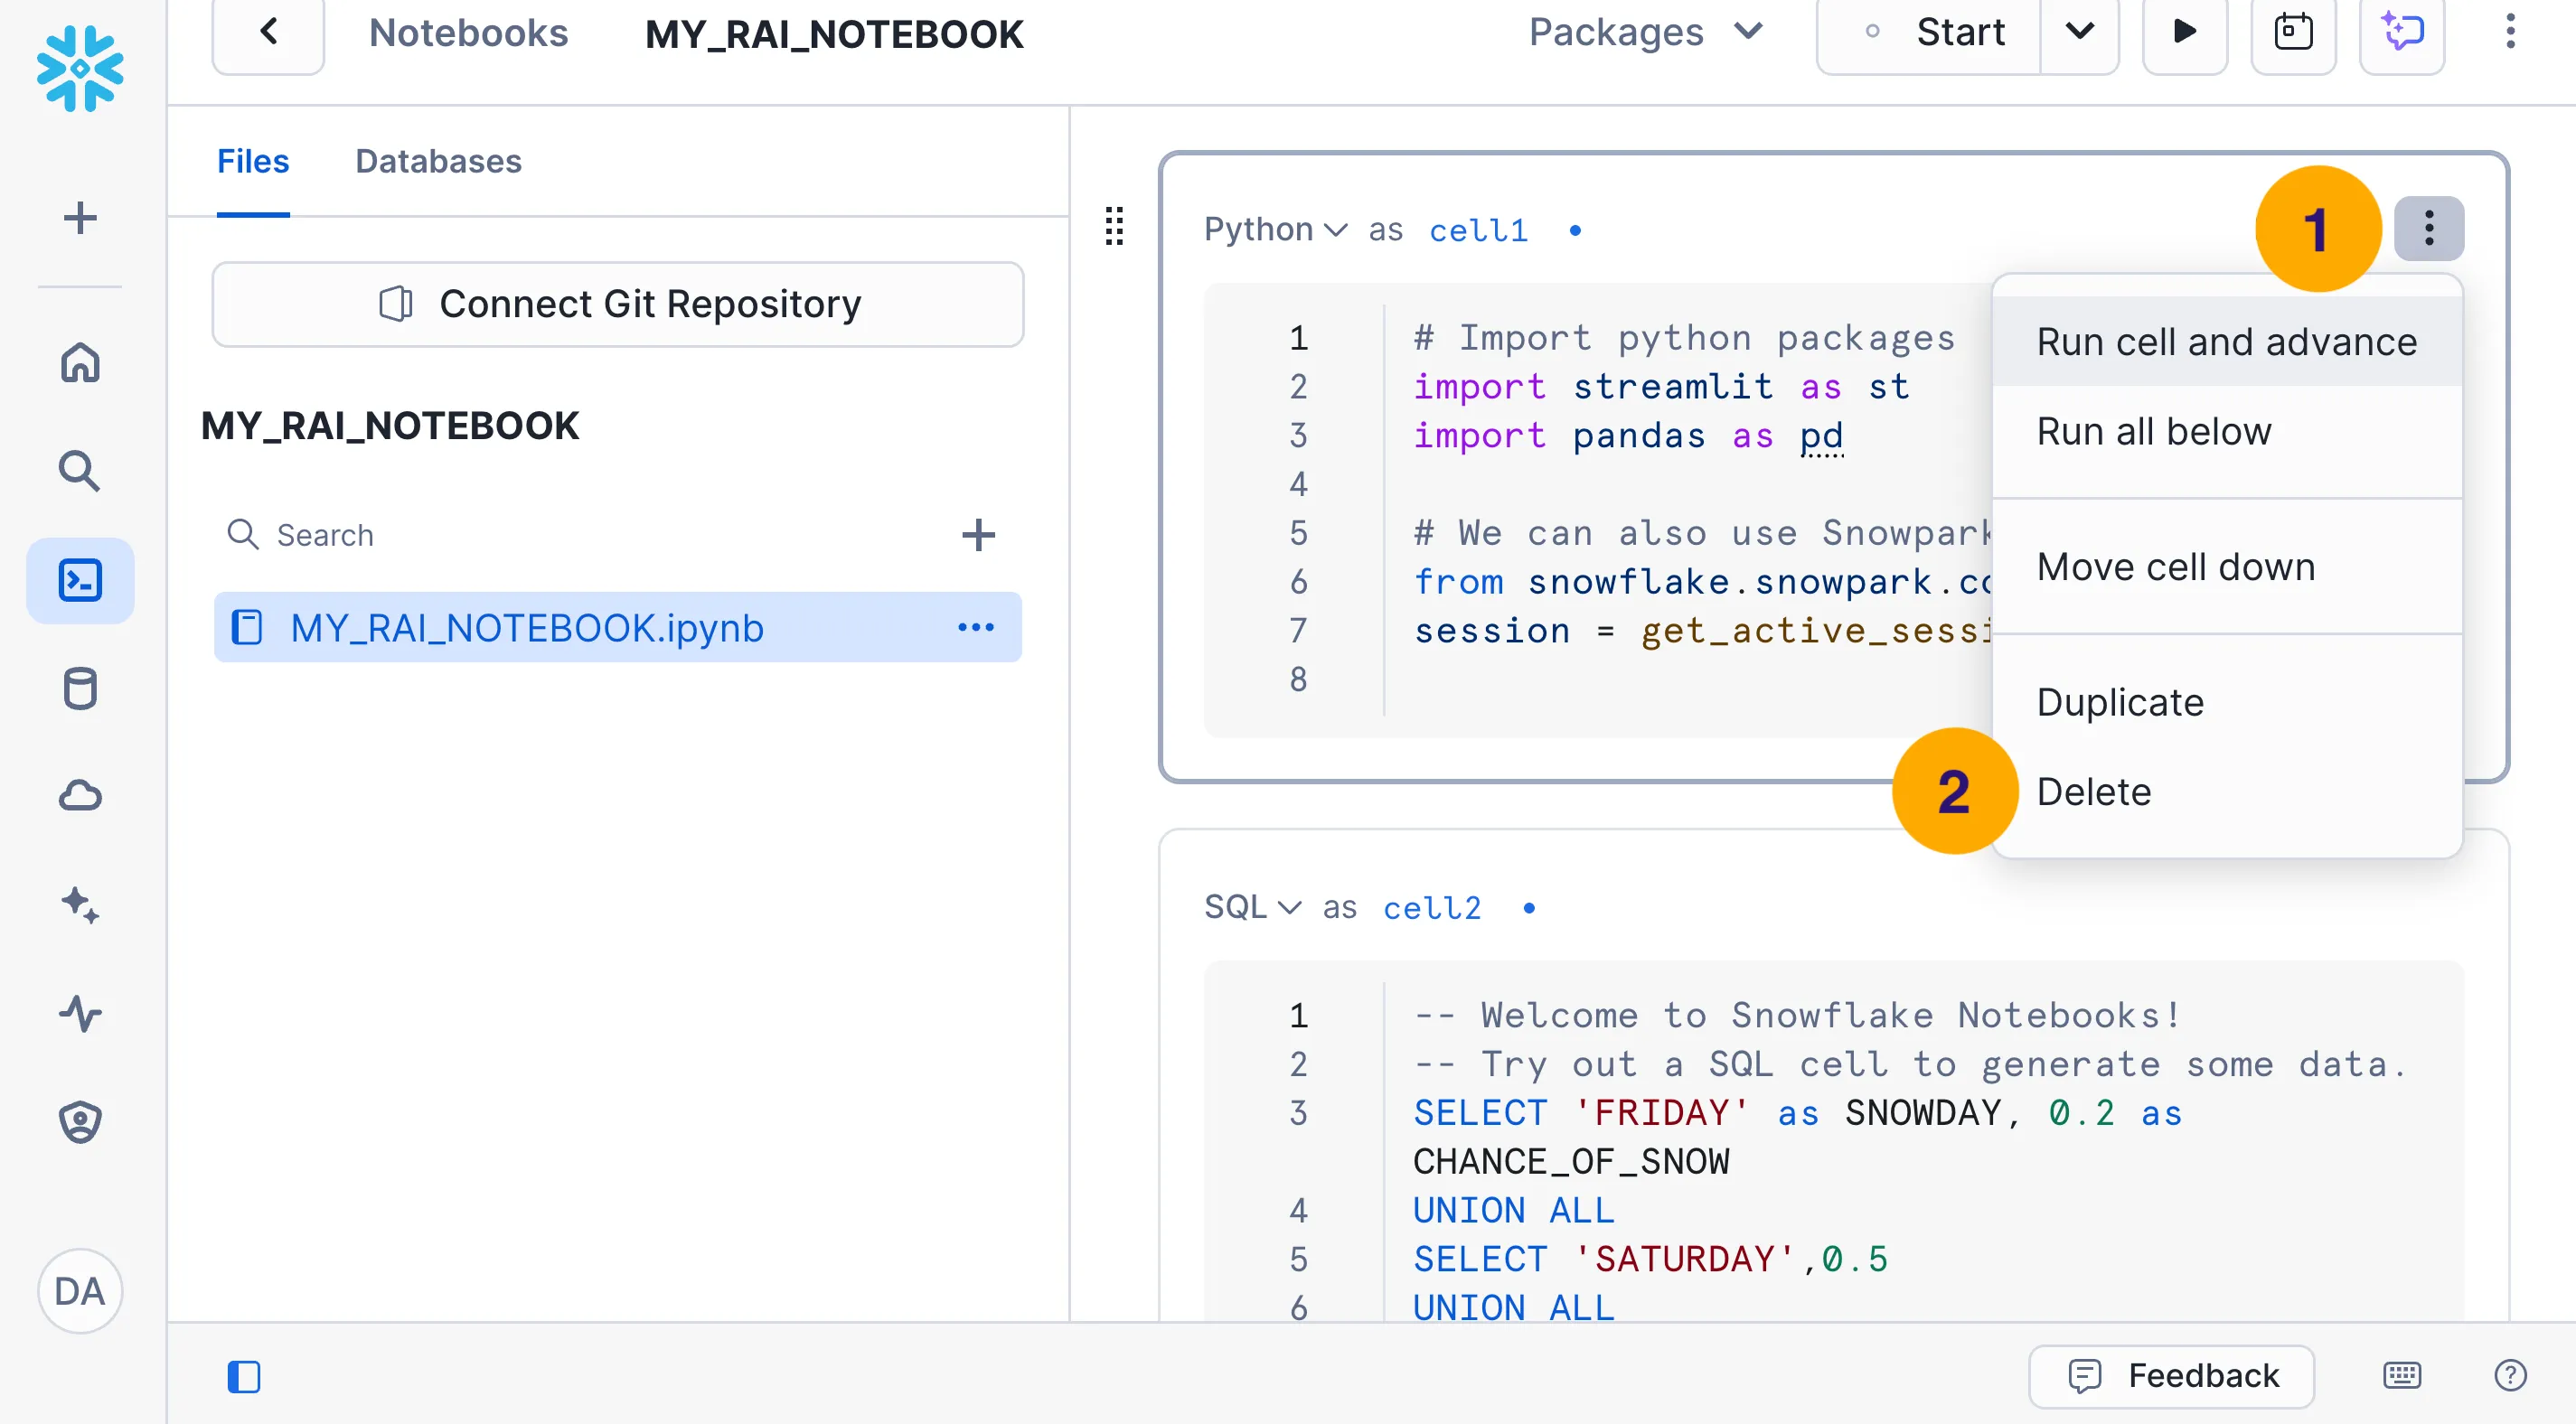
- Click on the triple-dot (⋮) dropdown in the top-right corner of the code cell.
- Click on Delete in the dropdown menu.
- Log in to your Snowflake account at https://app.snowflake.com.
- Create a new notebook:
- Click on + Create in the top-left corner of the Snowflake window.
- Hover over Notebook in the list of options.
- Click on New Notebook in the pop-out menu.
- Fill out the modal with the information for your new notebook and then click Create:
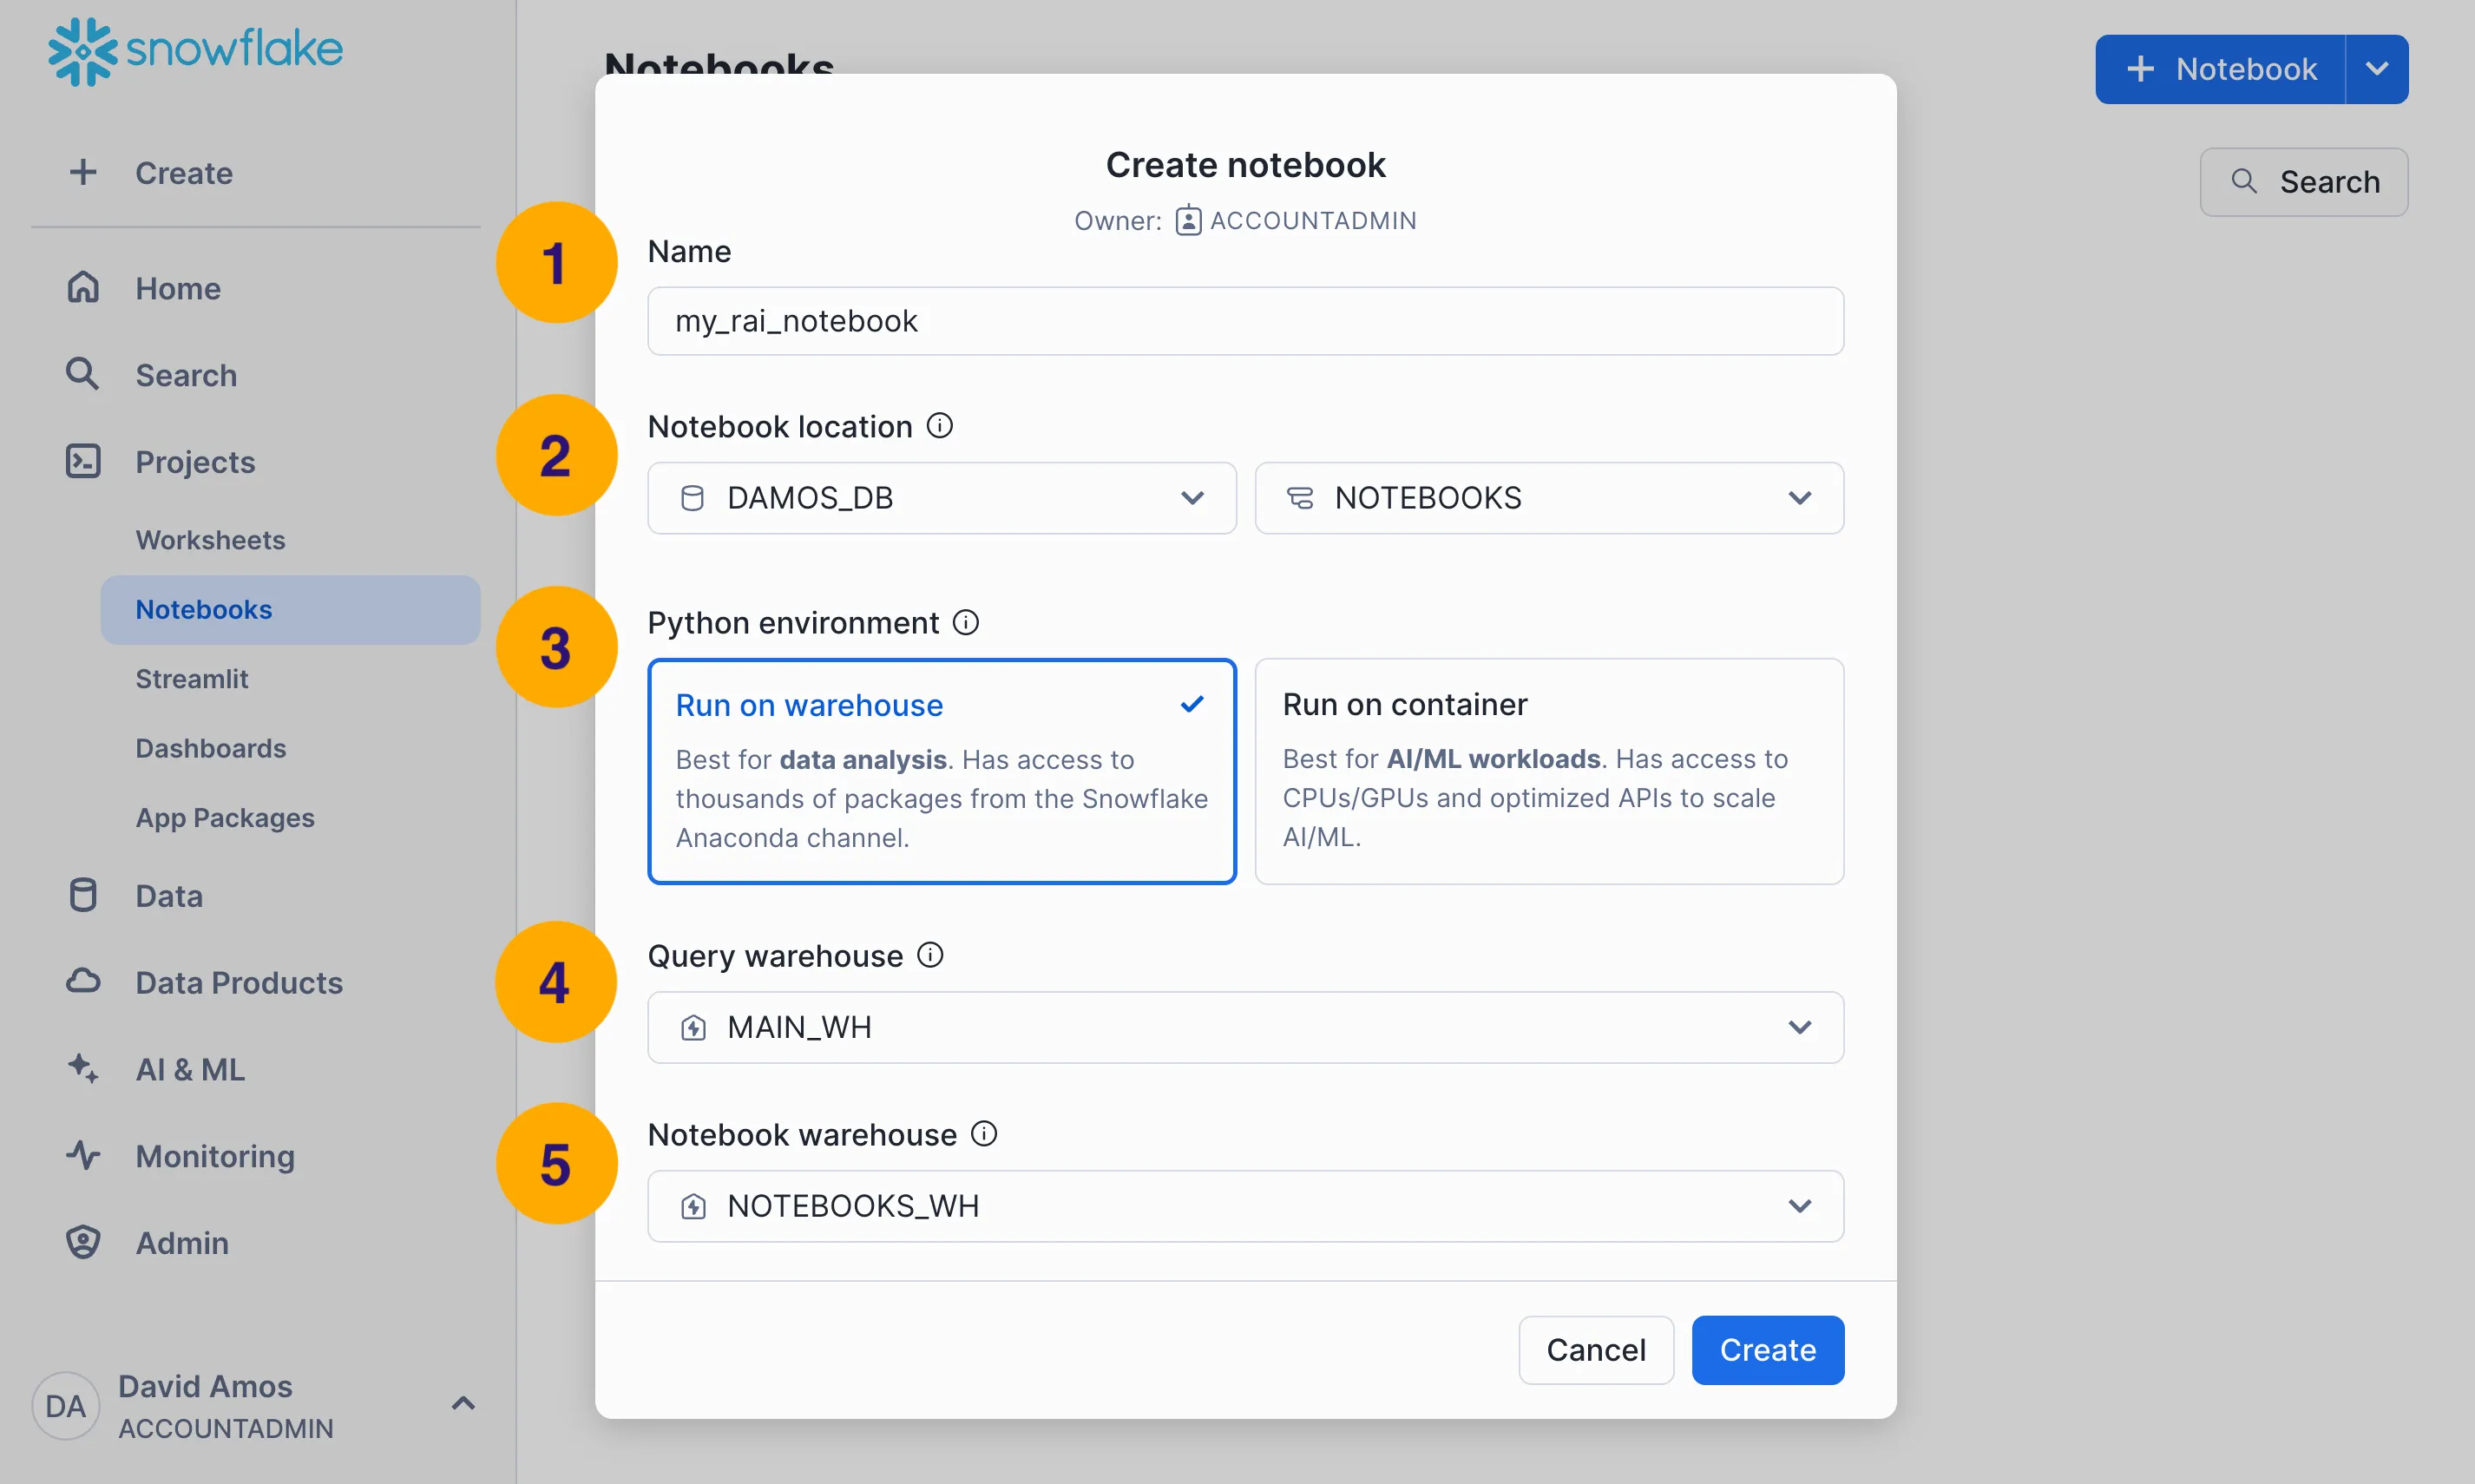
- Name: Give your notebook a name.
- Notebook location: Choose the database and schema for creating the notebook.
- Python environment: Choose the Run on warehouse option.
- Query warehouse: Select the warehouse for executing SQL queries.
- Notebook warehouse: Select the warehouse that executes the notebook’s Python kernel.
- When the notebook opens, delete the sample code cells that Snowflake creates for you:
- Click on the triple-dot (⋮) dropdown in the top-right corner of the code cell.
- Click on Delete in the dropdown menu.
Set Up External Access
Section titled “Set Up External Access”- Choose Notebook settings from the triple-dot (⋮) dropdown in the top-right corner of the Snowflake Notebooks window.
- Configure the notebook for access to PyPI:
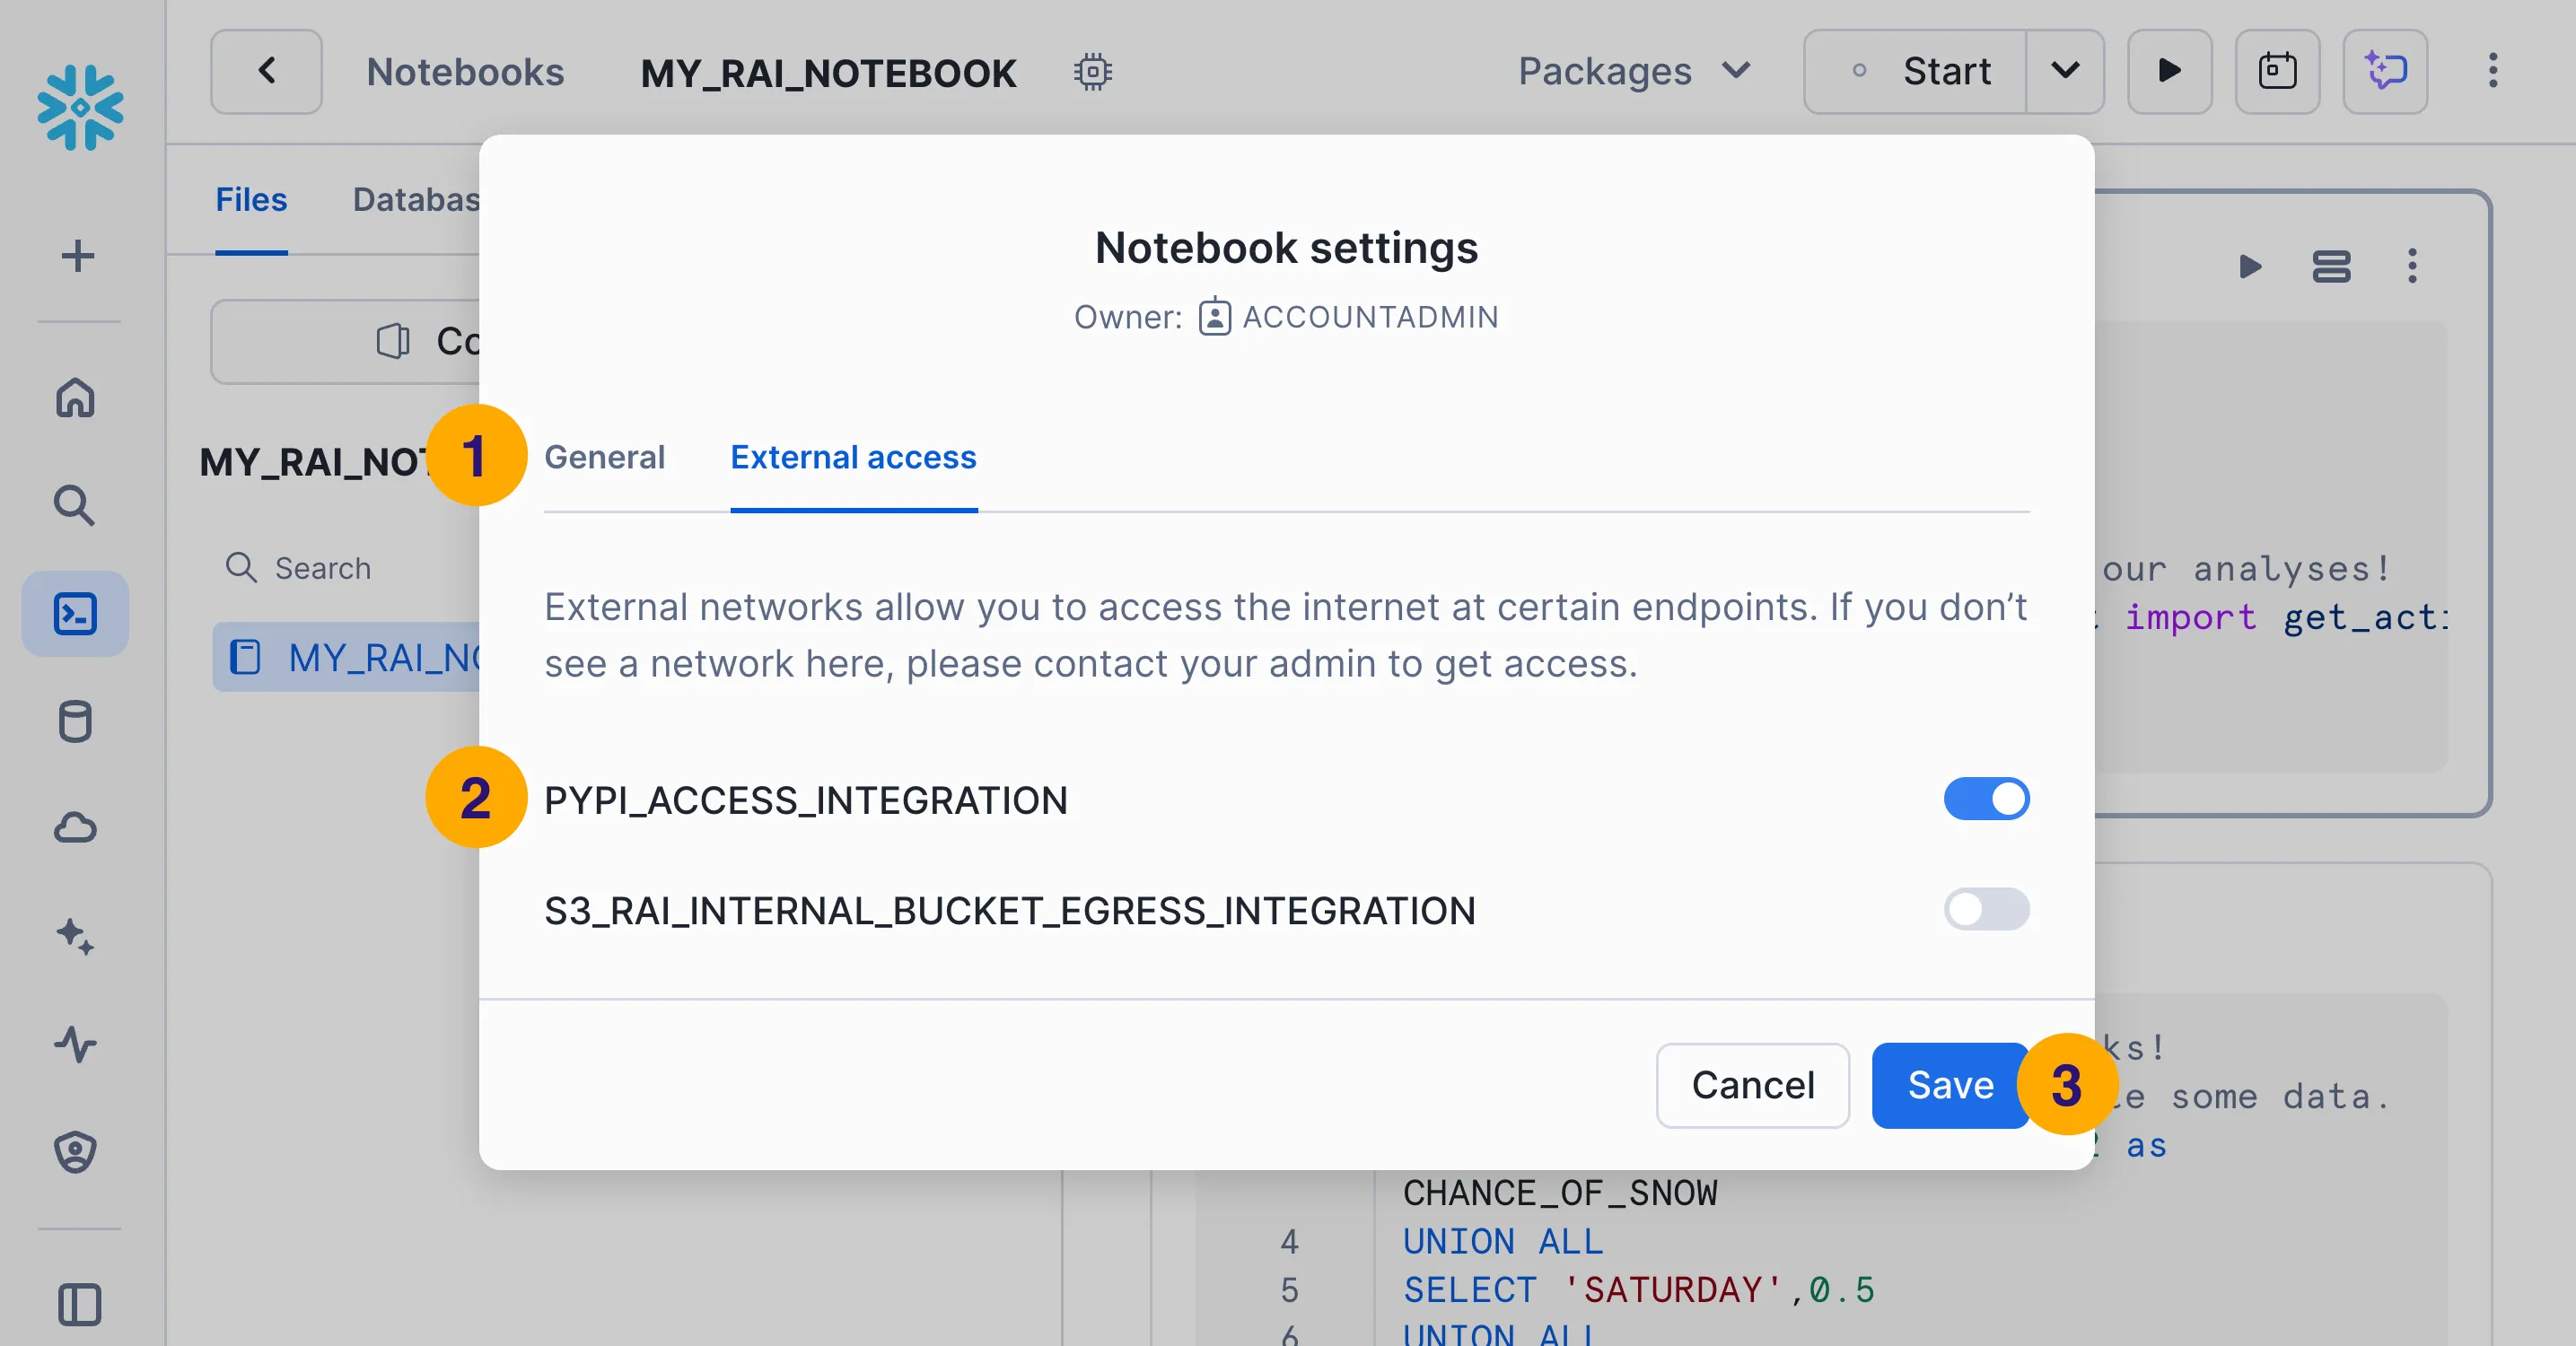
- Switch to the External access tab.
- Turn on the
PYPI_ACCESS_INTEGRATIONtoggle. This allows your notebook to install third-party Python packages from PyPI. - Click Save.
- Choose Notebook settings from the triple-dot (⋮) dropdown in the top-right corner of the Snowflake Notebooks window.
- Configure the notebook for access to the RAI Native App:
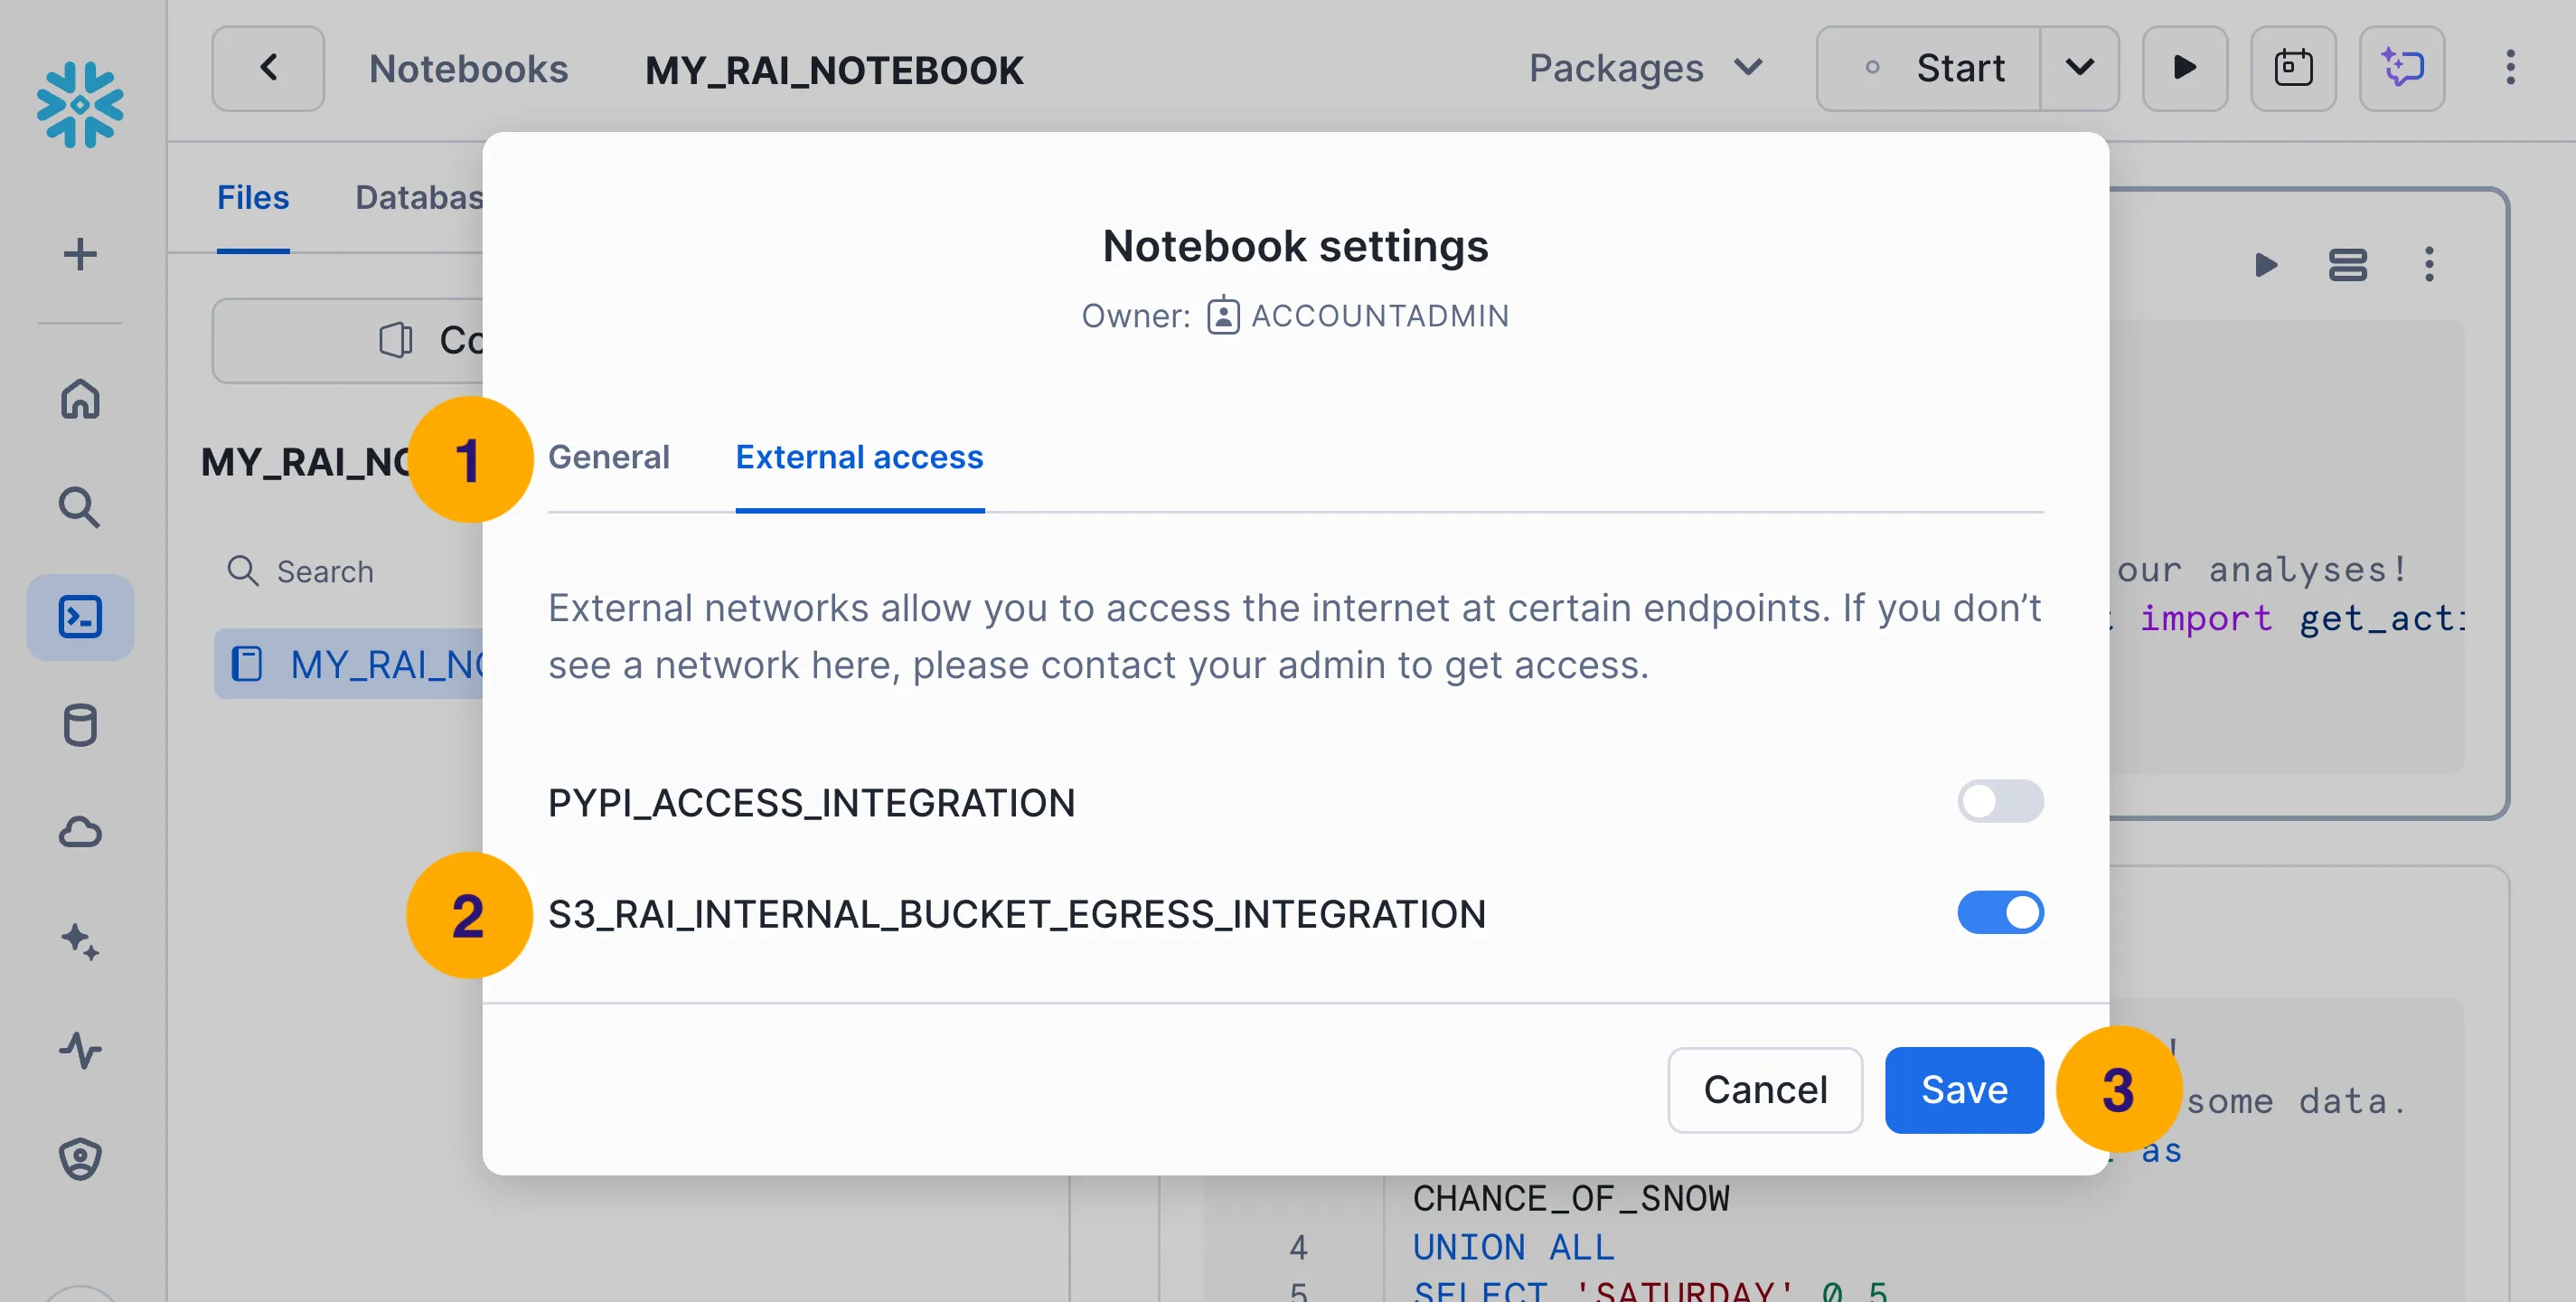
- Switch to the External access tab.
- Turn on the
S3_RAI_INTERNAL_BUCKET_EGRESS_INTEGRATIONtoggle. This allows your notebook to access data from the RAI Native App. - Click Save.
Install the relationalai Package
Section titled “Install the relationalai Package”- In a new Python cell, run the following code to install the
relationalaipackage:!pip install relationalai - Verify that the package is installed by running the following code:
You should see the version number of theimport relationalai as raiprint(rai.__version__)
relationalaipackage printed in the output.
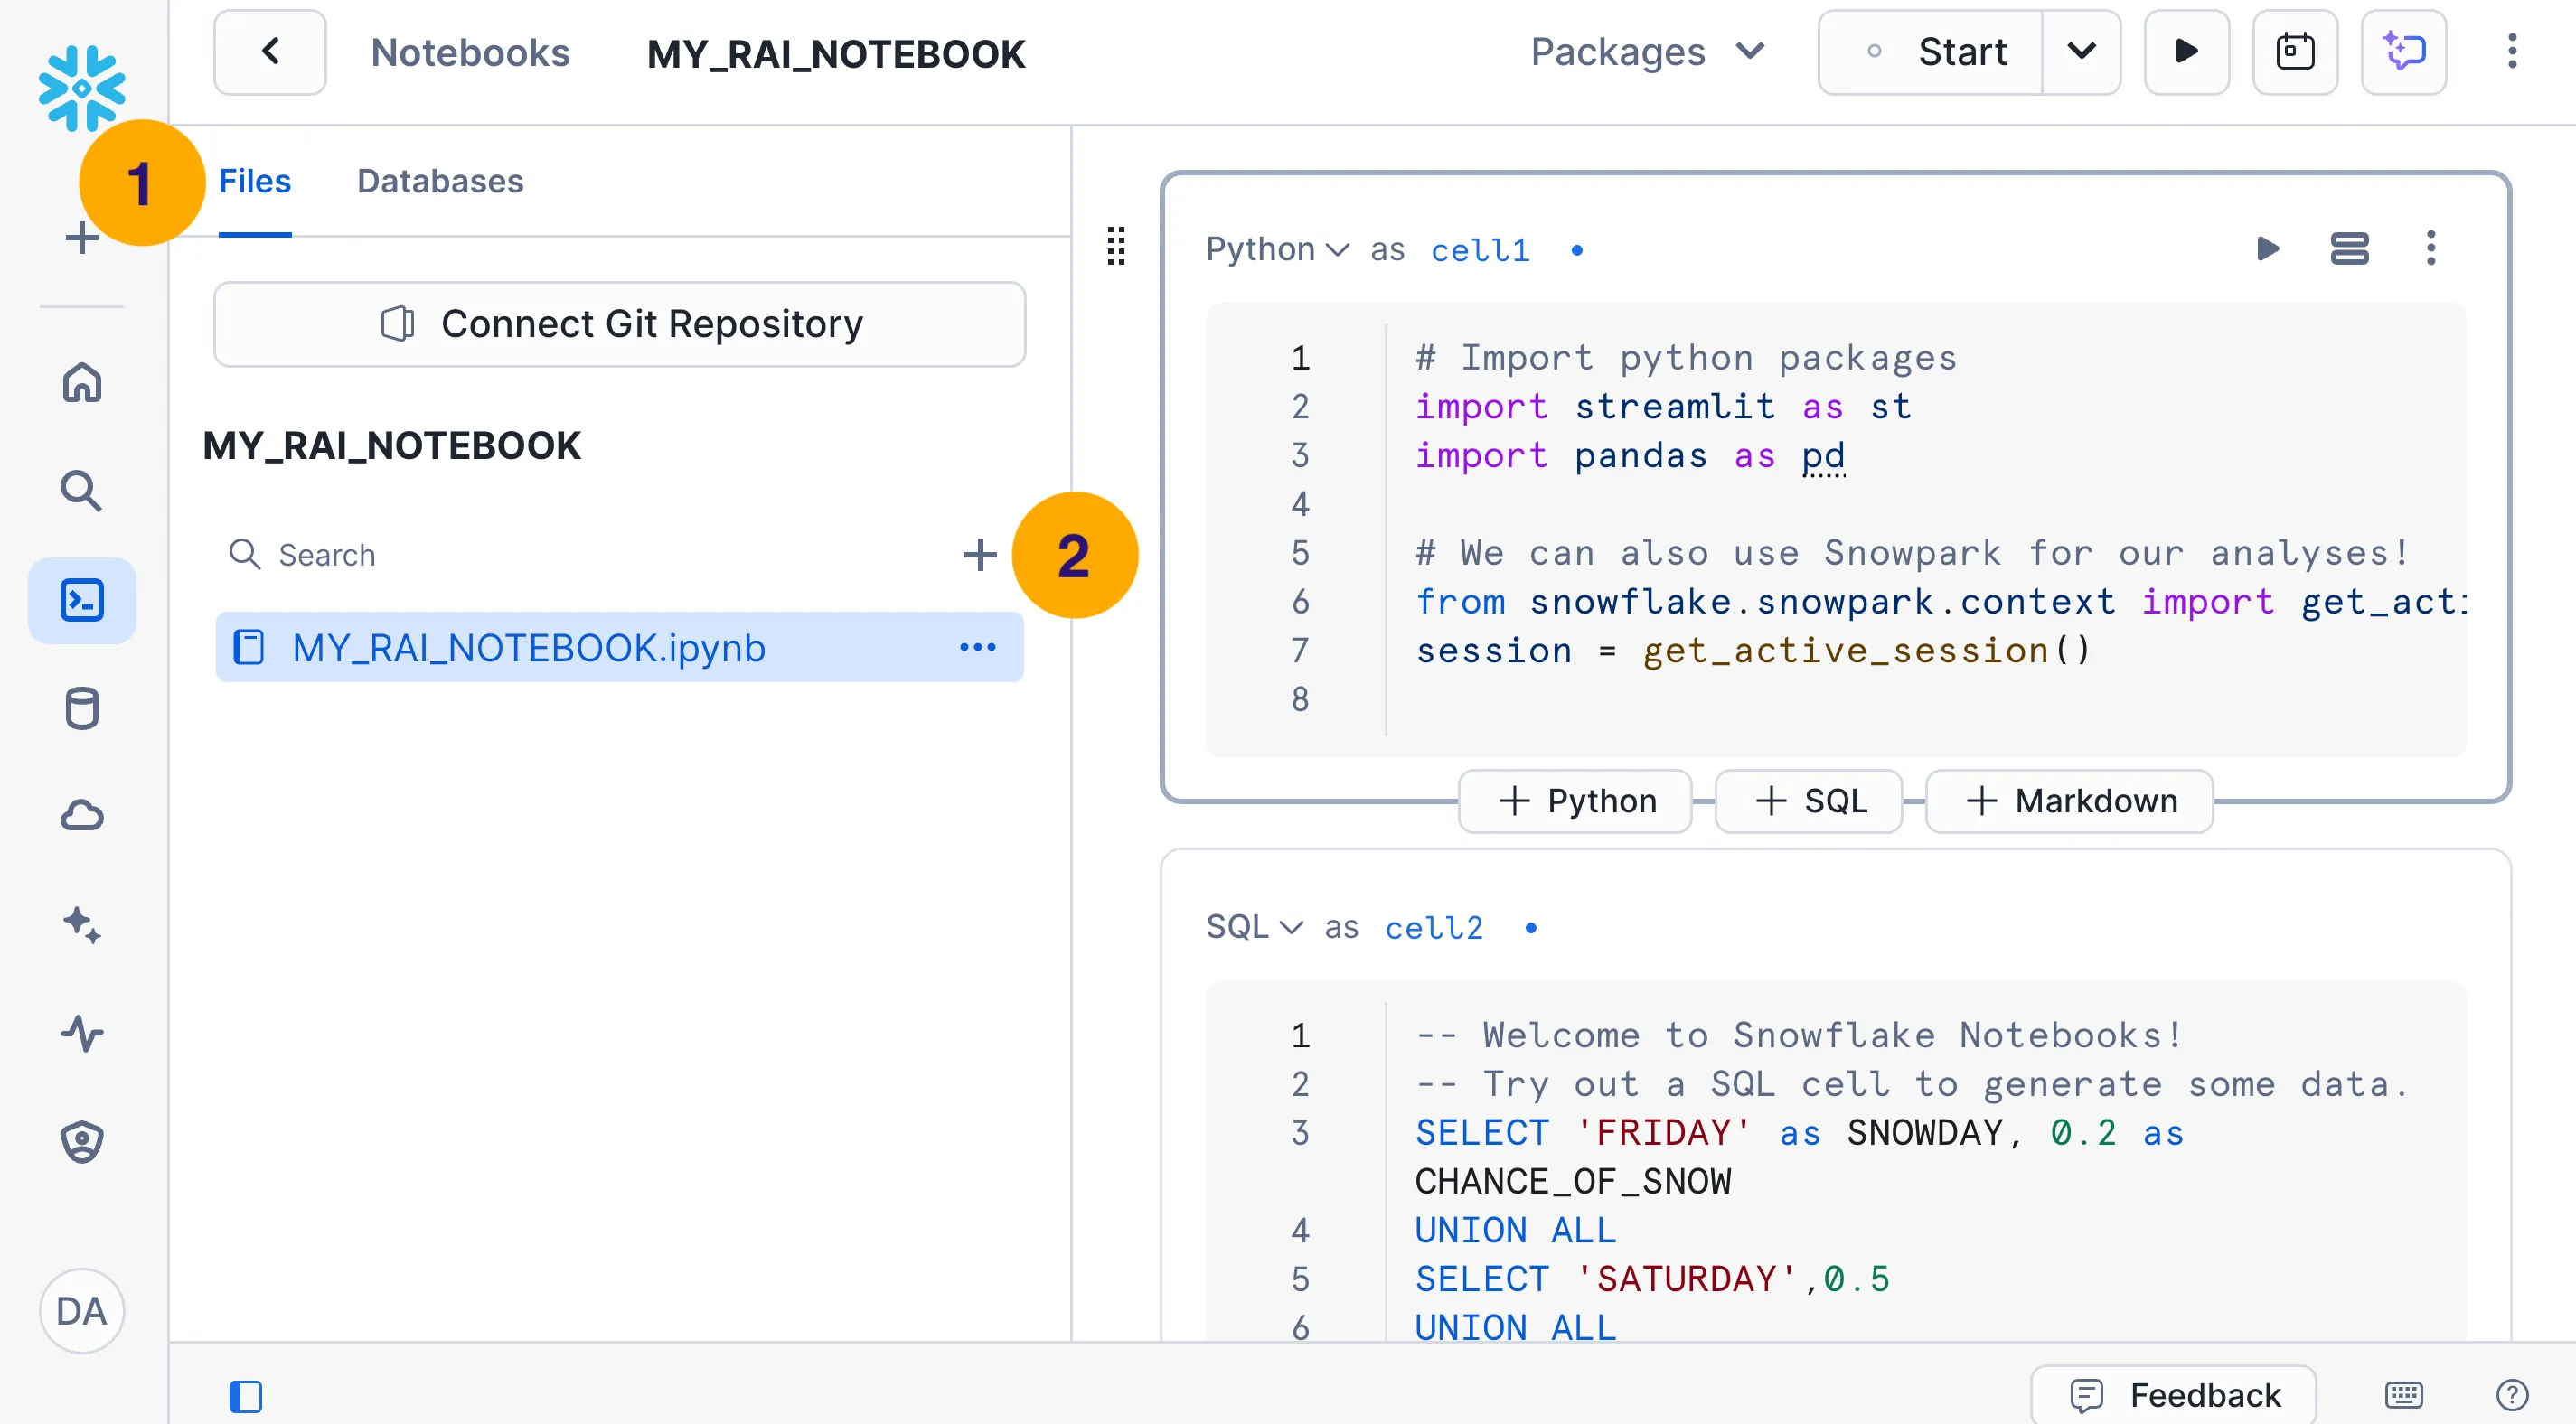
- Download the
relationalai.zipfile. - Select the Files tab in the left sidebar and then click on the + button.
- Drag and drop the
relationalai.zipfile into the file upload area, then click Upload: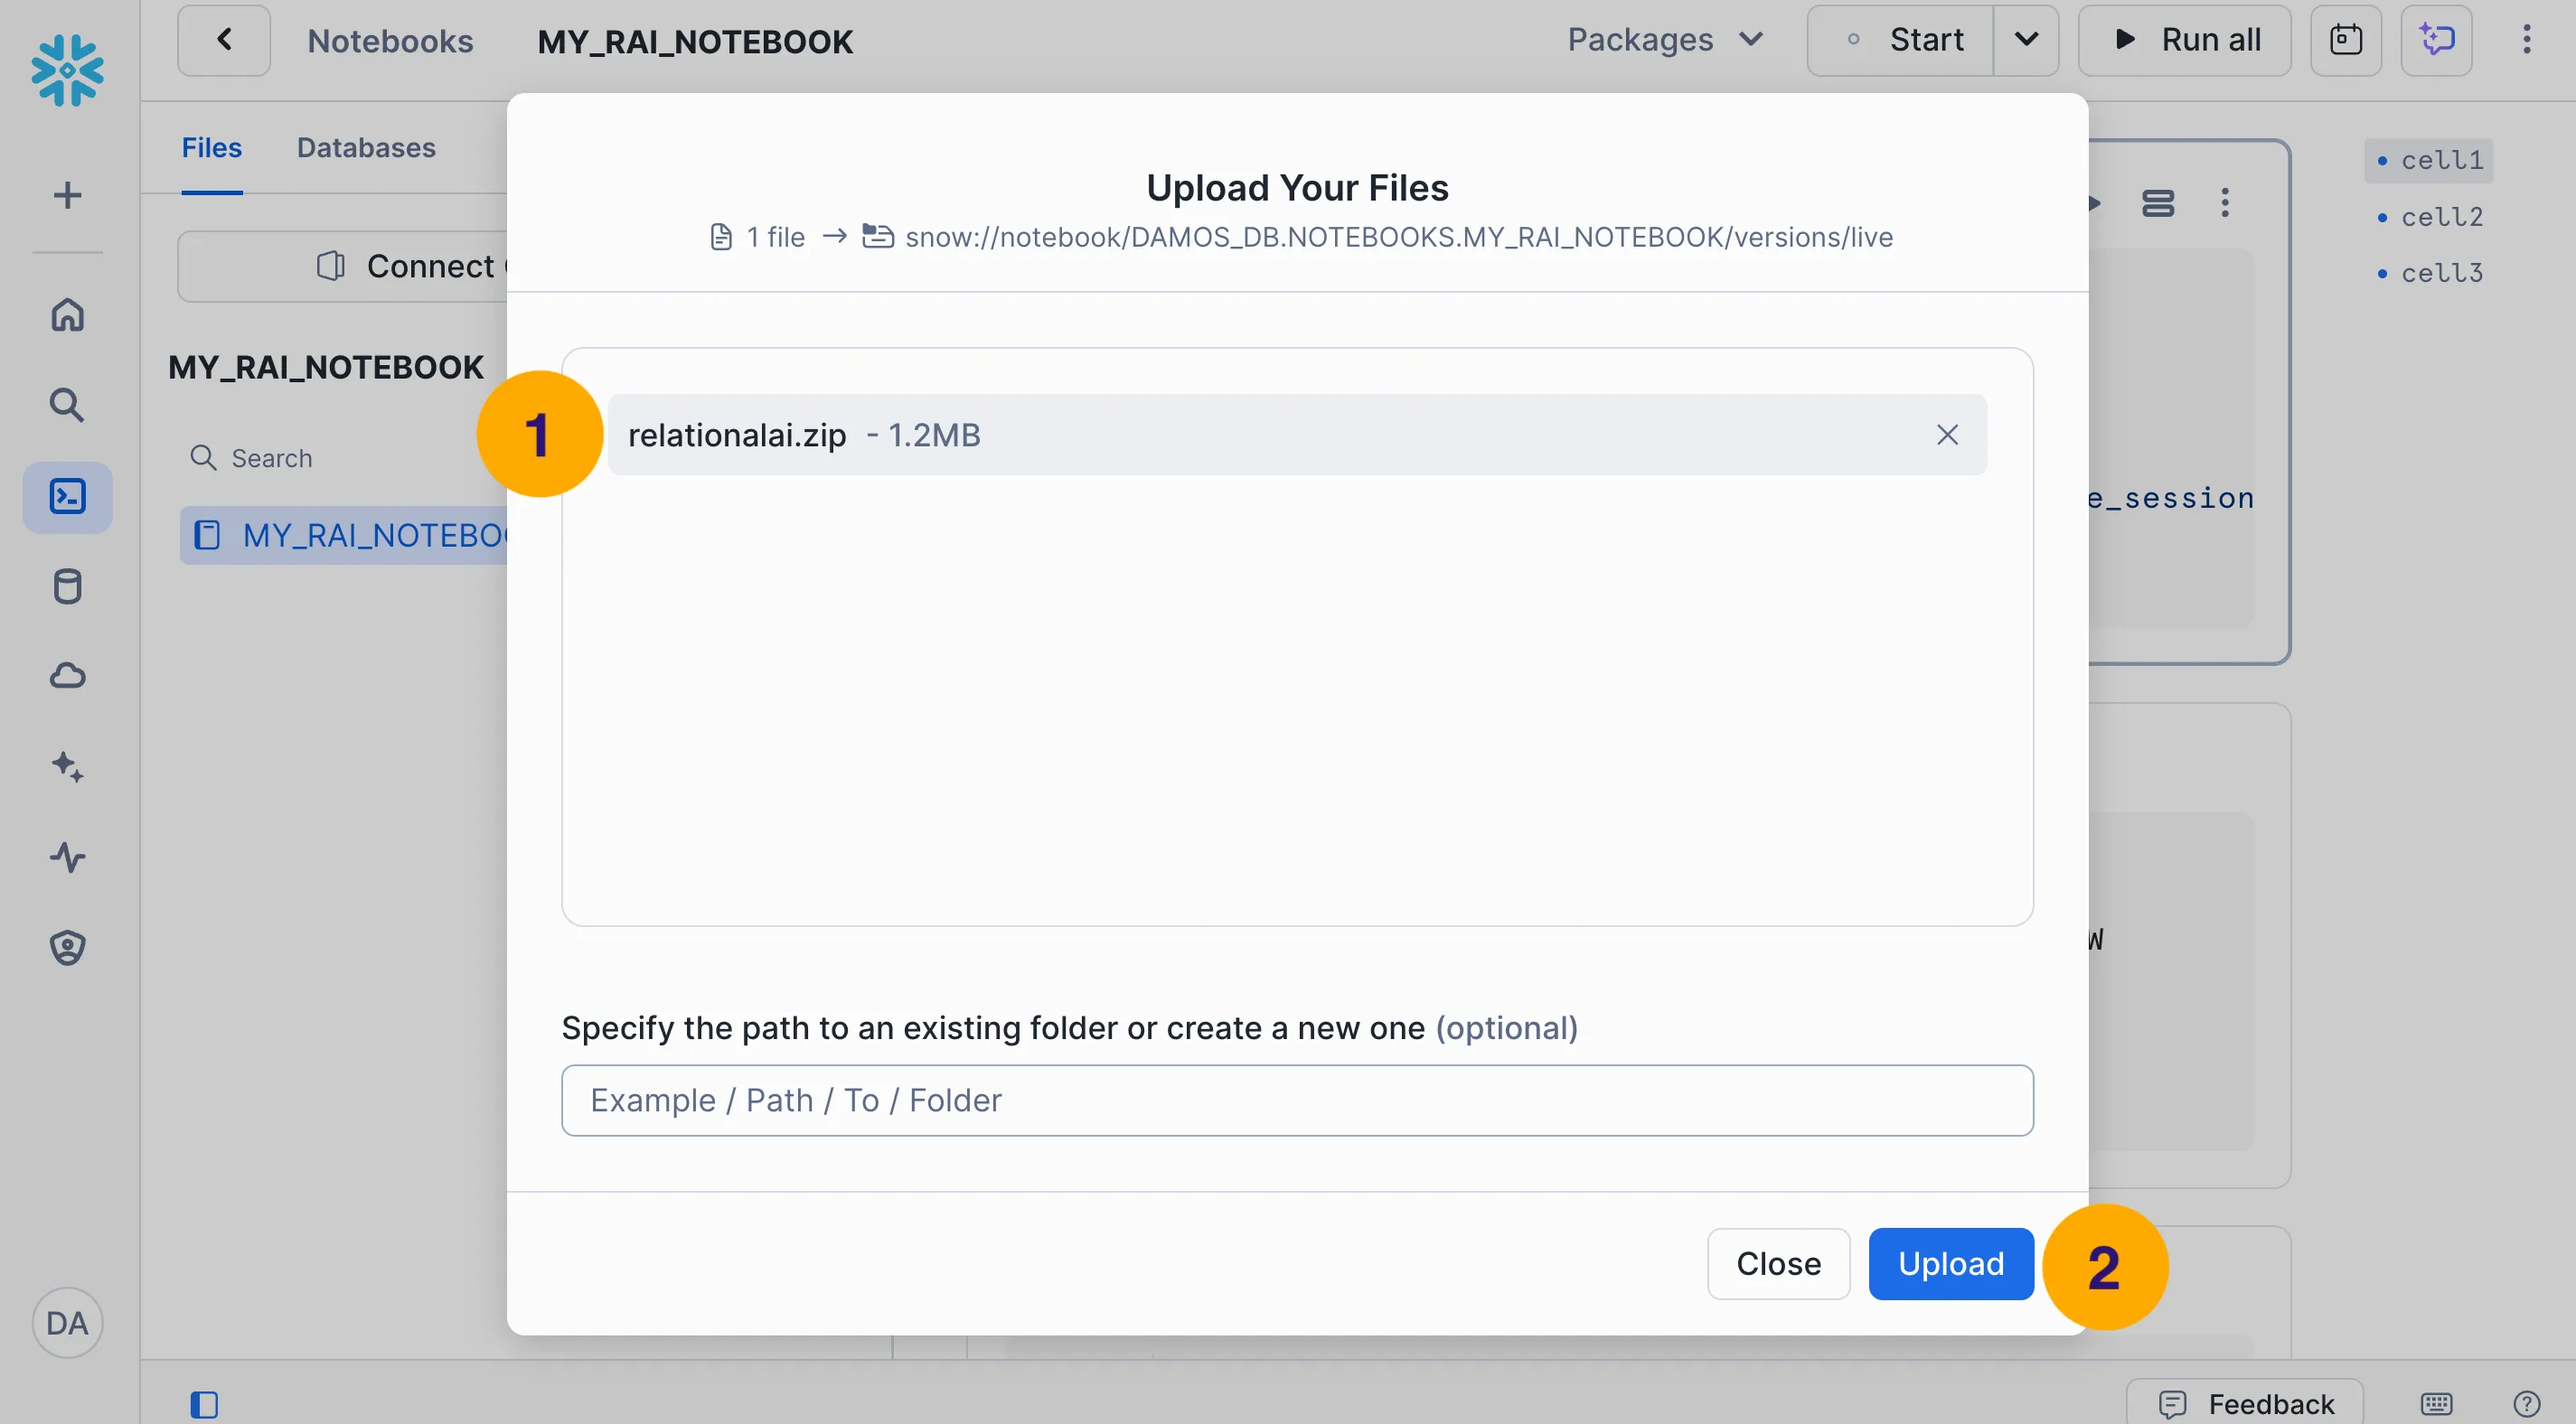
- In a new Python cell, run the following code to install the
relationalaipackage:import syssys.path.append("relationalai.zip") - Verify that the package is installed by running the following code:
You should see the version number of theimport relationalai as raiprint(rai.__version__)
relationalaipackage printed in the output.
Run a Test Query
Section titled “Run a Test Query”Verify that the relationalai package is installed and working correctly by running the following code:
import relationalai as rai
# Create a model named "MyFirstModel".model = rai.Model("MyFirstModel")
# Send a test query.with model.query() as select:    response = select(1 + 1)
# The results are stored as a pandas DataFrame in the response.results attribute.print(response.results)# v# 0 2Limitations
Section titled “Limitations”- Direct Access: Not currently supported in Snowflake Notebooks. See Direct Access for details.
- Package installation: Warehouse runtime supports Snowflake Anaconda packages or a
.zipupload only. Container runtime supportspip/condabut requires an external access integration to reach PyPI. - External connectivity: Without external access enabled, outbound network calls from notebooks—for example, to public package indexes or APIs—may be blocked by account policy.