Part 2: Build an App
In part one, you learned how to create a model and query it using a Python notebook. Now, you’ll see how to build a simple Streamlit app that consumes the model you created.
You’ll learn how to:
- Set up a local development environment.
- Organize your model’s types and rules into a modular structure.
- Save and run scripts that export data from your model.
- Create a Streamlit app that consumes the model.
Set Up The Project Environment
Section titled “Set Up The Project Environment”Create a new directory for your project and navigate to it:
mkdir my_projectcd my_projectThen, create a virtual environment and activate it:
python3 -m venv .venvsource .venv/bin/activatepython -m venv .venv.venv\Scripts\activateCreate a requirements.txt file and add the following dependencies to it:
relationalaiSave the file and run the following command to install the dependencies with pip:
python -m pip install -r requirements.txtCreate a raiconfig.toml File
Section titled “Create a raiconfig.toml File”Use the RAI CLI included with the relationalai Python package to create a raiconfig.toml file by running the following command:
rai initFollow the interactive prompts to enter your Snowflake account details.
The CLI will create a raiconfig.toml file in your project directory.
Refer to the Configuration guide for more information on configuration options.
When you’re done, your project should have the following structure:
Directorymy_project
Directory.venv/
- …
- .gitignore
- raiconfig.toml RelationalAI configuration file
- requirements.txt
Files modified in this step are highlighted.
Create a Model Module
Section titled “Create a Model Module”For simple models or small projects, you can create a single module with all of the model’s types and rules and then import it into notebooks or other scripts.
Populate your project folder with the following files:
touch model.pytouch export.pyYour project should now have the following structure:
Directorymy_project
Directory.venv/
- …
- .gitignore
- export.py Script for exporting data
- model.py Model object, type declarations, and rules
- raiconfig.toml
- requirements.txt
Files modified in this step are highlighted.
Open the model.py file and add all of the types and rules from the notebook in part one:
import relationalai as raifrom relationalai.std import aggregates, graphs, strings

model = rai.Model("RetailStore")

# =====# TYPES# =====
Sale = model.Type("Sale", source="RAI_TUTORIAL.TPCDS.STORE_SALES")Item = model.Type("Item", source="RAI_TUTORIAL.TPCDS.ITEM")ItemCategory = model.Type("ItemCategory")Customer = model.Type("Customer")CustomerSegment = model.Type("CustomerSegment")RankedCategory = model.Type("RankedCategory")

# =====# RULES# =====
# Define rules to alias the columns names from the source tables with more# natural names. Note that this does not modify the source tables.with model.rule():    item = Item()    item.set(        item_id=item.i_item_sk,        category_name=item.i_category,        class_name=item.i_class    )
with model.rule():    sale = Sale()    sale.set(        item_id=sale.ss_item_sk,        customer_id=sale.ss_customer_sk    )
# Define an item property on Sale entities that joins them to Item entities by# matching a sale's item_id property to an item's item_id property.Sale.define(item=(Item, "item_id", "item_id"))
# Create ItemCategory entities from Item entities.with model.rule():    item = Item()    full_name = strings.concat(item.category_name, ": ", item.class_name)    category = ItemCategory.add(name=full_name)    item.set(category=category)    category.items.add(item)
# Define Customer objects from Sale entities using the customer_id property.with model.rule():    sale = Sale()    customer = Customer.add(customer_id=sale.customer_id)    customer.items_purchased.add(sale.item)  # Set a multi-valued property    sale.set(customer=customer)
# Define a customer graph.customer_graph = graphs.Graph(model, undirected=True)
# Write a rule that adds an edge between two customers if they've purchased the same# item. Note that nodes are automatically added to the graph when edges are added.with model.rule():    customer1, customer2 = Customer(), Customer()    customer1 != customer2    customer1.items_purchased == customer2.items_purchased    customer_graph.Edge.add(customer1, customer2)
# Create CustomerSegment entities from communities computed by the Louvain algorithm.with model.rule():    customer = Customer()    segment_id = customer_graph.compute.louvain(customer)    segment = CustomerSegment.add(segment_id=segment_id)    segment.customers.add(customer)    customer.set(segment=segment)
# Set the size property for CustomerSegment entities.with model.rule():    segment = CustomerSegment()    customer = segment.customers    segment_size = aggregates.count(customer, per=[segment])    segment.set(size=segment_size)
# Create RankedCategory entities.with model.rule():    segment = CustomerSegment()    customer = segment.customers    item = customer.items_purchased    category = item.category    category_rank = aggregates.count(customer, per=[category, segment]) / segment.size    ranked_category = RankedCategory.add(segment=segment, category=category)    ranked_category.set(rank=category_rank)    segment.ranked_categories.add(ranked_category)
You can now import the model object and query it in other files.
Open the export.py file, import the model object and Customer type, and then copy and paste the export query and logic from the notebook:
from relationalai.std import alias
from model import model, Customer, CustomerSegment, RankedCategory
session = model.resources.get_sf_session()customers = session.table("SNOWFLAKE_SAMPLE_DATA.TPCDS_SF10TCL.CUSTOMER")

# ===========================# RAI_TUTORIAL.TPCDS.CUSTOMER# ===========================
# Query the Customer entities.with model.query(format="snowpark") as select:    customer = Customer()    segment = customer.segment    response = select(customer.customer_id, segment.segment_id)
# Join the results with the customer table on the CUSTOMER_ID and C_CUSTOMER_SK columns.customers_with_segments = (    response.results    .join(customers, response.results["CUSTOMER_ID"] == customers["C_CUSTOMER_SK"])    .select(customers["*"], response.results["SEGMENT_ID"]))
# Save the results to a new table in the RAI_TUTORIAL.TPCDS schema.(    customers_with_segments.write    .save_as_table("RAI_TUTORIAL.TPCDS.CUSTOMER", mode="overwrite"))

# ===================================# RAI_TUTORIAL.TPCDS.CUSTOMER_SEGMENT# ===================================
# Query the CustomerSegment entities.with model.query(format="snowpark") as select:    segment = CustomerSegment()    response = select(segment.segment_id, segment.size)
# Save the results to a Snowflake table.(    response.results.write    .save_as_table("RAI_TUTORIAL.TPCDS.CUSTOMER_SEGMENT", mode="overwrite"))

# ==================================# RAI_TUTORIAL.TPCDS.RANKED_CATEGORY# ==================================
# Query the RankedCategory entities.with model.query(format="snowpark") as select:    ranked_category = RankedCategory()    segment = ranked_category.segment    category = ranked_category.category    pct_customers = alias(ranked_category.rank, "pct_customers")    response = select(segment.segment_id, category.name, pct_customers)
# Save the results to a Snowflake table.(    response.results.write    .save_as_table("RAI_TUTORIAL.TPCDS.RANKED_CATEGORY", mode="overwrite"))
You can run the export script with the following command:
python export.pyBuild a Streamlit App
Section titled “Build a Streamlit App”Next you’ll create a simple Streamlit app that displays data for each segment of customers.
First, add the Streamlit package to your requirements.txt file.
It should now look like this:
relationalaimatplotlibstreamlitSave the file and run the following command to install the Streamlit package:
python -m pip install -r requirements.txtThen, create a new file called app.py in your project’s root directory:
touch app.pyYour project should now have the following structure:
Directorymy_project
Directory.venv/
- …
- app.py Streamlit app
- export.py
- model.py
- .gitignore
- raiconfig.toml
- requirements.txt
Files modified in this step are highlighted.
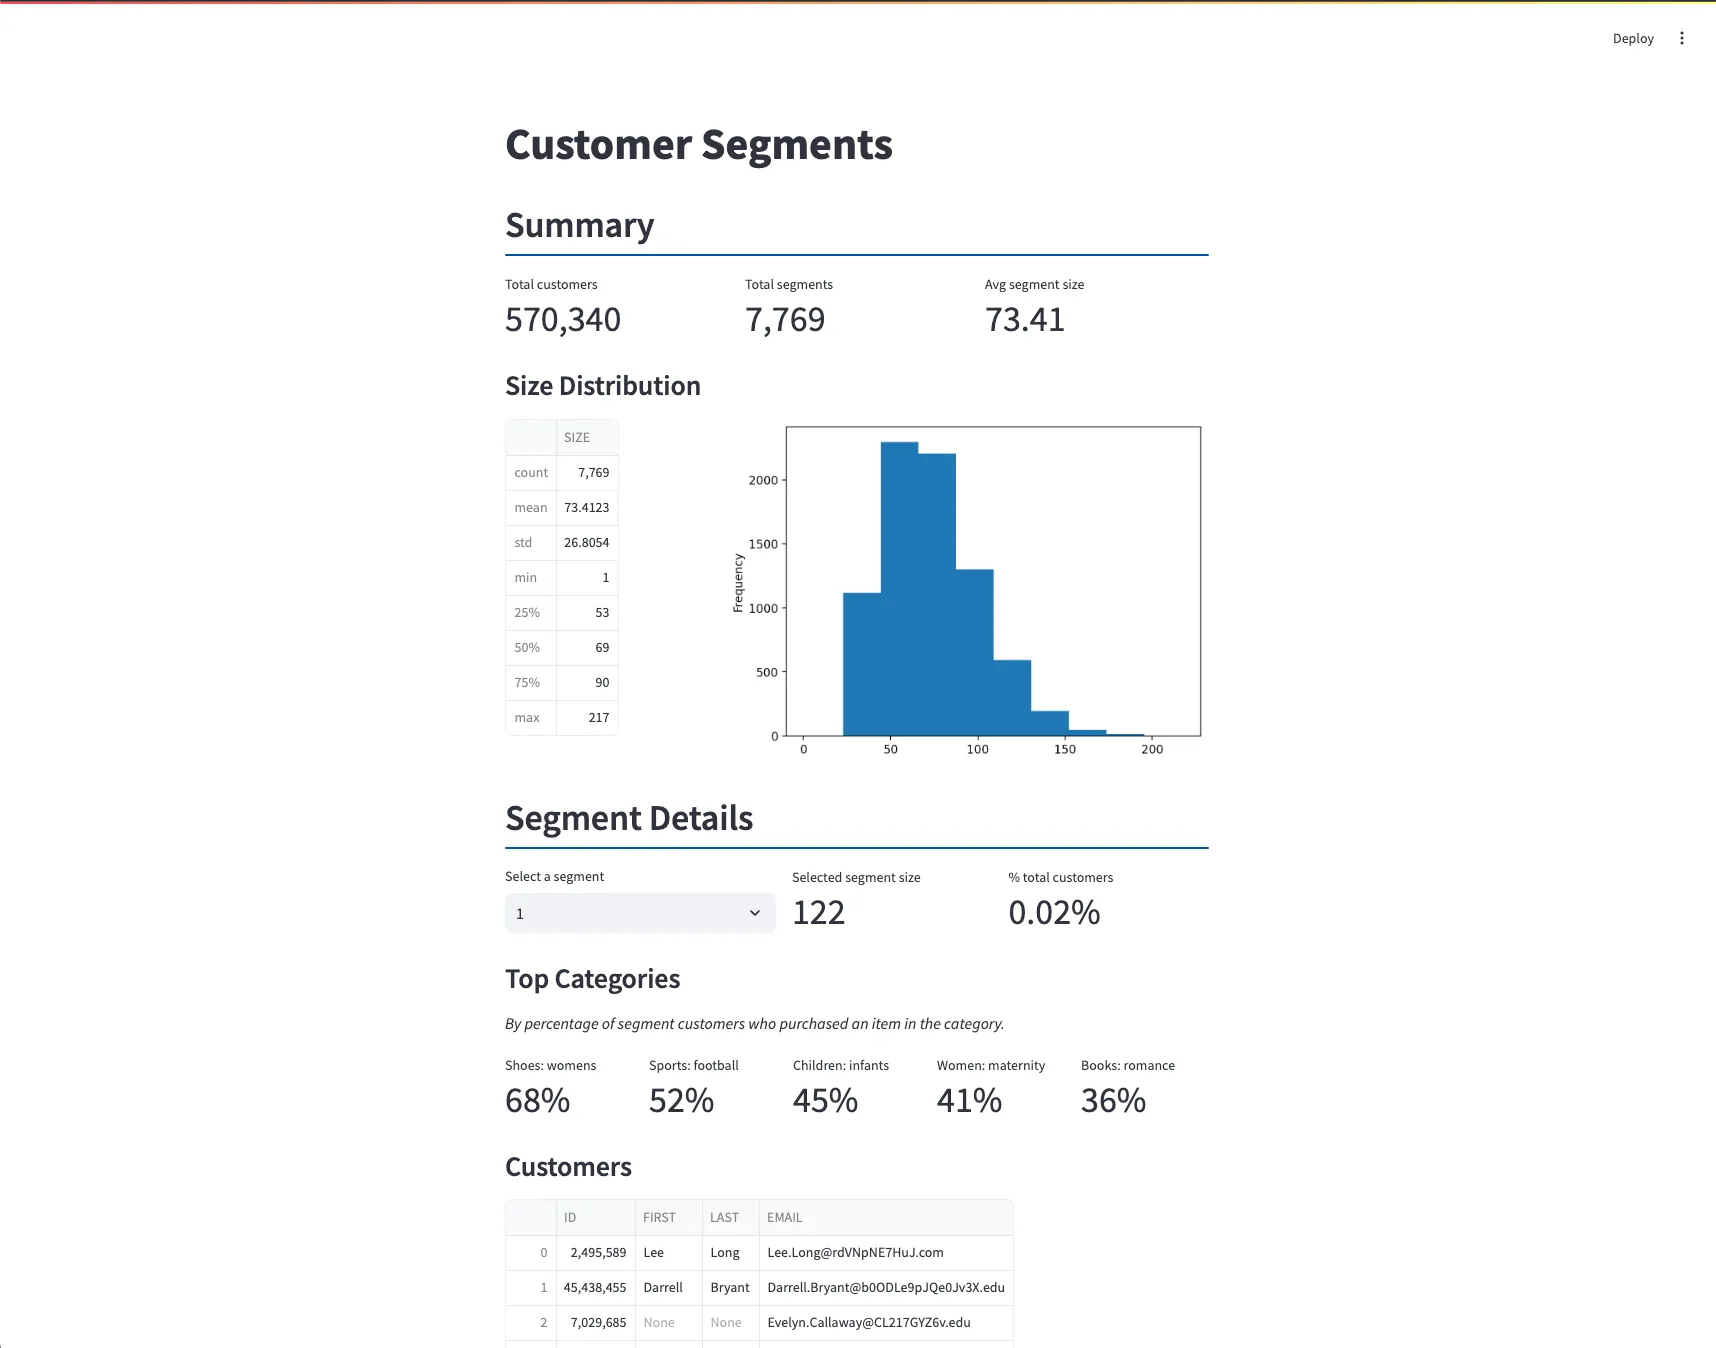
Now open app.py and add the following code to create a Streamlit app that displays summary statistics and details for each customer segment:
import relationalai as raifrom snowflake.snowpark.functions import colimport streamlit as st

provider = rai.Provider()session = provider.resources.get_sf_session()
# Add a title to the app.st.title("Customer Segments")
# Load the segment data exported from the model.customers = session.table("RAI_TUTORIAL.TPCDS.CUSTOMER")customer_segments = session.table("RAI_TUTORIAL.TPCDS.CUSTOMER_SEGMENT")ranked_categories = session.table("RAI_TUTORIAL.TPCDS.RANKED_CATEGORY")

# ===============# SUMMARY SECTION# ===============
# Header for the summary sectionst.header("Summary", divider=True)
# Get metrics to displaynum_customers = customers.count()num_segments = customer_segments.count()avg_segment_size = num_customers / num_segments
# Display metricscol1, col2, col3 = st.columns(3)col1.metric("Total customers", f"{num_customers:,}")col2.metric("Total segments", f"{num_segments:,}")col3.metric("Avg segment size", f"{avg_segment_size:,.2f}")
# Show summary statistics and histogram for the segment sizes.st.write("### Size Distribution")customer_segments_df = customer_segments.to_pandas()col1, col2 = st.columns([0.3, 0.7])col1.write(customer_segments_df["SIZE"].describe())col2.pyplot(    customer_segments_df    .plot(kind="hist", y="SIZE", legend=False)    .get_figure())

# =======================# SEGMENT DETAILS SECTION# =======================
# Header for the segment details sectionst.header("Segment Details", divider=True)
col1, col2, col3 = st.columns([0.4, 0.3, 0.3])with col1:    # Show a dropdown menu to select a segment.    segment_ids = customer_segments.sort("SEGMENT_ID").select("SEGMENT_ID")    selected_segment_id = st.selectbox("Select a segment", segment_ids)
    # Get the selected segment's details.    selected_segment = customer_segments.filter(col("SEGMENT_ID") == selected_segment_id).first()    segment_customers = customers.filter(col("SEGMENT_ID") == selected_segment_id)    segment_size = selected_segment["SIZE"]    pct_total_customers = segment_size / num_customers
    # Get the top 5 categories for the segment    top_5_categories = (        ranked_categories        .filter(col("SEGMENT_ID") == selected_segment_id)        .sort(col("PCT_CUSTOMERS").desc())        .select("NAME", "PCT_CUSTOMERS")        .limit(5)    )col2.metric("Selected segment size", f"{segment_size:,}")col3.metric("% total customers", f"{pct_total_customers:.2%}")
# Show the top 5 categories for the selected segment.st.write("### Top Categories")st.write("*By percentage of segment customers who purchased an item in the category.*")cols = st.columns(5)for i, (name, pct_customers) in enumerate(top_5_categories.collect()):    with cols[i]:        st.metric(name, f"{pct_customers:.0%}")
# Show the customers in the selected segment.st.write("### Customers")st.write(segment_customers.select(    col("C_CUSTOMER_SK").alias("ID"),    col("C_FIRST_NAME").alias("First"),    col("C_LAST_NAME").alias("Last"),    col("C_EMAIL_ADDRESS").alias("Email"),))
Finally, use the streamlit run command to start the Streamlit app:
streamlit run app.pyThe app will open in your default web browser:
Convert the Model to a Package
Section titled “Convert the Model to a Package”As your model grows, it may become difficult to manage all of the types and rules in a single file. In this case, you can create a model package with submodules for different parts of the model.
Create a new directory called my_model/ with an __init__.py file:
mkdir my_modeltouch my_model/__init__.pyThinking about the retail store model, types like Sale, Item, and Customer could be grouped together as all related to sales, while types like CustomerSegment and RankedCategory could be grouped together as all related to marketing.
Move the model.py file to the my_model/ directory and create types.py, sales.py, and marketing.py files:
mv model.py my_model/touch my_model/types.pytouch my_model/sales.pytouch my_model/marketing.pyYour project should now have the following structure:
Directorymy_project
Directory.venv/
- …
Directorymy_model/
- __init__.py
- model.py Contains the
Modelobject - types.py Type declarations
- sales.py Rules related to sales
- marketing.py Rules related to marketing
- app.py
- export.py
- .gitignore
- raiconfig.toml
- requirements.txt
Files modified in this step are highlighted.
Open my_model/types.py and add the type declarations from the model.py file:
from .model import model

Sale = model.Type("Sale", source="RAI_TUTORIAL.TPCDS.STORE_SALES")Item = model.Type("Item", source="RAI_TUTORIAL.TPCDS.ITEM")ItemCategory = model.Type("ItemCategory")Customer = model.Type("Customer")CustomerSegment = model.Type("CustomerSegment")RankedCategory = model.Type("RankedCategory")Next, open my_model/sales.py and add the rules for the Sale, Item, ItemCategory, and Customer types from model.py:
from relationalai.std import strings
from .model import modelfrom .types import Sale, Item, ItemCategory, Customer

# Set the item_id, category_name, and class_name properties for Item entities.with model.rule():    item = Item()    item.set(        item_id=item.i_item_sk,        category_name=item.i_category,        class_name=item.i_class    )
# Set the item_id and customer_id properties for Sale entities.with model.rule():    sale = Sale()    sale.set(        item_id=sale.ss_item_sk,        customer_id=sale.ss_customer_sk    )
# Define an item property on Sale entities that joins them to Item entities by# matching a sale's item_id property to an item's item_id property.Sale.define(item=(Item, "item_id", "item_id"))
# Create ItemCategory entities from Item entities.with model.rule():    item = Item()    full_name = strings.concat(item.category_name, ": ", item.class_name)    category = ItemCategory.add(name=full_name)    item.set(category=category)    category.items.add(item)
# Define Customer objects from Sale entities using the customer_id property.with model.rule():    sale = Sale()    customer = Customer.add(customer_id=sale.customer_id)    customer.items_purchased.add(sale.item)  # Set a multi-valued property    sale.set(customer=customer)
Then, move the rules for the CustomerSegment and RankedCategory types from model.py to marketing.py:
from relationalai.std import aggregates, graphs
from .model import modelfrom .types import Customer, CustomerSegment, RankedCategoryimport .sales  # Include rules from the sales module

# Define a customer graph.customer_graph = graphs.Graph(model, undirected=True)
# Write a rule that adds an edge between two customers if they've purchased the same# item. Note that nodes are automatically added to the graph when edges are added.with model.rule():    customer1, customer2 = Customer(), Customer()    customer1 != customer2    customer1.purchases.item == customer2.purchases.item    customer_graph.Edge.add(customer1, customer2)
# Create CustomerSegment entities from communities computed by the Louvain algorithm.with model.rule():    customer = Customer()    segment_id = customer_graph.compute.louvain(customer)    segment = CustomerSegment.add(segment_id=segment_id)    segment.customers.add(customer)    customer.set(segment=segment)
# Set the size property for CustomerSegment entities.with model.rule():    segment = CustomerSegment()    customer = segment.customers    segment_size = aggregates.count(customer, per=[segment])    segment.set(size=segment_size)
# Create RankedCategory entities.with model.rule():    segment = CustomerSegment()    customer = segment.customers    item = customer.purchases.item    category = item.category    category_rank = aggregates.count(customer, per=[category, segment]) / segment.size    ranked_category = RankedCategory.add(segment=segment, category=category)    ranked_category.set(rank=category_rank)    segment.ranked_categories.add(ranked_category)
Note that the marketing module imports the sales module.
This means that whenever the marketing module is imported, the rules from the sales module will also be loaded.
Now, remove everything except the Model object definition from retail_store/model.py.
Your file should look like this:
import relationalai as rai

model = rai.Model("RetailStore")
Then, add the following to the my_model/__init__.py file to make the model object and all types importable directly from the my_model package:
from .model import modelfrom .types import *Notebooks, scripts, and apps in the project’s root directory can use the package as follows:
# Import the model object and a typefrom my_model import model, Customer
# Select the rules modules to loadimport my_model.sales
Open the my_project/export.py file and update the imports to use the new package structure:
from relationalai.std import alias
# Import the model object and types.from my_model import model, Customer, CustomerSegment, RankedCategory
# Load the marketing rules. Since the marketing module includes the sales rules,# they will be loaded as well.import my_model.marketing
# The rest of the script is the same ...
By separating the model into submodules, you create “layers” that can be loaded selectively.
For instance, the marketing module sets a segment property on Customer entities.
If Customer is imported from the sales module, and the marketing module is not loaded, the segment property will not be available.
This separation allows you to manage the complexity of your model and ensure that only the necessary rules are compiled when querying the model in different contexts.
Summary and Next Steps
Section titled “Summary and Next Steps”In this tutorial, you took a RAI model built in a Python notebook and organized it into a modular project structure. You also saw how to create a Streamlit app that consumes static tables exported from the model.
Your RAI journey has just begun! Explore the following resources to deepen your understanding and expand your skills: