

Solve a classification problem
Walk through a complete classification workflow on a synthetic academic dataset: load data from Snowflake, build a knowledge graph, define the task splits, train a GNN, and inspect predictions.
The goal is to predict whether a student ranks in the top 50% of their cohort based on class participation, class credits, and the grades they received. This is a binary node classification task.
Set up Snowflake access
Section titled “Set up Snowflake access”Before using the predictive reasoner, grant the RelationalAI Native App the access it needs to your Snowflake account.
Snowflake permissions for experiment tracking and model storage
To enable the RelationalAI Native App to save trained models, track experiments, and persist results, you must grant it access to a database and schema of your choice. These must match the exp_database and exp_schema you pass to the GNN constructor.
The database and schema used for experiment tracking and model storage must be dedicated to RelationalAI artifacts only. Do not store other data in the same database or schema — mixing user or application data with experiment-tracking data can introduce security and operational risks and is not supported. We strongly recommend creating a separate database and schema specifically for experiment tracking and model storage.
Run the following commands in Snowflake (replace placeholders as needed):
-- Grant access to required database and schemaGRANT USAGE ON DATABASE <DATABASE> TO APPLICATION RELATIONALAI;GRANT USAGE ON SCHEMA <DATABASE>.<SCHEMA> TO APPLICATION RELATIONALAI;-- Allow storing experiment resultsGRANT CREATE EXPERIMENT ON SCHEMA <DATABASE>.<SCHEMA> TO APPLICATION RELATIONALAI;-- Allow registering trained modelsGRANT CREATE MODEL ON SCHEMA <DATABASE>.<SCHEMA> TO APPLICATION RELATIONALAI;Snowflake role with read access
The role you set under connections in your raiconfig.yaml
names the Snowflake role the RelationalAI Native App uses when PyRel creates a new session for the connection:
connections: my_connection: type: snowflake account: "<ACCOUNT>" user: "<USER>" role: "<ROLE>" warehouse: "<WAREHOUSE>" rai_app_name: "<RAI_APP_NAME>" # ...auth method (password, OAuth, etc.)The role you list above must have read access on the tables you plan to use as a source.
Prepare the data
Section titled “Prepare the data”The walkthrough below offers two ways to load the dataset: from Snowflake tables (the standard path for real-world data) or from local CSV files (the quickest way to try the example end to end). Either way, you need a database and schema for experiment tracking — see Set up Snowflake access above.
If you plan to use local CSVs, download the six files from the synthetic academic dataset and place them next to your script:
students.csvclasses.csvparticipation.csvstudent_rank_train.csvstudent_rank_validation.csvstudent_rank_test.csv
The Snowflake source-table setup in the expandable section below is optional — follow it only if you want to load source data from Snowflake. If you plan to use local CSVs, you can skip it entirely.
Expand for dataset and Snowflake setup instructions
The following instructions walk you through preparing the synthetic academic dataset used in the example.
On this dataset, we have defined a binary node classification problem. Each node represents a student, and the objective is to predict whether that student belongs to the top 50% of the cohort. The target label is defined as:
- 1 → student belongs to the top 50%
- 0 → student belongs to the bottom 50%
This task evaluates the model’s ability to distinguish higher-performing students from lower-performing ones, based on the available features and relationships in the dataset.
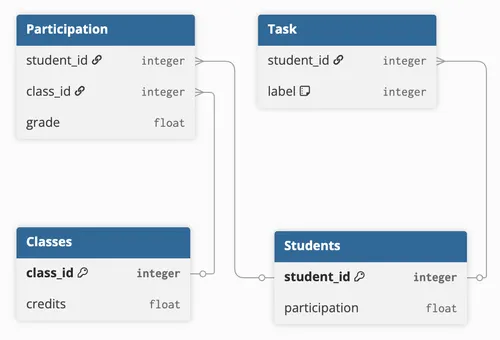
The dataset consists of three simple tables:
STUDENTS— each row represents a student, identified by a uniquestudentId.CLASSES— each row represents a class, identified by a uniqueclassId.PARTICIPATION— each row indicates which student took which class and includes the grade they received.
This is the database’s schema along with the ranking task:
Set up Snowflake objects
Section titled “Set up Snowflake objects”The steps below create the Snowflake objects needed to load the dataset — a role, database, warehouse, schemas, and a stage — and grant the RelationalAI Native App the access required for experiment tracking and model storage. Run all commands in a Snowflake SQL worksheet. For convenience, the complete script is available here:
create_assets.sql
USE ROLE SYSADMIN;  -- or any role with privileges to run the commands below
-- set up of constants, change the names in this section of what assets you'd like to create,-- no need to touch the rest of the code
SET db_name = 'synthetic_academic_ranking_db'; --database to store all tables of the synthetic academic datasetSET schema_name = 'data'; -- schema to store the database tablesSET schema_full_name = $db_name||'.'||$schema_name; -- full path to the schemaSET schema_rank_name = 'rank'; -- another schema to store the task (training) data tablesSET schema_rank_full_name = $db_name||'.'||$schema_rank_name; -- full path to the schemaSET schema_model_registry_name = 'model_registry'; -- schema to store experiments resultsSET schema_model_registry_full_name = $db_name||'.'||$schema_model_registry_name; -- full path to the schemaSET stage_name = 'synth_stage'; -- stage to upload csv tablesSET stage_full_name = $schema_full_name||'.'||$stage_name; -- full path to the stageSET wh_name = 'synth_wh'; -- warehouse to useSET wh_size = 'X-SMALL'; -- warehouse size
-- create a databaseCREATE DATABASE IF NOT EXISTS identifier($db_name);USE DATABASE identifier($db_name);
-- create warehouseCREATE OR REPLACE WAREHOUSE identifier($wh_name) WITH WAREHOUSE_SIZE = $wh_size;
-- create schemasCREATE SCHEMA IF NOT EXISTS identifier($schema_full_name);USE SCHEMA identifier($schema_full_name);
CREATE SCHEMA IF NOT EXISTS identifier($schema_rank_full_name);
-- create a stageCREATE STAGE IF NOT EXISTS identifier($stage_full_name) DIRECTORY = ( ENABLE = true );GRANT READ ON STAGE identifier($stage_full_name) TO ROLE identifier($role_name);
-- grant access to resources needed for snowflake experiment trackingGRANT USAGE ON DATABASE identifier($db_name) TO APPLICATION RELATIONALAI;GRANT USAGE ON SCHEMA identifier($schema_model_registry_full_name) TO APPLICATION RELATIONALAI;-- grant access to store experiment resultsGRANT CREATE EXPERIMENT ON SCHEMA identifier($schema_model_registry_full_name) TO APPLICATION RELATIONALAI;-- grant access to register modelsGRANT CREATE MODEL ON SCHEMA identifier($schema_model_registry_full_name) TO APPLICATION RELATIONALAI;
Specify object names
Section titled “Specify object names”You can choose your own names for these objects and define them as variables at the beginning of your script. This allows the rest of the code to reference those variables consistently when creating the necessary objects.
Below is an example configuration for setting the names of your database, warehouse, stage, and other assets:
USE ROLE SYSADMIN;  -- or any role with privileges to run the commands below
SET db_name = 'synthetic_academic_ranking_db'; --database to store all tables of the synthetic academic datasetSET schema_name = 'data'; -- schema to store the database tablesSET schema_full_name = $db_name||'.'||$schema_name; -- full path to the schemaSET schema_rank_name = 'rank'; -- another schema to store the task (training) data tablesSET schema_rank_full_name = $db_name||'.'||$schema_rank_name; -- full path to the schemaSET schema_model_registry_name = 'model_registry'; -- schema to store experiments resultsSET schema_model_registry_full_name = $db_name||'.'||$schema_model_registry_name; -- full path to the schemaSET stage_name = 'synth_stage'; -- stage to upload csv tablesSET stage_full_name = $schema_full_name||'.'||$stage_name; -- full path to the stageSET wh_name = 'synth_wh'; -- warehouse to useSET wh_size = 'X-SMALL'; -- warehouse sizeSET role_name = 'SYNTH_DB_ROLE';   -- what role will have access to the db/warehouse/schema etc.
Create a role
Section titled “Create a role”The following step creates and selects the role that will have access to your database. This is the role you should be using in the predictive reasoner to be able to read from and write to the database.
CREATE ROLE IF NOT EXISTS identifier($role_name);USE ROLE identifier($role_name);Create a database
Section titled “Create a database”Next, you will create a database:
CREATE DATABASE IF NOT EXISTS identifier($db_name);USE DATABASE identifier($db_name);Create a warehouse
Section titled “Create a warehouse”Next, you will create a warehouse:
CREATE OR REPLACE WAREHOUSE identifier($wh_name) WITH WAREHOUSE_SIZE = $wh_size;Create schemas
Section titled “Create schemas”You will need two schemas: the data schema, which contains the synthetic academic dataset tables,
and the rank schema, which holds the task training tables. You can create these schemas using the following commands:
CREATE SCHEMA IF NOT EXISTS identifier($schema_full_name);USE SCHEMA identifier($schema_full_name);
CREATE SCHEMA IF NOT EXISTS identifier($schema_rank_full_name);
Create a stage
Section titled “Create a stage”You will need a stage to upload the raw CSV data, which will then be imported into Snowflake tables. You can create the stage using the following command:
CREATE STAGE IF NOT EXISTS identifier($stage_full_name) DIRECTORY = ( ENABLE = true );GRANT READ ON STAGE identifier($stage_full_name) TO ROLE identifier($role_name);Grant access to the RelationalAI Native App
Section titled “Grant access to the RelationalAI Native App”To enable the RelationalAI Native App to save the results of training, such as registered models and training metrics, you also need to grant it the necessary access permissions.
-- grant access to resources needed for snowflake experiment tracking
GRANT USAGE ON DATABASE identifier($db_name) TO APPLICATION RELATIONALAI;GRANT USAGE ON SCHEMA identifier($schema_model_registry_full_name) TO APPLICATION RELATIONALAI;-- grant access to store experiment resultsGRANT CREATE EXPERIMENT ON SCHEMA identifier($schema_model_registry_full_name) TO APPLICATION RELATIONALAI;-- grant access to register modelsGRANT CREATE MODEL ON SCHEMA identifier($schema_model_registry_full_name) TO APPLICATION RELATIONALAI;
Get and upload data to the stage
Section titled “Get and upload data to the stage”Download the Synthetic Academic Dataset files and upload them to the Snowflake stage you created in the previous step.
In Snowsight, navigate to the left sidebar and click on Data > Databases.
Next, locate the database you just created, then select the schema, followed by Stages, and finally click on the stage you created.
For example, if you followed the naming convention in this guide, you would navigate to:
SYNTHETIC_ACADEMIC_RANKING_DB > DATA > Stages > SYNTH_STAGE.
Next, you will need to add some files to the stage. To do this, click the Files button in the top-right corner.
In the upload window that appears, select and upload the following files:
students.csvclasses.csvparticipation.csvstudent_rank_train.csvstudent_rank_validation.csvstudent_rank_test.csv
You can select the files and drag and drop them into the upload window.
Once you dragged and dropped the files click on the Upload button.
Load the data into Snowflake tables
Section titled “Load the data into Snowflake tables”Once all the files are uploaded to the stage, you can import the data into Snowflake tables.
To do this, run the following commands in a Snowflake SQL worksheet:
import_data.sql
-- Script to load the synthetic academic dataset into Snowflake tables
USE ROLE SYNTH_DB_ROLE;USE DATABASE SYNTHETIC_ACADEMIC_RANKING_DB;USE SCHEMA DATA;USE WAREHOUSE SYNTH_WH;
-- Create a file format for CSVCREATE OR REPLACE FILE FORMAT my_csv_format    TYPE = 'CSV'    FIELD_DELIMITER = ','    SKIP_HEADER = 1    NULL_IF = ('NULL', 'null')    FIELD_OPTIONALLY_ENCLOSED_BY = '0x22'    EMPTY_FIELD_AS_NULL = TRUE;
-- Create the students tableCREATE OR REPLACE TABLE STUDENTS (  "studentId" NUMBER(38,0),  "participation" FLOAT);
-- Copy data into the students tableCOPY INTO STUDENTSFROM '@"SYNTHETIC_ACADEMIC_RANKING_DB"."DATA"."SYNTH_STAGE"/students.csv'FILE_FORMAT = my_csv_format;
-- Create the classes tableCREATE OR REPLACE TABLE CLASSES (    "classId" NUMBER(38,0),    "credits" FLOAT);
-- Copy data into the classes tableCOPY INTO CLASSESFROM '@"SYNTHETIC_ACADEMIC_RANKING_DB"."DATA"."SYNTH_STAGE"/classes.csv'FILE_FORMAT = my_csv_format;
-- Create the participation tableCREATE OR REPLACE TABLE PARTICIPATION (    "studentId" NUMBER(38,0),    "classId" NUMBER(38,0),    "grade" FLOAT);
-- Copy data into the participation tableCOPY INTO PARTICIPATIONFROM '@"SYNTHETIC_ACADEMIC_RANKING_DB"."DATA"."SYNTH_STAGE"/participation.csv'FILE_FORMAT = my_csv_format;

USE SCHEMA RANK;
-- Create a file format for CSVCREATE OR REPLACE FILE FORMAT my_csv_format    TYPE = 'CSV'    FIELD_DELIMITER = ','    SKIP_HEADER = 1    NULL_IF = ('NULL', 'null')    FIELD_OPTIONALLY_ENCLOSED_BY = '0x22'    EMPTY_FIELD_AS_NULL = TRUE;
-- Create the train tableCREATE OR REPLACE TABLE TRAIN (    "studentId" NUMBER(38,0),    "label" NUMBER(38,0));
-- Copy data into the validation tableCOPY INTO TRAINFROM '@"SYNTHETIC_ACADEMIC_RANKING_DB"."DATA"."SYNTH_STAGE"/student_rank_train.csv'FILE_FORMAT = my_csv_format;
-- Create the train tableCREATE OR REPLACE TABLE VALIDATION (    "studentId" NUMBER(38,0),    "label" NUMBER(38,0));
-- Copy data into the train tableCOPY INTO VALIDATIONFROM '@"SYNTHETIC_ACADEMIC_RANKING_DB"."DATA"."SYNTH_STAGE"/student_rank_validation.csv'FILE_FORMAT = my_csv_format;
-- Create the train tableCREATE OR REPLACE TABLE TEST (    "studentId" NUMBER(38,0),    "label" NUMBER(38,0));
-- Copy data into the train tableCOPY INTO TESTFROM '@"SYNTHETIC_ACADEMIC_RANKING_DB"."DATA"."SYNTH_STAGE"/student_rank_test.csv'FILE_FORMAT = my_csv_format;
-- Clean upREMOVE '@"SYNTHETIC_ACADEMIC_RANKING_DB"."DATA"."SYNTH_STAGE"/students.csv';REMOVE '@"SYNTHETIC_ACADEMIC_RANKING_DB"."DATA"."SYNTH_STAGE"/classes.csv';REMOVE '@"SYNTHETIC_ACADEMIC_RANKING_DB"."DATA"."SYNTH_STAGE"/participation.csv';REMOVE '@"SYNTHETIC_ACADEMIC_RANKING_DB"."DATA"."SYNTH_STAGE"/student_rank_train.csv';REMOVE '@"SYNTHETIC_ACADEMIC_RANKING_DB"."DATA"."SYNTH_STAGE"/student_rank_validation.csv';REMOVE '@"SYNTHETIC_ACADEMIC_RANKING_DB"."DATA"."SYNTH_STAGE"/student_rank_test.csv';
As a final cleanup step, we also remove the CSV files from the stage since they are no longer needed. After the above are complete,
you will be able to see the imported tables listed under DATA > Tables and RANK > Tables in your Snowflake environment.
Import the libraries and create a model
Section titled “Import the libraries and create a model”Start by importing the predictive reasoner and creating a Model.
GNN is the trainer that produces predictions,
and PropertyTransformer
configures how node and edge features are preprocessed before training.
from relationalai.semantics import Model, select, definefrom relationalai.semantics.reasoners.graph import Graphfrom relationalai.semantics.reasoners.predictive import GNN, PropertyTransformer
model = Model("gnn_synthdb")Concept, Table = model.Concept, model.Table
Concept
and Table
are pulled out of the model for convenience so you can reference them directly in the rest of the example.
Define concepts and load data
Section titled “Define concepts and load data”Declare a Concept for each table in the dataset — Students, Classes, and Participation, plus three more for the train, validation, and test splits — and populate them from your data. Each domain concept becomes a node type in the graph that the GNN will learn over.
Pick the path that matches how your data is stored:
- Snowflake — the standard path for real-world data. Reads each table from a fully qualified Snowflake name.
- Local CSVs — quickest way to try this example end to end. Reads the bundled CSVs you downloaded above.
Classes = Concept("Classes")Students = Concept("Students")Participation = Concept("Participation")
train_table_concept = Concept("SynthTrainTable")validation_table_concept = Concept("SynthValidationTable")test_table_concept = Concept("SynthTestTable")
classes_table = Table("SYNTHETIC_ACADEMIC_RANKING_DB.DATA.CLASSES")define(Classes.new(classes_table.to_schema()))
students_table = Table("SYNTHETIC_ACADEMIC_RANKING_DB.DATA.STUDENTS")define(Students.new(students_table.to_schema()))
participation_table = Table("SYNTHETIC_ACADEMIC_RANKING_DB.DATA.PARTICIPATION")define(Participation.new(participation_table.to_schema()))
train_table = Table("SYNTHETIC_ACADEMIC_RANKING_DB.RANK.TRAIN")define(train_table_concept.new(train_table.to_schema()))
val_table = Table("SYNTHETIC_ACADEMIC_RANKING_DB.RANK.VALIDATION")define(validation_table_concept.new(val_table.to_schema()))
test_table = Table("SYNTHETIC_ACADEMIC_RANKING_DB.RANK.TEST")define(test_table_concept.new(test_table.to_schema()))
from pandas import read_csv
Classes = Concept("Classes")Students = Concept("Students")Participation = Concept("Participation")
train_table_concept = Concept("SynthTrainTable")validation_table_concept = Concept("SynthValidationTable")test_table_concept = Concept("SynthTestTable")
classes_df = read_csv("classes.csv")define(Classes.new(model.data(classes_df).to_schema()))
students_df = read_csv("students.csv")define(Students.new(model.data(students_df).to_schema()))
participation_df = read_csv("participation.csv")define(Participation.new(model.data(participation_df).to_schema()))
train_df = read_csv("student_rank_train.csv")define(train_table_concept.new(model.data(train_df).to_schema()))
val_df = read_csv("student_rank_validation.csv")define(validation_table_concept.new(model.data(val_df).to_schema()))
test_df = read_csv("student_rank_test.csv")define(test_table_concept.new(model.data(test_df).to_schema()))In the Snowflake path, Table(...) points to a fully qualified Snowflake table name; in the CSV path, model.data(df) wraps a pandas DataFrame instead. In both cases, to_schema() maps columns directly onto the concept’s properties — each Students instance ends up with a studentid and a participation property, inferred from the source.
Build the training, validation, and test splits
Section titled “Build the training, validation, and test splits”With the split tables loaded above, build a select fragment for each that pairs a Students instance with the label from the matching split:
Train = select(Students, train_table_concept.label).where( train_table_concept.studentid == Students.studentid)Validation = select(Students, validation_table_concept.label).where( validation_table_concept.studentid == Students.studentid)Test = select(Students).where( test_table_concept.studentid == Students.studentid)It’s up to you whether the Test fragment includes the label — the GNN doesn’t use it for prediction either way; we omit it here for simplicity.
Train and Validation are passed to the GNN at construction time, while Test is used later to generate predictions with .predictions(domain=Test).
Construct the graph
Section titled “Construct the graph”The GNN learns on a graph built from your concepts. Create a Graph object and add edges that connect each
Participation record to the Students and Classes it references. Each where clause matches a foreign key on Participation to the primary key of the referenced concept — the same relationship a SQL JOIN would express. Each matching pair becomes an edge in the graph.
gnn_graph = Graph(model, directed=True, weighted=False)Edge = gnn_graph.Edge
define(Edge.new(src=Participation, dst=Students)).where(    Participation.studentid == Students.studentid)define(Edge.new(src=Participation, dst=Classes)).where(    Participation.classid == Classes.classid)
Participation instances act as intermediate nodes that link a Student to the Classes they take.
During training, the GNN propagates information along these edges so that each student’s embedding incorporates
signal from the classes they took and the grades they received.
Configure feature preprocessing
Section titled “Configure feature preprocessing”PropertyTransformer specifies
which properties will be fed as features to the GNN and how to treat them. Use continuous to list the numeric features that should be fed
into the model, and drop to exclude concept properties that shouldn’t be treated as features (such as identifier columns).
pt = PropertyTransformer( continuous=[Students.participation, Classes.credits, Participation.grade], drop=[Students, Classes, Participation],)In this example, three continuous features — participation, credits, and grade — are used.
Passing the concepts themselves to drop excludes all of their other properties from being treated as features.
You can read more about the feature preprocessing in the Encode features page.
Train the GNN and generate predictions
Section titled “Train the GNN and generate predictions”Configure the GNN with a hyperparameter dictionary, a task type, and the train and validation fragments.
Call .fit() to train,
then .predictions()
on the Test fragment to compute predictions for the held-out students.
gnn = GNN(    exp_database="SYNTHETIC_ACADEMIC_RANKING_DB",    exp_schema="MODEL_REGISTRY",    graph=gnn_graph,    property_transformer=pt,    train=Train,    validation=Validation,    task_type="binary_classification",)gnn.fit()
Students.predictions = gnn.predictions(domain=Test)
The key arguments are:
exp_databaseandexp_schema— the Snowflake database and schema where a Snowflake Experiment Tracking experiment is created to save trained models and artifacts, track metrics and runs, and persist results. The RelationalAI Native App must have permission to create experiments and register models there. Read more about Monitor training.graph,property_transformer,train,validation— the graph, feature configuration, and labeled splits built in the previous steps.task_type="binary_classification"— tells the trainer the label is binary (0 or 1). Read more about different task types in the Define a learning task page.
Students.predictions = gnn.predictions(domain=Test) attaches a predictions relationship to the Students concept,
populated for every student in the Test domain. Each prediction exposes a predicted_labels value (the predicted class)
and a probs score (the probability for the positive class, since this is binary classification).
Inspect the predictions
Section titled “Inspect the predictions”Query the predictions like any other property on Students:
( select( Students.studentid, Students.predictions.predicted_labels, Students.predictions.probs, ) .where(Students.predictions) .inspect())The .where(Students.predictions) filter restricts the output to students that have a prediction attached — in this case, the Test cohort.
The result is a table with each student’s id, the predicted class label, and the model’s probability scores.
You can read more about how to leverage predictions in the Make predictions page.