Managing Transactions in the RAI Console
Database transaction activity can be viewed, analyzed, and managed in the RAI Console.
Within the Transactions page, you have access to the last 100 transactions associated with the selected RAI account. This includes transactions initiated via the Console or any of the RelationalAI SDKs.
You can inspect the details of all past and currently running transactions. Running transactions can also be canceled.
Using the Transactions Page
Here’s how to navigate the Transactions page:
-
To access the Transactions page, click the Transactions icon on the left-hand side of the Console.
-
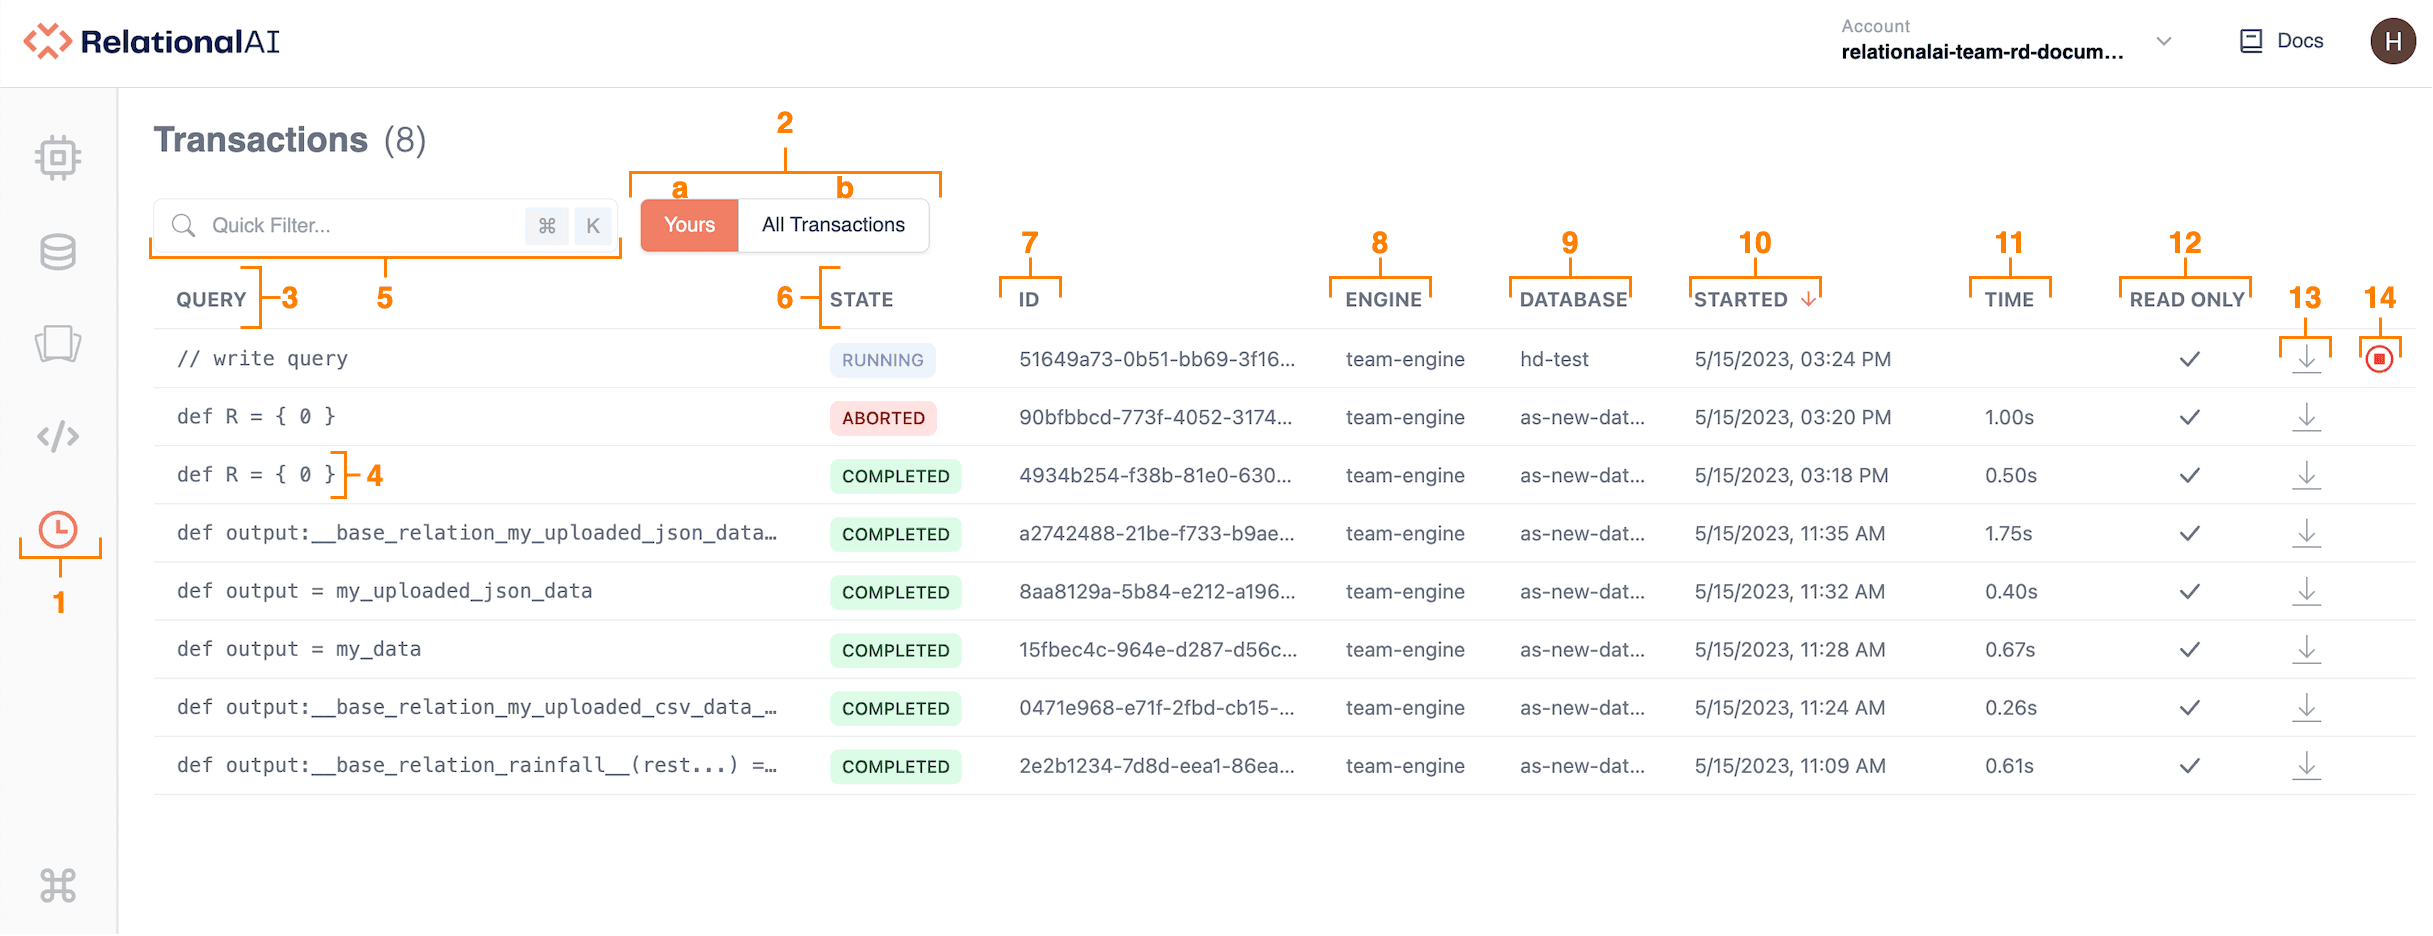
The Transactions page lists the last 100 transactions associated with your RelationalAI account:
a. By default, the Transactions page displays the last 100 transactions you’ve initiated under Yours. This is indicated on the Yours toggle button by an orange background and white text.
b. To view the last 100 transactions for your entire RelationalAI account, click All Transactions.
-
The Query column contains the first several characters of the Rel contents of each transaction. Click Query to sort transactions in ascending or descending alphabetical order by this column.
-
To view the Transaction Details page for a query, click the respective query in the list under the Query field. Note that you can preview the content and details of a query by holding your pointer over the query. See Inspecting a Single Transaction for more information on transaction details.
🔎To return to viewing your list of transactions, click the Transactions icon on the left-hand side of the Console.
-
To search or filter transactions, type text or values into the Quick Filter field. Quick Filter conducts a search only on the transactions currently displayed in the transaction list, and filters through the Query, State, ID, Engine, Database, and Started columns.
-
To view the state of a transaction, see the respective information under the State field. To rearrange transactions in ascending or descending alphabteical order of transaction states, click State. For more details, see Transaction States.
-
To view a transaction’s ID, see the respective information under the ID field. To rearrange transactions in ascending or descending order of their ID number, click ID.
-
To view the name of the engine on which the transaction ran, see the respective information under the Engine field. To rearrange transactions in ascending or descending alphabetical order of the engine used, click Engine.
-
To view the name of the database on which the transaction ran, see the respective information under the Database field. To rearrange transactions in ascending or descending alphabetical order of the database used, click Database.
-
To view the date and time a transaction was initiated, see the respective information under the Started field. Note that you can see the full details of when the transaction was initiated by holding your pointer over the date. To sort transactions by the date they were started, click Started.
-
To view the amount of time a transaction took to run, see the respective infromation under the Time field. To rearrange transactions in increasing or decreasing order by run time, click Time.
-
To view whether a transaction was read-only, see the respective infromation under the Read Only field. A check sign indicates that the transaction was read-only, an empty field indicates that it wasn’t. To group transactions by their read-only status, click Read Only.
-
To download the query, click the Download query icon. The file saves in your Downloads folder with the default name
<Transaction ID>.rel. -
To cancel a transaction while it’s running, click the Cancel Transaction icon. You can also cancel a running transaction in the Editor. It may take up to one hour for a transaction to cancel, and canceled transactions will eventually move to an aborted state. If a transaction happens to complete before the system processes the cancellation, it may move to a completed state.
Inspecting a Single Transaction
You can view detailed information on a transaction by clicking the transaction under the Query field. This opens the Transaction Details page.
The Transaction Details page displays the following sections:
| Section | Description |
|---|---|
| Transaction | Lists status and details of the transaction. |
| Query | Displays the executed Rel query (first 1000 characters). |
| Problems | Appears only if there are errors or integrity constraint (IC) violations in the query. |
| Results | Displays results of the transaction (if applicable). |
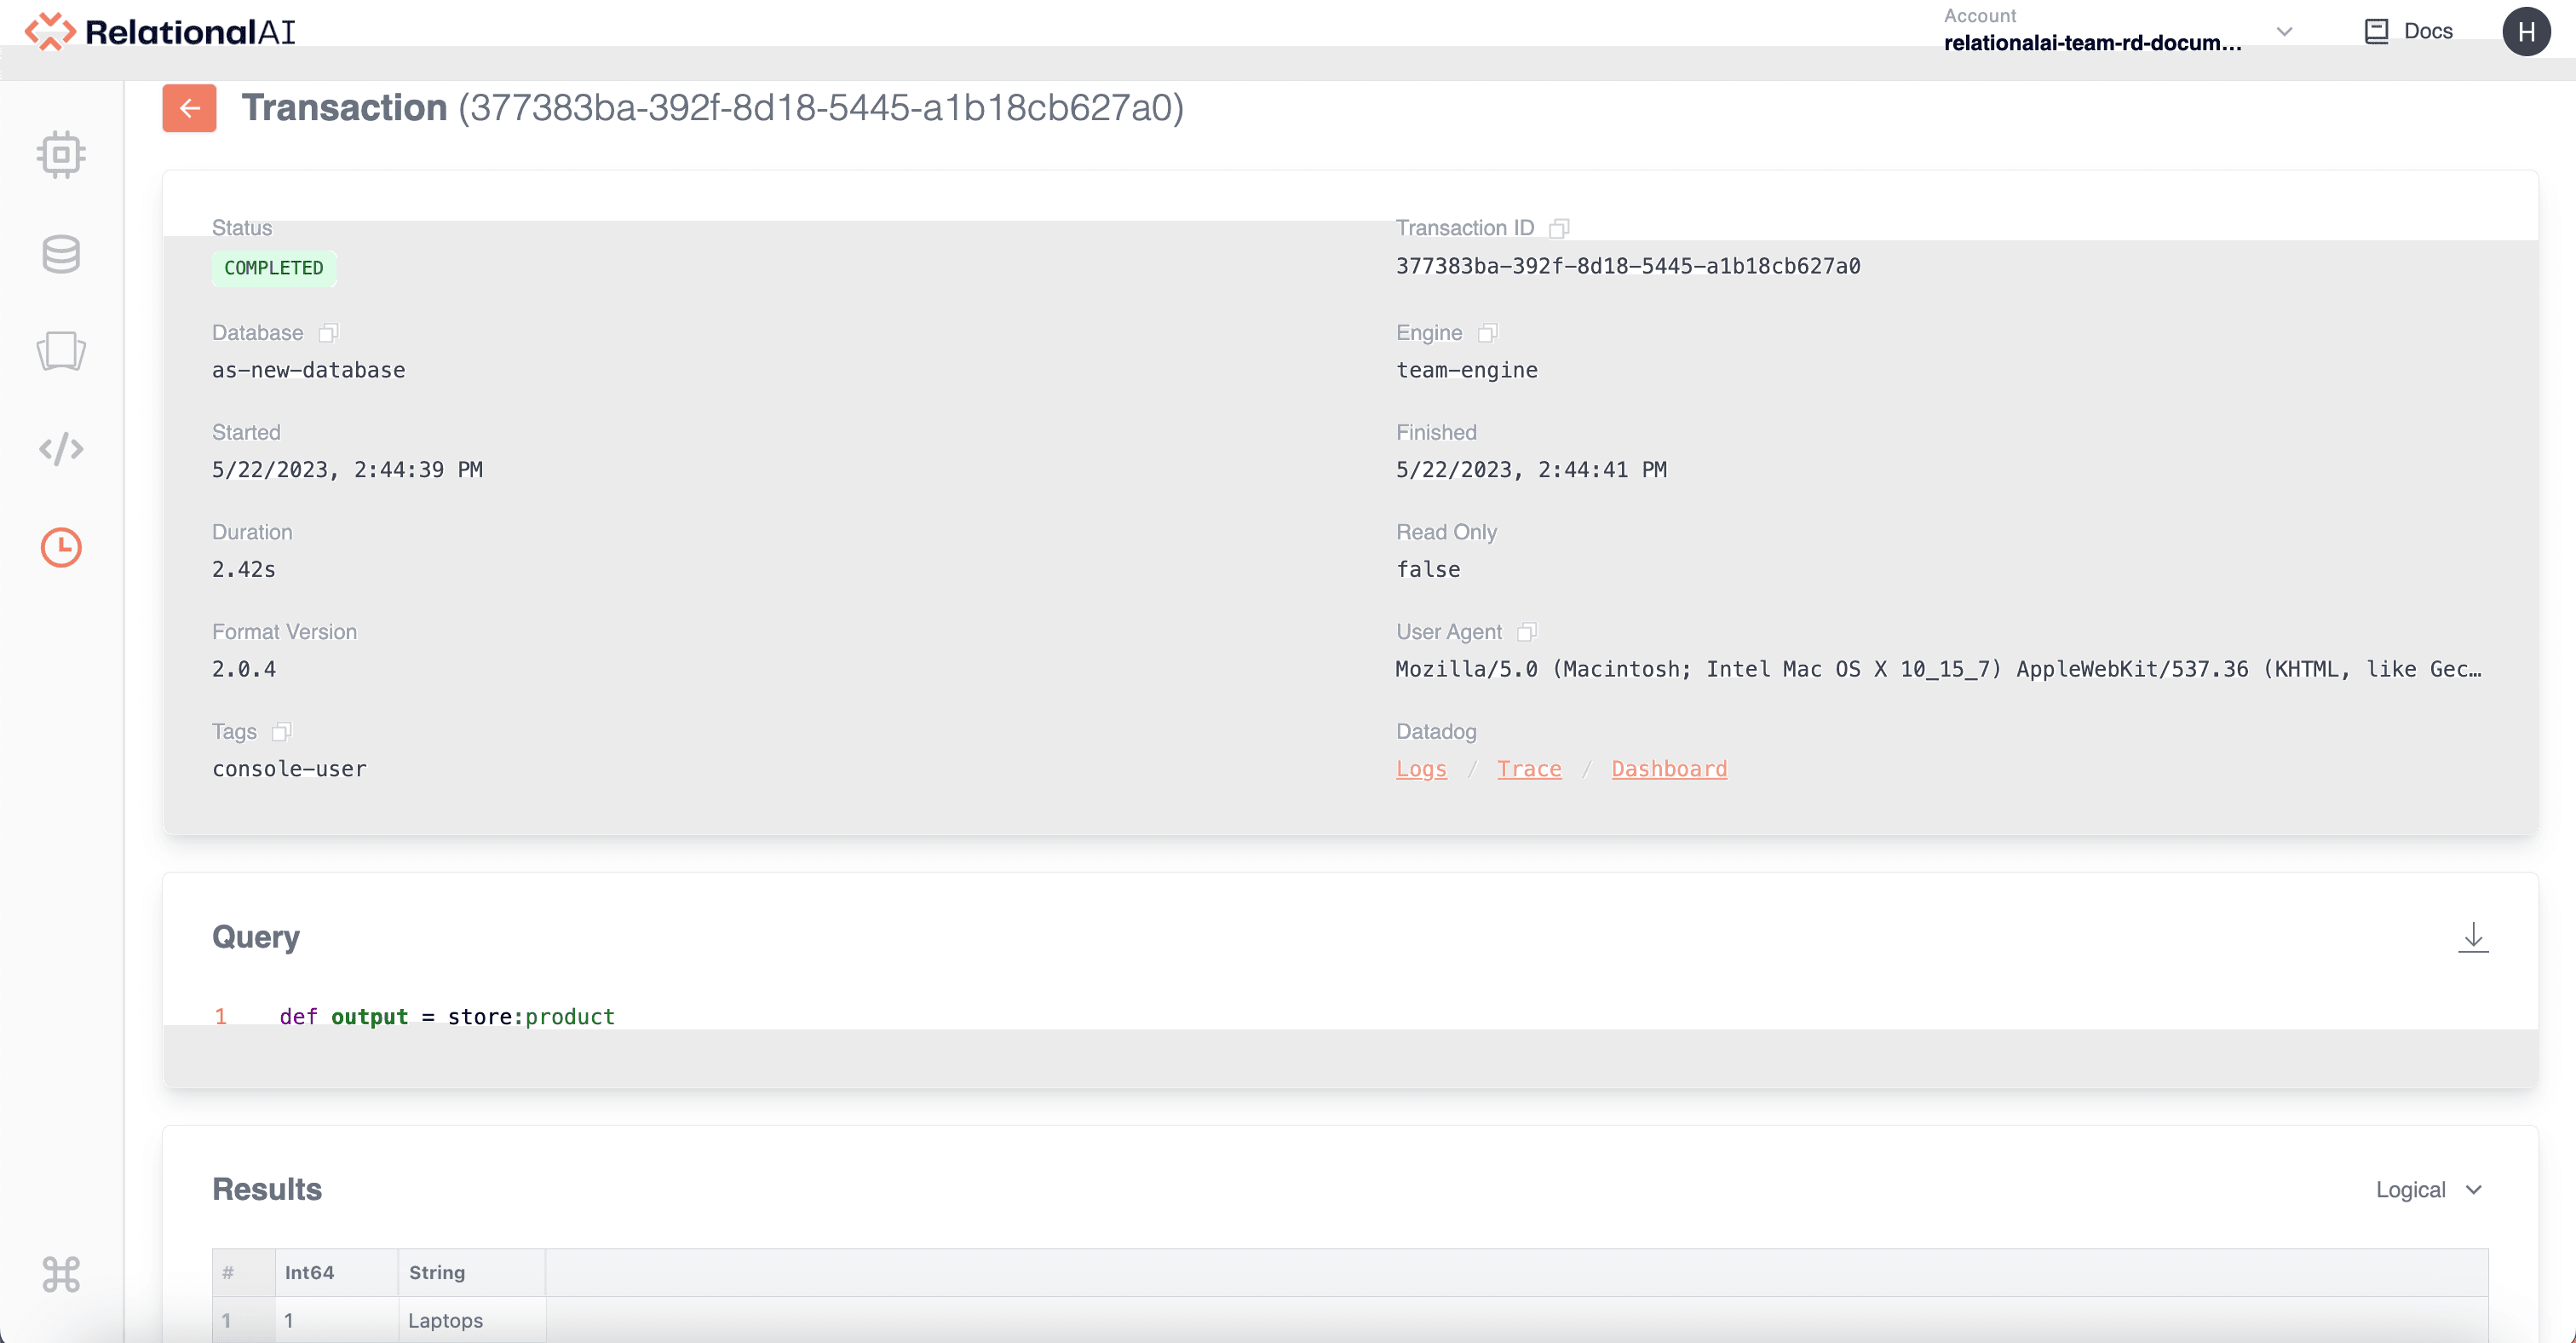
Transaction Section
The Transaction section shows the following information about your transaction:
| Field | Explanation |
|---|---|
| Status | Current state of the transaction. See Transaction States for more details. |
| Database | Name of the database on which the transaction ran. |
| Started | Time the transaction was initiated. |
| Format Version | Version of the SDK used. It’s best practice to use the latest version of the SDK. |
| Tags | Displays metadata attached to a transaction via the SDKs. |
| Transaction ID | Unique identifier for the transaction. Useful for communicating with RAI support. |
| Engine | Name of the engine on which the transaction ran. |
| Read Only | Whether or not the transaction was read-only. |
| User Agent | Name of the SDK or the browser details when executed via the Console. |
Query Section
This section displays the code you’ve run in the Editor.
To download the query, click the Download query icon at the right-hand corner of the box.
The file saves in your Downloads folder with the default name <Transaction ID>.rel.
Problems Section
This section appears in the Transaction Details page only if your query has an error or if there’s an integrity constraint (IC) violation. The query in the image above doesn’t have any errors, and so the section doesn’t appear.
If you run a query where the data don’t obey a specified constraint, the system will report an IC violation and the running transaction will be aborted.
In this case, the Transaction Details page will look like this:
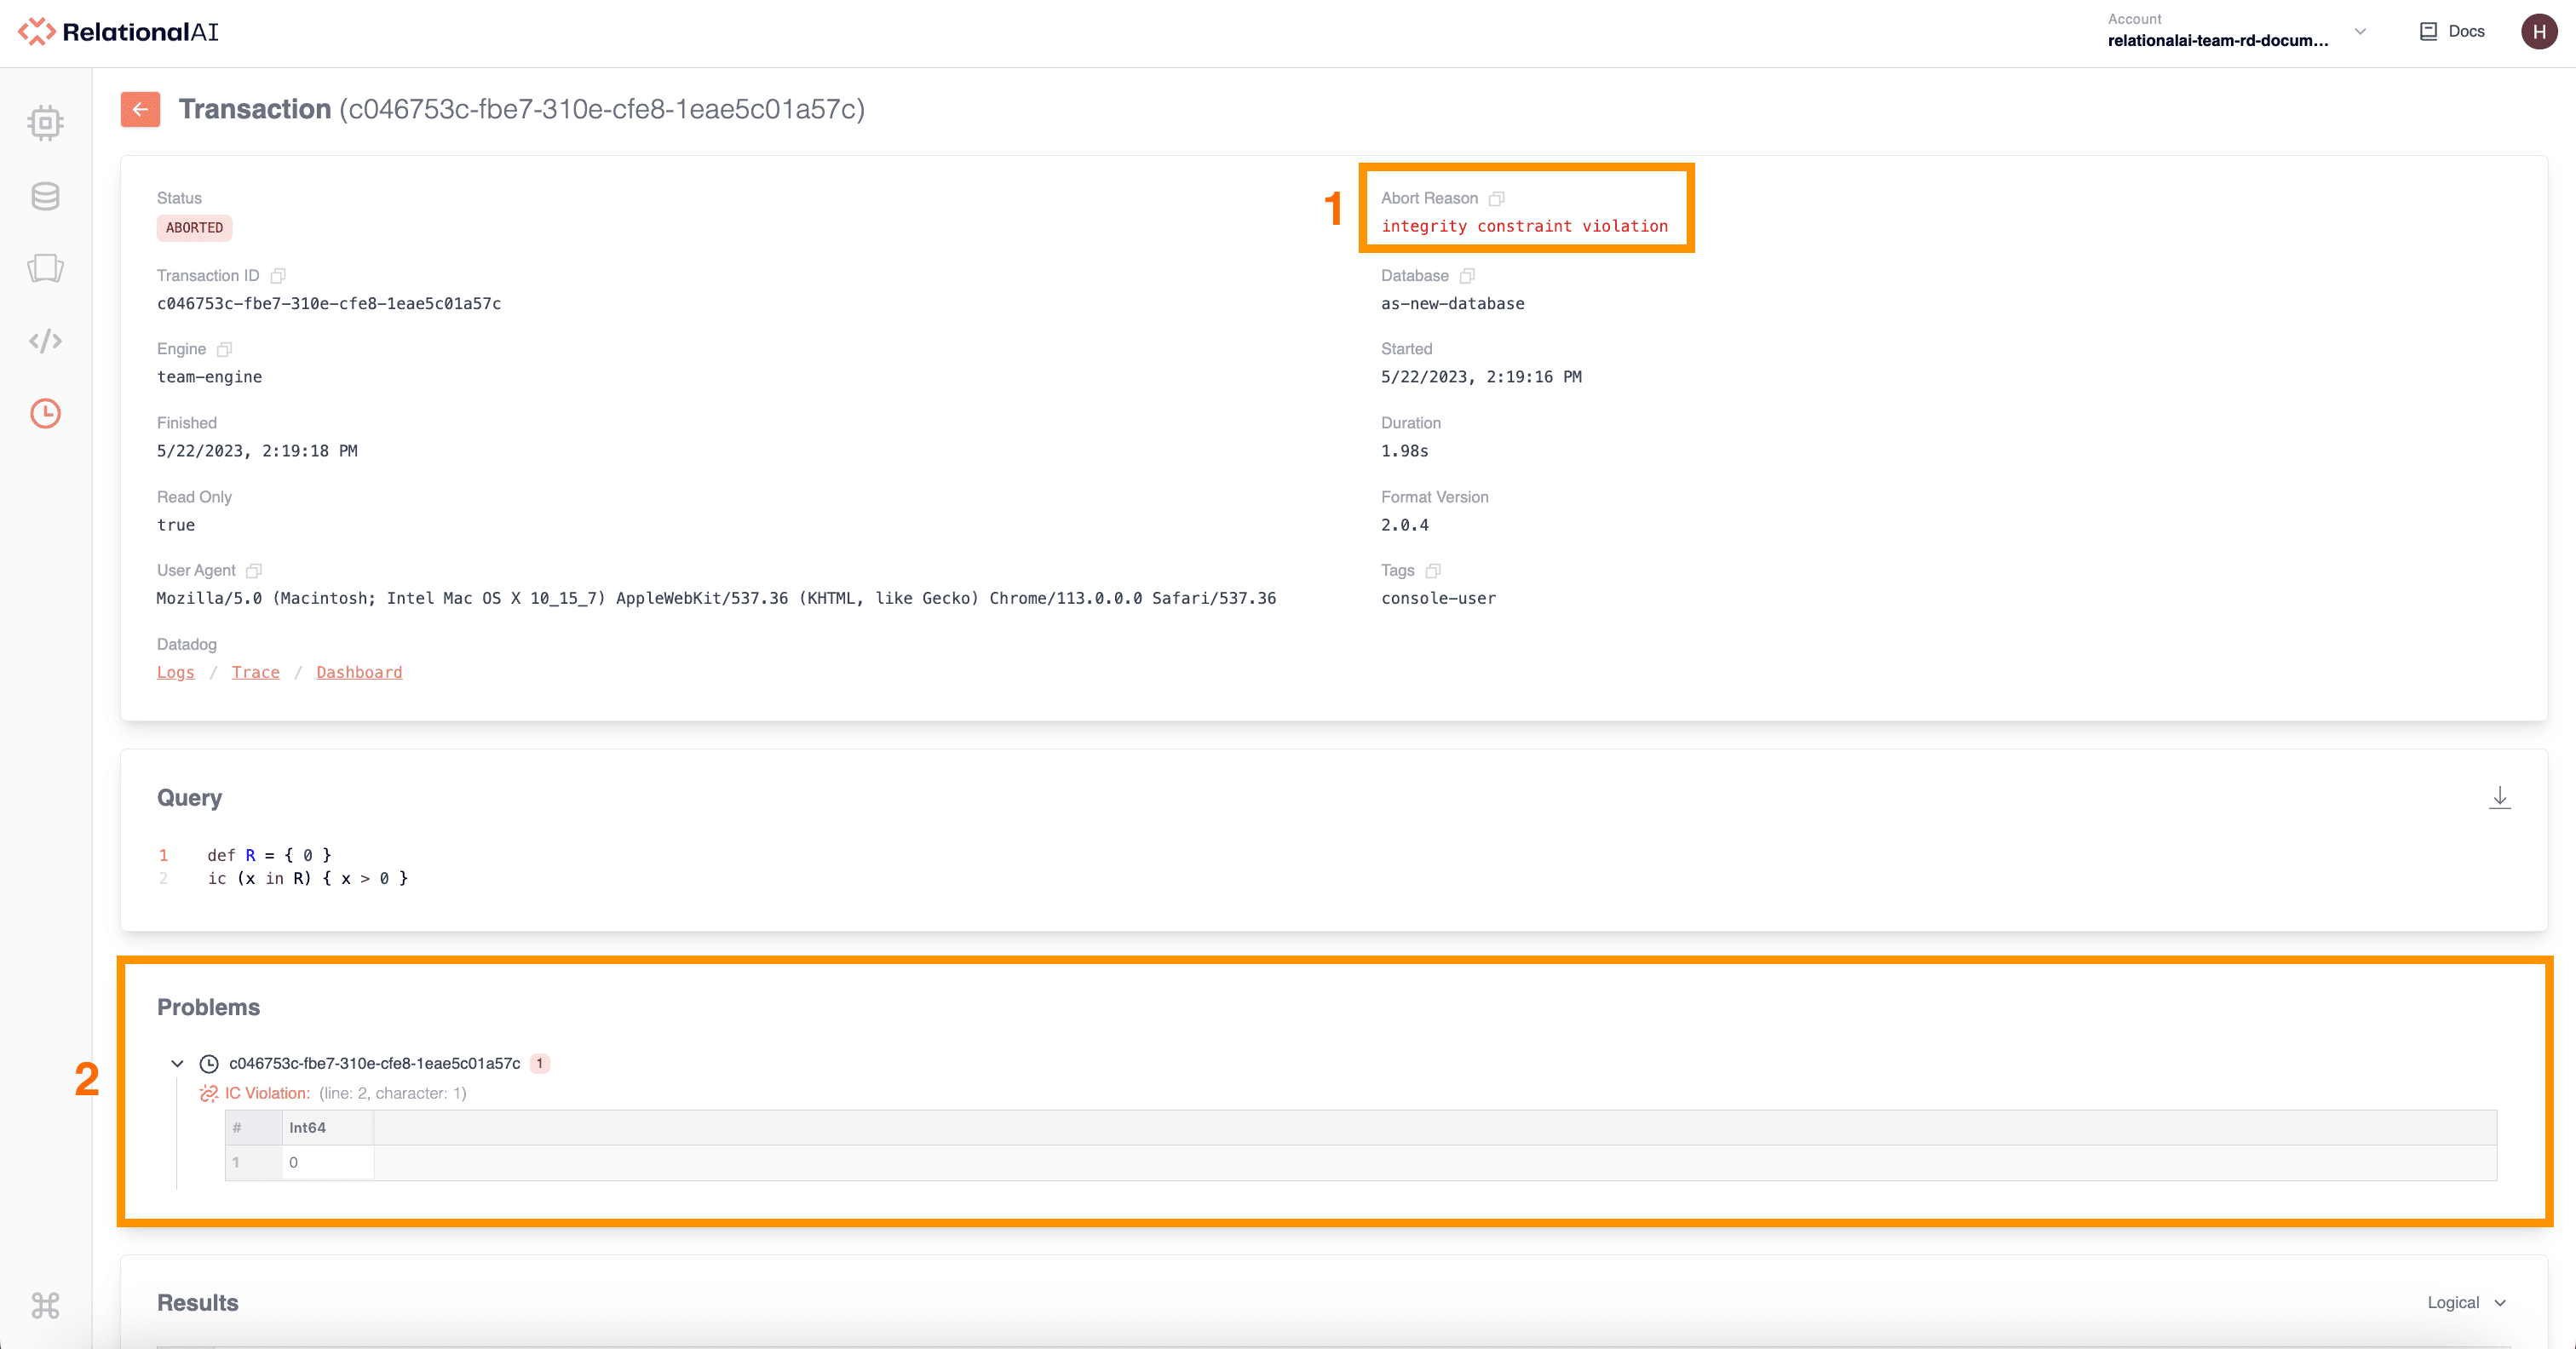
Note that when the status is “ABORTED”, an Abort Reason field is displayed in the Transaction section (box 1). In this case, the reason is “integrity constraint violation.” For more details on why a query may be aborted, see Abort Reasons.
The Problems section (box 2) also highlights the error in your query.
For example, IC Violation: (line: 2, character: 1).
Results Section
This section displays the output results of the query as shown in the Output tab of the Bottom panel in the Editor page. You can change the view mode of the output by clicking the down arrow at the right-hand corner of the Results box and selecting a mode.
Transaction States
Transactions can be in one of four states:
| Status | Explanation |
|---|---|
| Created | Transaction has been issued but is not yet running. |
| Running | Transaction is currently running. Running transactions can be canceled. |
| Canceling | Transaction has been asked to cancel. Canceled transactions will eventually move to an aborted state. |
| Completed | Transaction has run successfully. |
| Aborted | Transaction has been canceled by the user or aborted by the system. See Abort Reasons below for more details. |
Abort Reasons
The following is a list of reasons why the system may abort a transaction:
| Abort Reason | Explanation |
|---|---|
| Canceled | Transaction was canceled by user. |
| Engine Shutting Down | Engine was shut down before transaction could complete. |
| Integrity Constraint Violation | Transaction was canceled because the query violates an integrity constraint. See Integrity Constraints for more details. In these cases, the transaction still shows results, so that you can debug the query. |
| Invalid Request | Transaction resulted in an invalid request to the server. |
| Runtime Error | Transaction was aborted because the computation of a requested relation triggered a runtime error. |
| System Internal Error | System has experienced an error. For more information, contact support@relational.ai. |