Working With Worksheets
Worksheets let you develop blocks of Rel code and run these against a database. Worksheets can be shared with other users using their URLs.
Using the Worksheets Page in the RAI Console
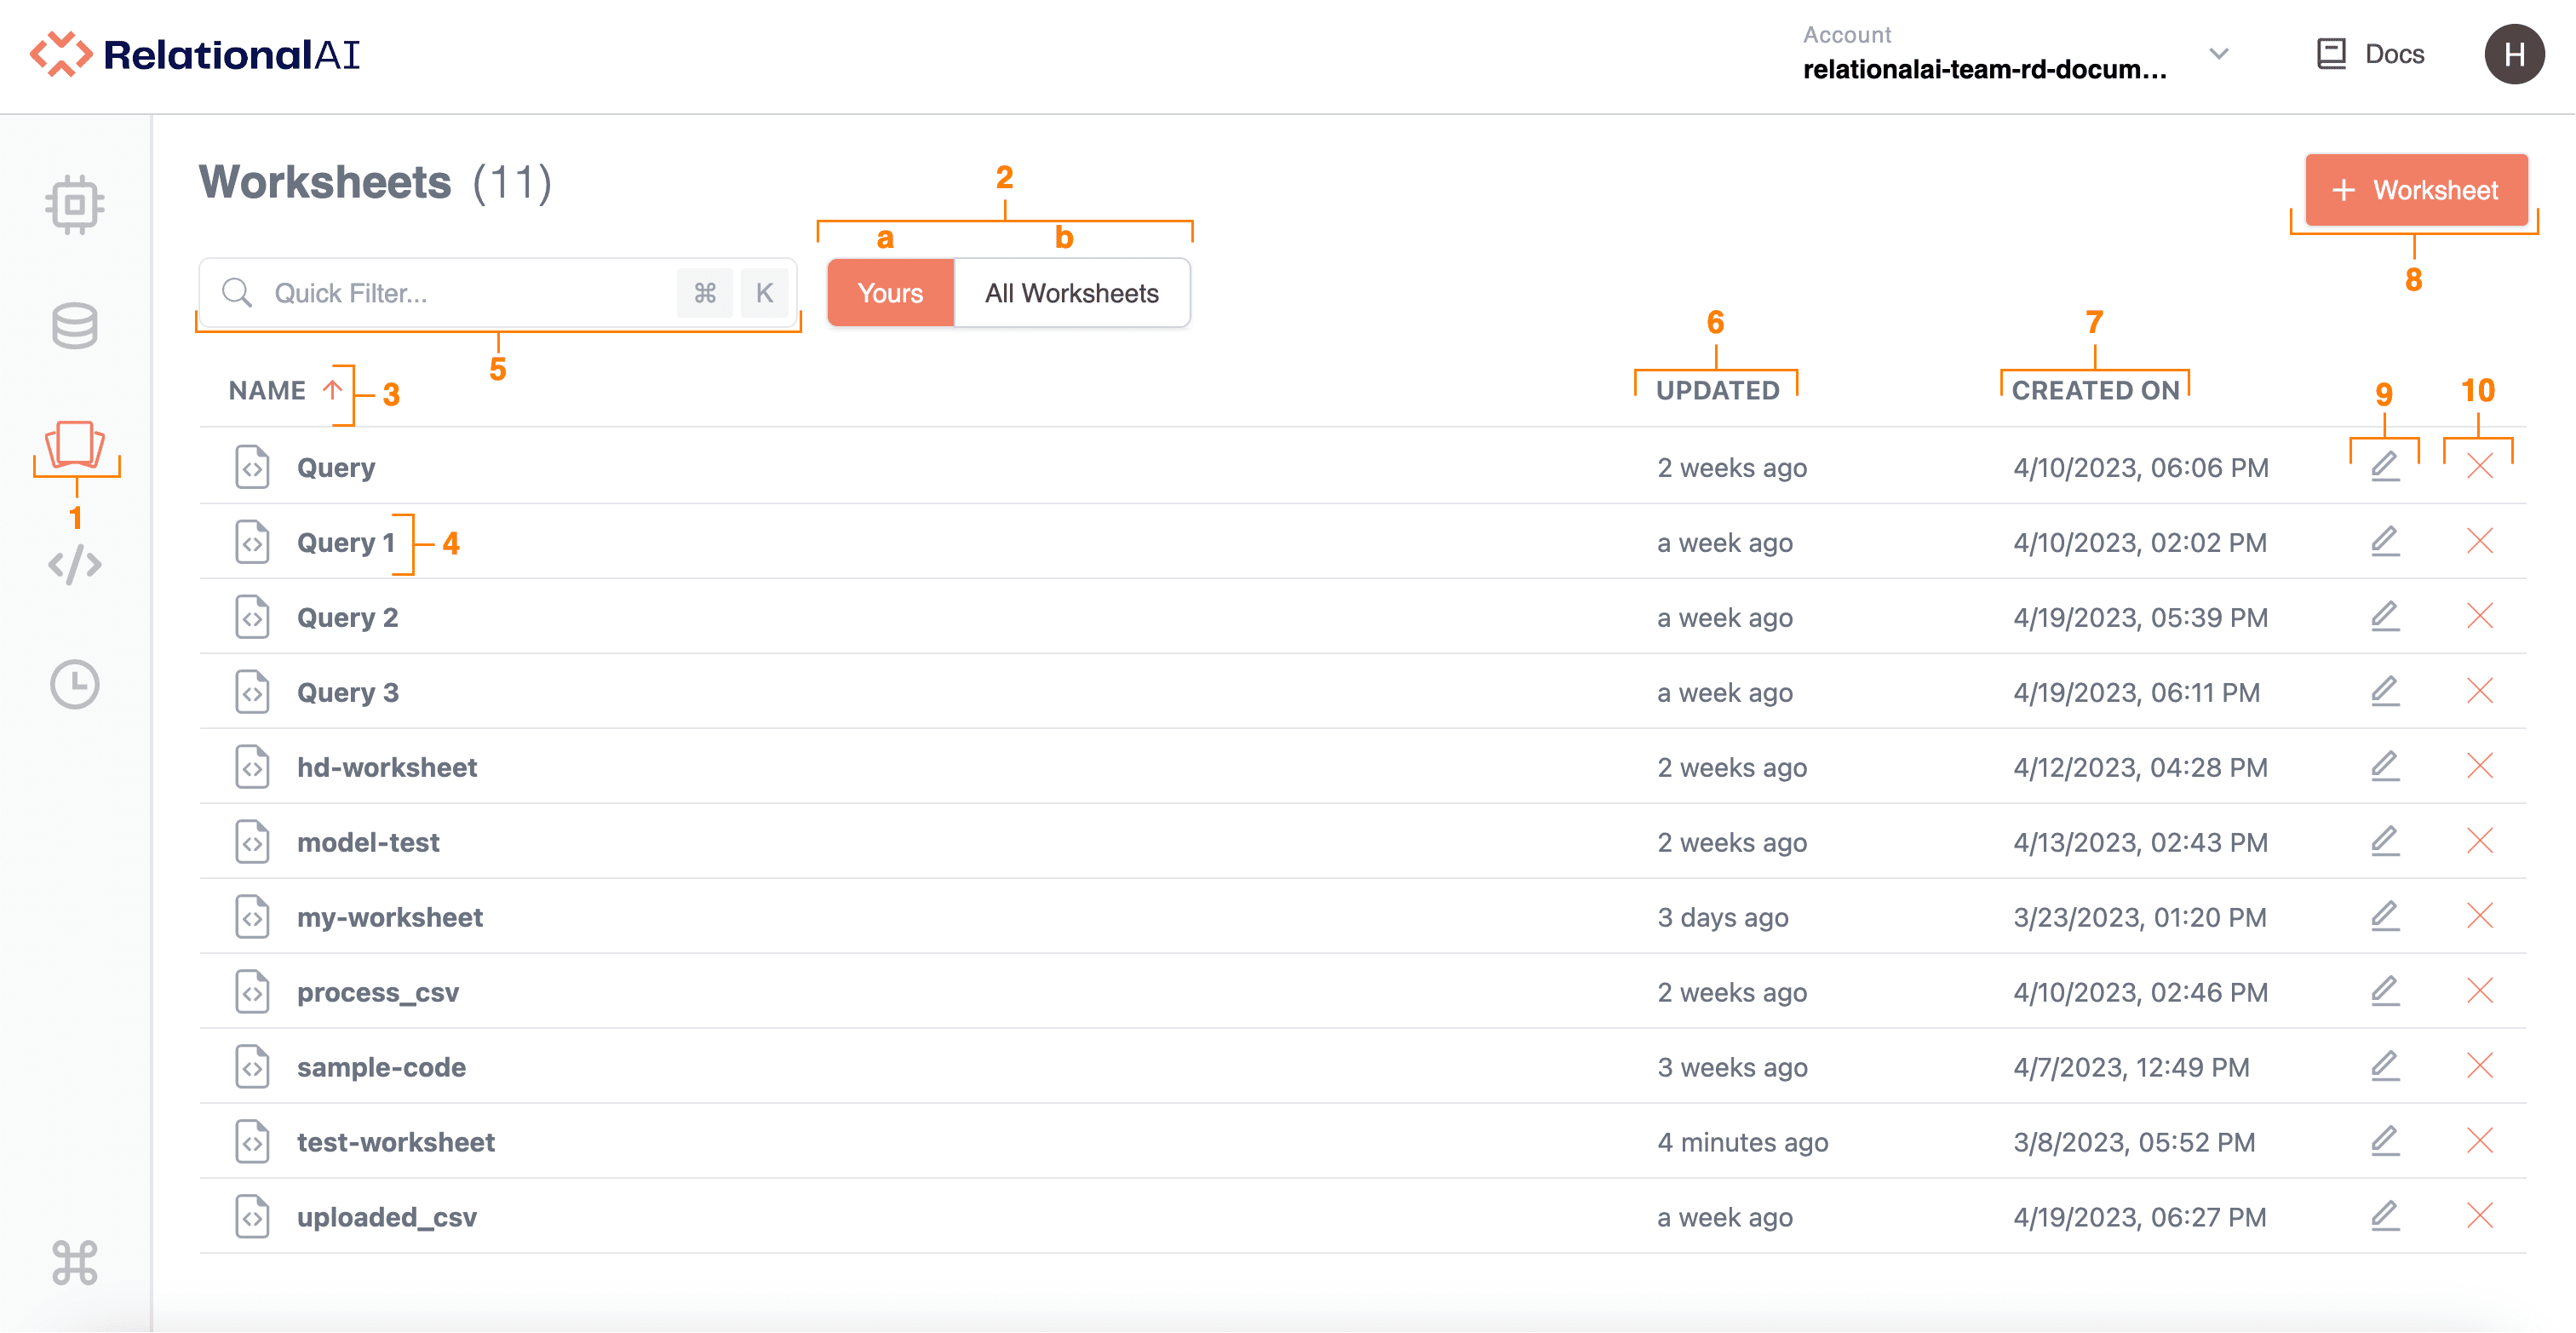
Here’s how to use and navigate the Worksheets page:
-
To access the Worksheets page, click the Worksheets icon on the left-hand side of the Console.
-
The Worksheets page lists all worksheets associated with your RelationalAI account:
a. By default, the Worksheets page displays all worksheets you’ve created under Yours.
b. To view worksheets for your entire RelationalAI account, click All Worksheets.
-
To rearrange worksheets in ascending or descending alphabetical order, click the arrow next to the Name field.
-
To open a worksheet, click its name in the list. Note that you can preview the content and details of a worksheet by holding the pointer over the name of the worksheet.
-
To search or filter worksheets, type text or values in the Quick Filter field.
-
To view when a worksheet was last updated, see the respective information under Updated On. Note that you can see the full details of when the worksheet was last updated by holding the pointer over the date. To sort worksheets by the date they were last updated, click Updated On.
-
To view the date and time a worksheet was created, see the respective information under Created On. Note that you can see the full details of when the worksheet was created by holding the pointer over the date. To sort worksheets by the date they were created, click Created On.
-
To create a worksheet, click + Worksheet in the top right-hand corner. It will automatically take you to the Editor page. You can also create worksheets from the Editor. See Adding Worksheets for more details.
-
To rename a worksheet:
- Click the Rename icon to the right of the worksheet you want to rename.
- In the window that opens, enter a new name for the worksheet.
- Click Rename. You can also rename worksheets from the Editor page. See Renaming Worksheets for more details.
-
To delete a worksheet:
- Click X at the far right of the worksheet you want to delete.
- In the Confirmation window that opens, click Delete. You can also delete worksheets from the Editor page. See Deleting Worksheets for more details.
Using the Editor in the RAI Console
The RAI Console features an Editor that you can use to create, edit, and run worksheets. To access the Editor, click the Editor icon on the left-hand side of the Console.
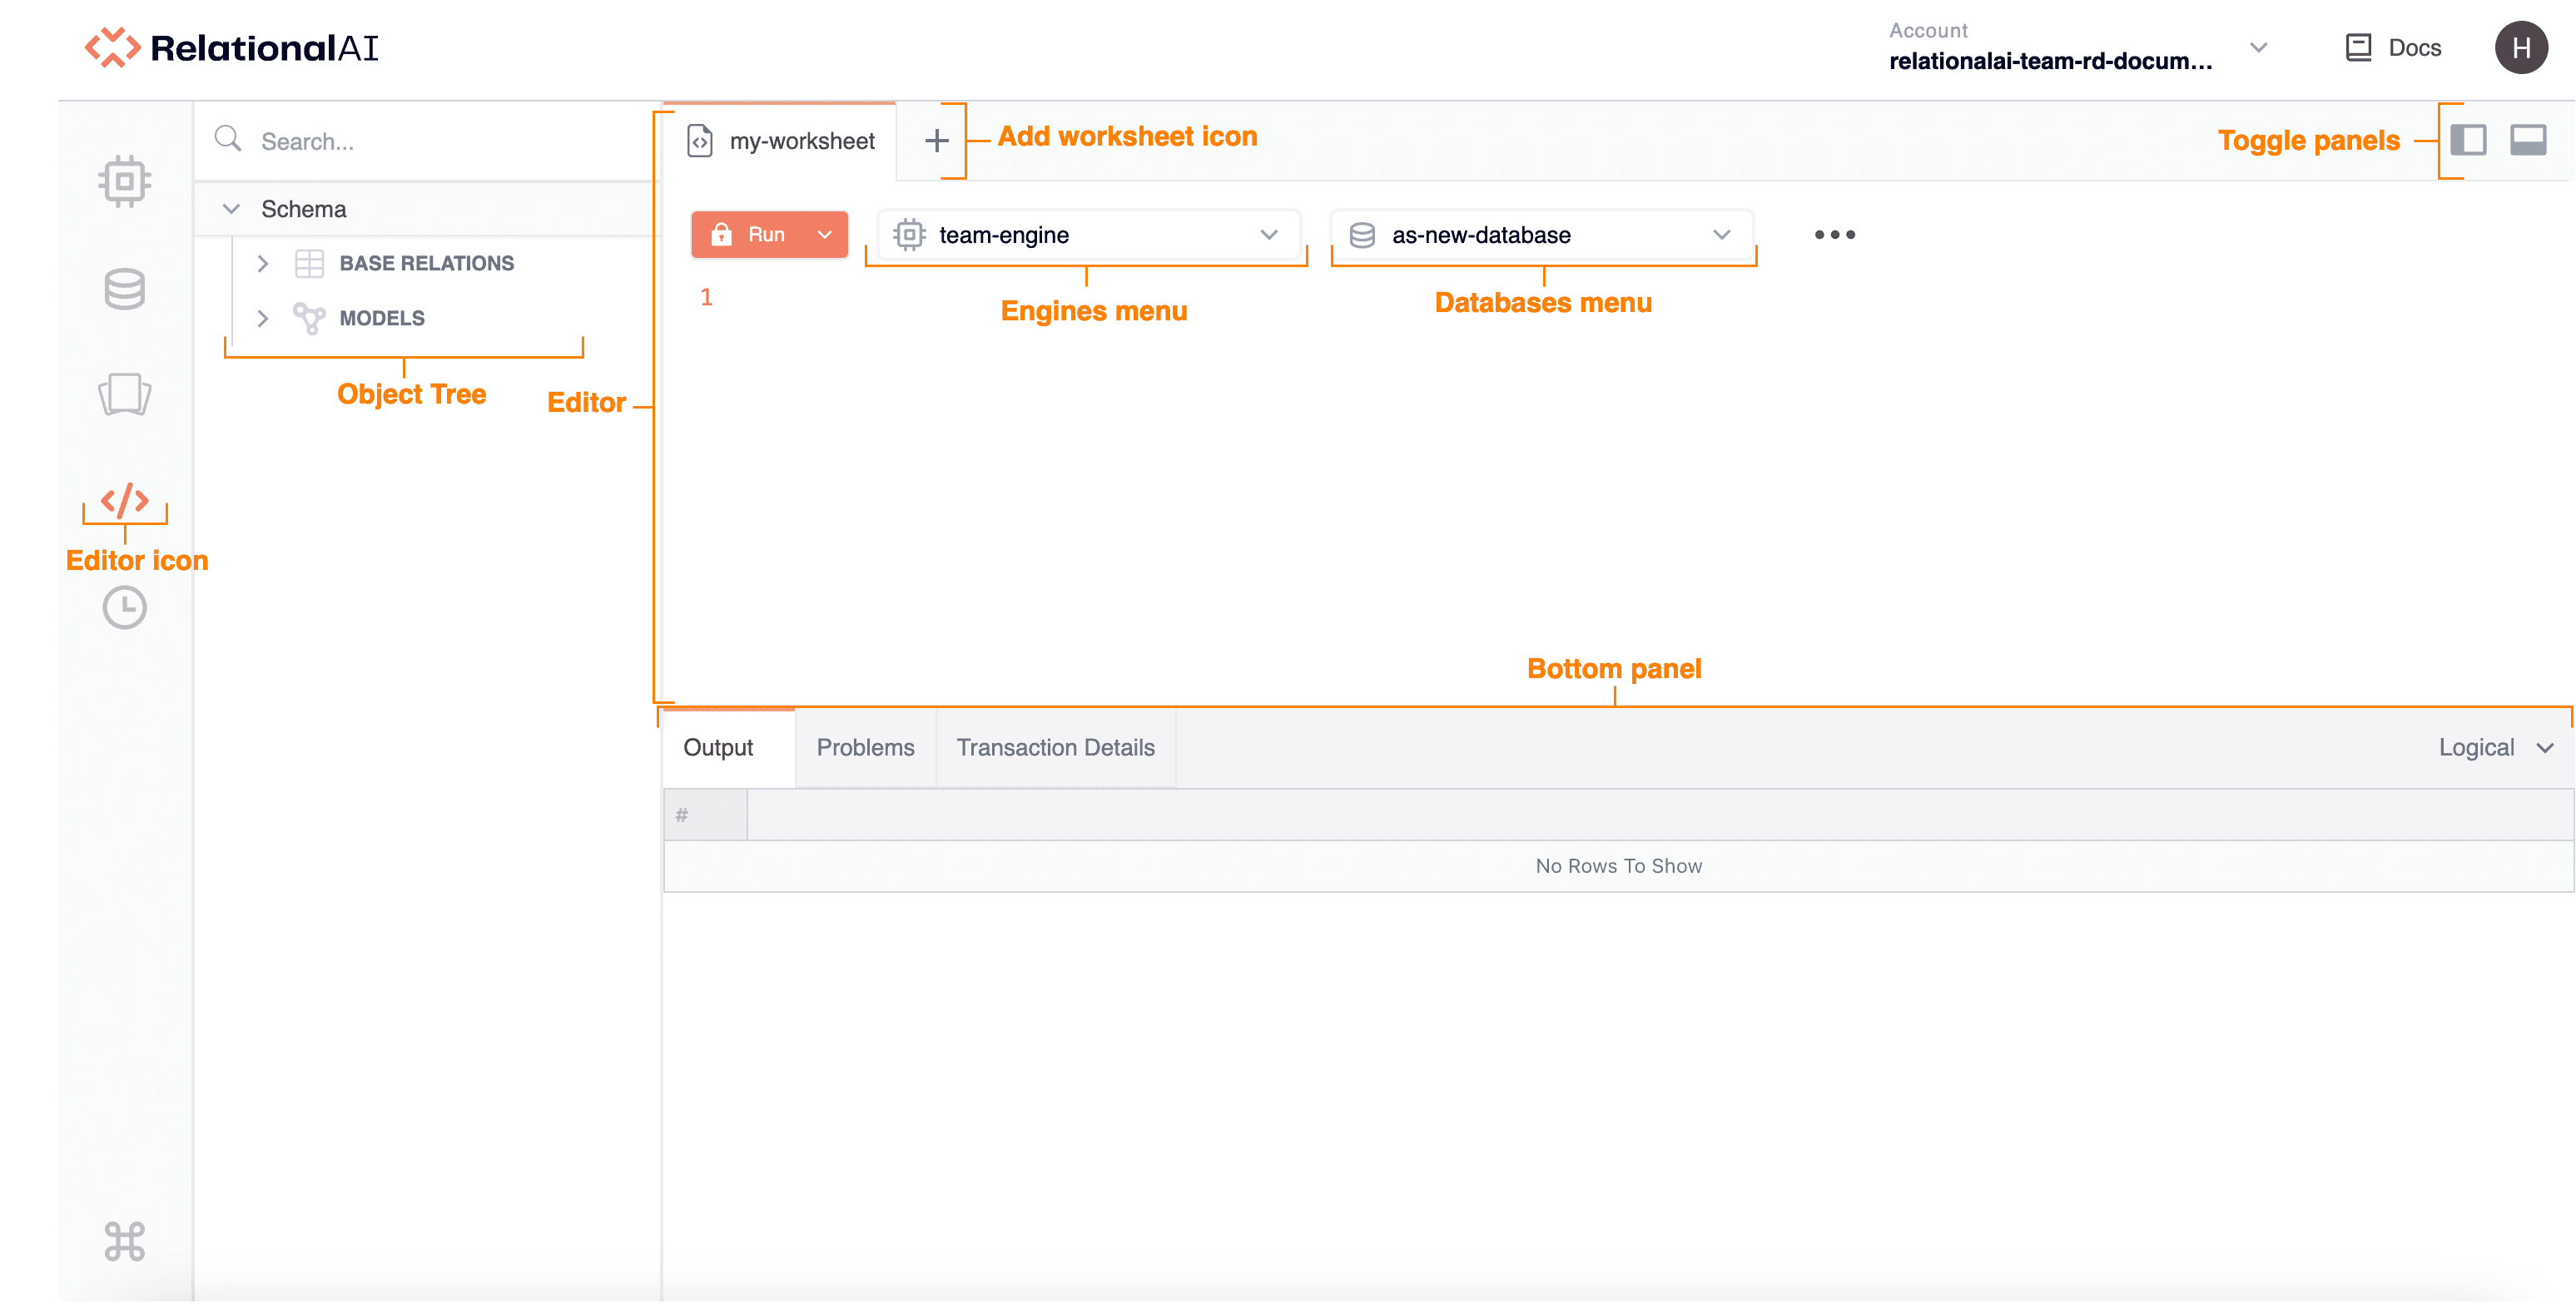
Adding Worksheets
To add a worksheet, click + in the Editor or press Alt+Shift+T (PC) or Option+Shift+T (Mac).
Note that you can’t access the list of worksheets when you have a worksheet open. You can, however, switch between tabs of open worksheets in the Editor.
To cycle through different open tabs, either:
- Click the tab you want to switch to.
OR
- Press Alt+Shift+N (PC) or Option+Shift+N (Mac).
To close an open tab:
- Click x on the tab you want to close.
OR
- Right-click the tab and choose Close.
OR
- Press Alt+Shift+W (PC) or Option+Shift+W (Mac).
Worksheets are stored separately from databases. If you create a worksheet for one database but run the worksheet on another database, the worksheet may not work.
Using Worksheets, Models, and the Viewer Simultaneously
You can run worksheets, edit and save models, and view base relations simultaneously. For more information on selecting models to use in the Editor, see Working With Models. For more information on the Viewer, see Viewing Base Relations.
To distinguish between open worksheet, model, and Viewer tabs in the Editor, check the icons displayed on the tabs as follows:
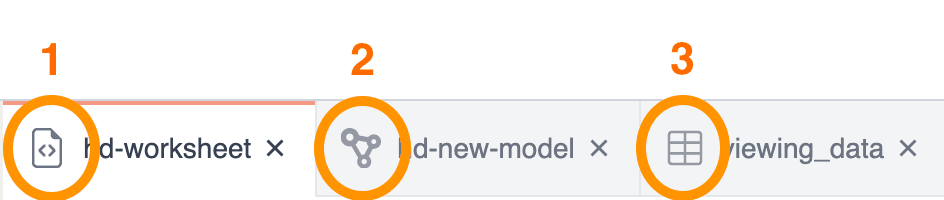
- Icon for worksheet tabs.
- Icon for model tabs.
- Icon for Viewer tabs.
To cycle through different open tabs, click the tab or press Alt+Shift+N (PC) or Option+Shift+N (Mac).
Renaming Worksheets
When you create a new worksheet, the worksheet is named Untitled <year>-<month>-<day> <two-digit-hour>:<two-digit-minute> by default.
To rename a worksheet:
-
You can:
- Double-click the worksheet’s tab.
OR
- Right-click the worksheet’s tab and choose Rename.
OR
- Click the three dots … in the Editor and choose Rename.
-
In the window that opens, enter a new name for the worksheet.
-
Click Rename.
The new name appears in the worksheet’s tab.
Selecting an Engine
To run queries in the worksheet, you need to select an engine from the Engines pop-up menu. For more information on Console engines, see Managing Engines.
Using the Engines pop-up menu, you can:
- Search for an engine by typing text into the Search field.
- Create an engine by clicking Create Engine. Then, in the window that opens give your engine a name and click Create.
- Select an existing engine.
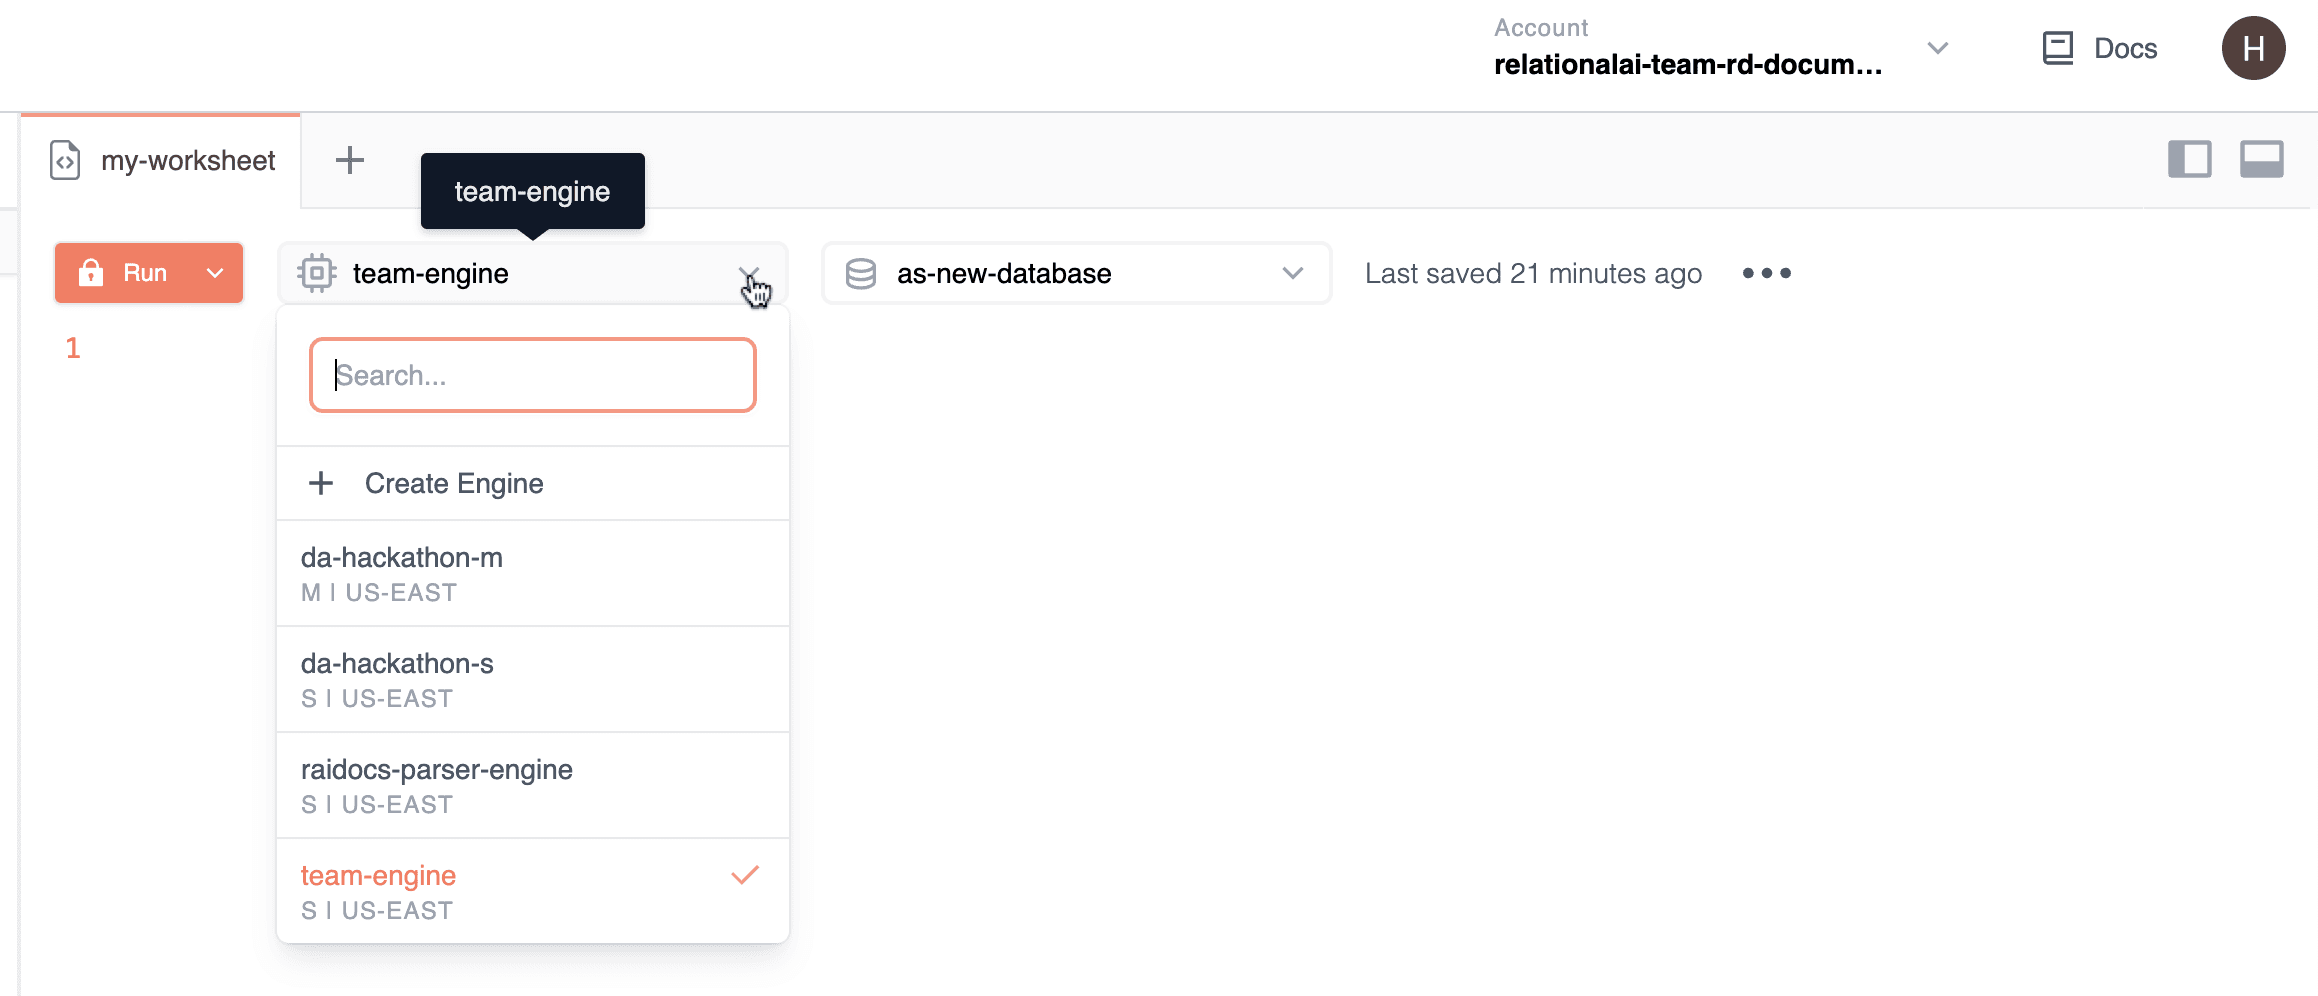
The name of the engine you select or create will then show in the menu.
Say you add a new worksheet. By default, the newly created worksheet will inherit the same engine as that of an active worksheet. You can change this preselected engine by choosing another from the Engines pop-up menu.
Selecting a Database
To run queries, you need to select a database. For more information on databases, see Managing Databases.
You can select a database from the Databases page. This will automatically take you to the Editor page, and you will see the name of your selected database in the Databases pop-up menu.
You can also select a database from the Editor page. Using the Databases pop-up menu in the Editor, you can:
- Search for a database by typing text into the Search field.
- Create a database by clicking Create Database. Then, in the window that opens, give your database a name and click Create.
- Select an existing database.
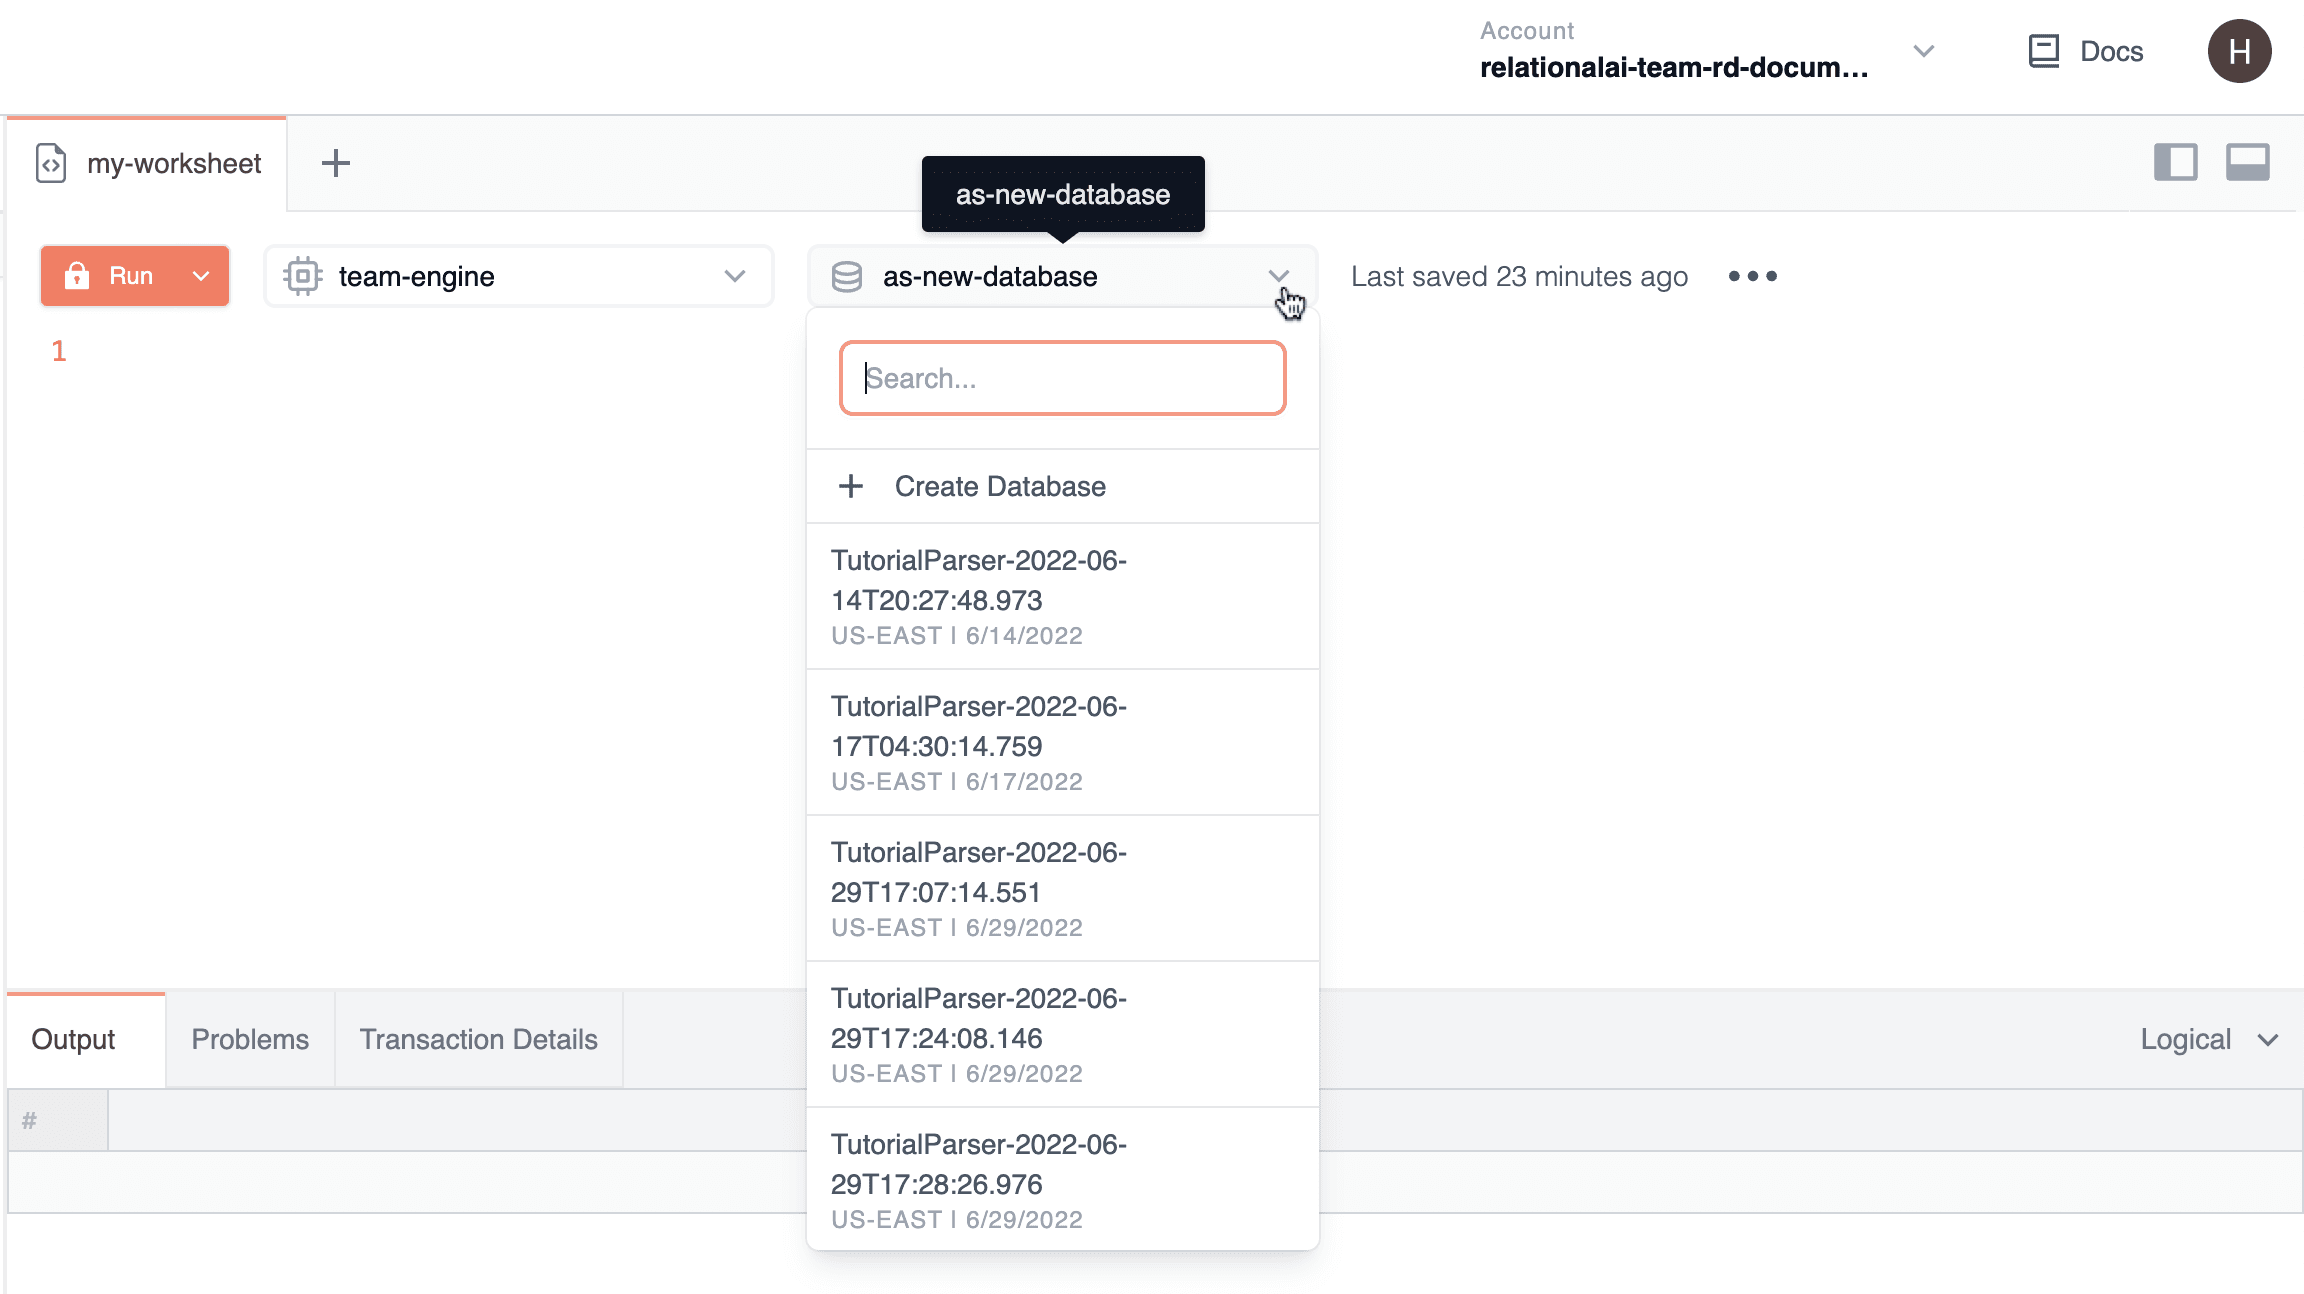
The name of the database you select or create will then show in the menu.
Note that queries will run only for the selected database. Likewise, any updates that are run are only made to the selected database.
Say you add a new worksheet. By default, the newly created worksheet will inherit the same database as that of an active worksheet. You can change this preselected database by choosing another from the Databases pop-up menu.
Showing/Hiding/Resizing the Object Tree and Bottom Panel
You can show, hide, and resize the Object Tree and Bottom panel.
To show/hide the Object Tree panel, click the Toggle left panel button in the top right corner of the Editor or press Alt+Shift+L (PC) or Option+Shift+L (Mac).
To show/hide the Bottom panel, click the Toggle bottom panel button in the top right corner of the Editor or press Alt+Shift+B (PC) or Option+Shift+B (Mac).
To resize the Object Tree panel:
- Hold your pointer over the line separating the Object Tree panel and the Editor.
- When the Resize pointer appears, drag left or drag right.
To resize the Bottom panel:
- Hold your pointer over the line separating the Editor and the Bottom panel.
- When the Resize pointer appears, drag up or drag down.
Using Worksheets in the Editor
To use a worksheet:
- Either open an existing worksheet or click + in the Editor to add a new worksheet.
- Begin typing code into the worksheet. Worksheets save automatically when you run your code.
- Click Run or press Shift+Enter.
You need to select an engine and a database in order to use worksheets. Worksheets require both storage (the database) and compute (the engine) in order to run. For more details, see Selecting an Engine and Selecting a Database.
Running Worksheets in Read Only Mode
To run queries in the Editor, click Run or press Shift+Enter. The Run button is set to Read Only mode by default. In Read Only mode, worksheets only query data; they do not make changes to the database. See Working With Base Relation Data for more details on how to change the query mode.
Results appear in the lower panel.
Note that the Output panel displays the amount of time the worksheet has been running in the upper right-hand corner.
For example, say the data in a model read as follows:
// model

module store
    def office = {
      "Los Angeles";
      "Chicago"}
    def product = {
      (1, "Laptops");
      (2, "Desktops");
      (3, "Phones")
    }
end
Running a worksheet that reads def output = store:product produces the following result:
// read query

def output = store:product
You can run worksheets repeatedly to view updated results.
Say, in the example above, you modify the definition of store:product to add (4, "Keyboards"):
// model

module store
    def office = {
      "Los Angeles";
      "Chicago"}
    def product = {
      (1, "Laptops");
      (2, "Desktops");
      (3, "Phones");
      (4, "Keyboards")
    }
end
When you run the worksheet again, the results will update as follows:
// read query

def output = store:productThe query size is limited to 64MB. An HTTPError exception will be thrown if the request exceeds this limit.
Note: Creating and editing models entails different steps to creating and editing worksheets. To create and edit models, you need to add or select a model from the Object Tree. For more details, see Working With Models.
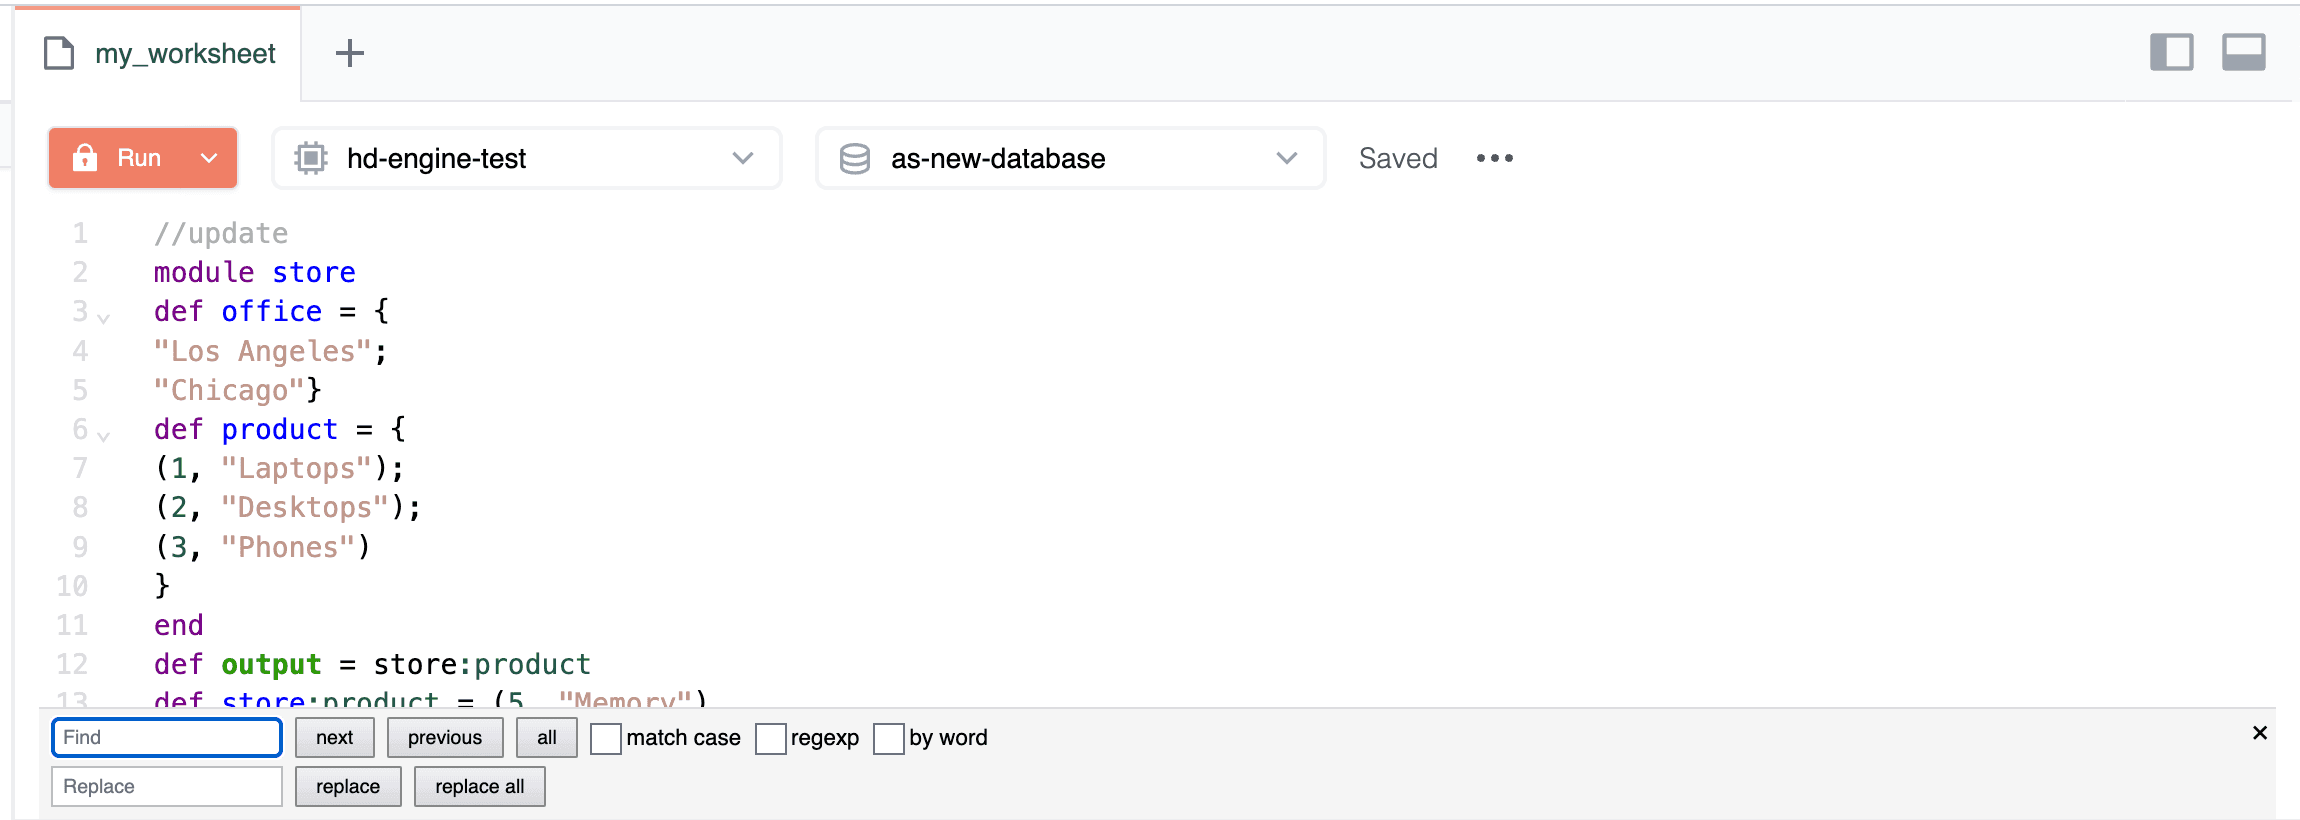
Including Definitions
You can also include definitions in a worksheet in order to simulate the results of making changes to data.
For example, to simulate adding a row to the store:product definition that you installed above, enter the following code into the Editor:
// read query

def store:product = (5, "Memory")
def output = store:product
When you run the worksheet, the results will read:
Note that (5, "Memory") is included in the output even though the installed data do not include this entry.
Partial Querying
You can perform partial querying in the Editor by selecting which data you want to query in a worksheet.
For example, say you enter code along the following lines:
// read query

def output:a = 1
def output:b = 2
def output:c = 3
def output:d = 4
When you run this query, you get the following result:
You can choose which data you want to see in the output by selecting the desired code in the Editor with your pointer. When you run the query again, you get the output of the selected data only:

Canceling a Running Worksheet
While a worksheet is running, you can cancel the worksheet.
To cancel a worksheet, click Cancel in the upper left corner of the Editor. The Cancel button appears in place of the Run button only for the duration in which the query is running.
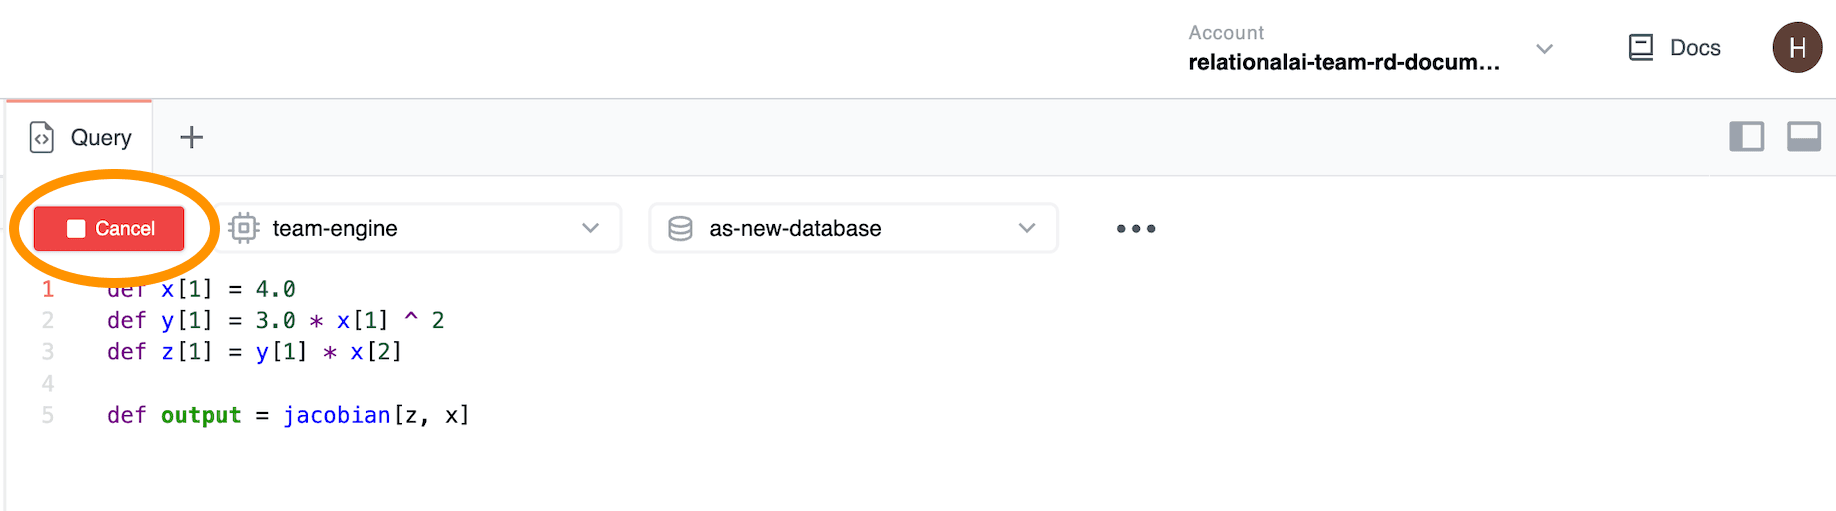
When you cancel a transaction, a request to stop the transaction is sent to the system. In many cases, the transaction will stop within a few seconds. Keep in mind, however, that some transactions may take several minutes to be canceled.
Sharing Worksheets
Each worksheet has a unique URL. To share a worksheet, you can copy a worksheet’s URL and send it to another user.
Note: The user will need to have access to the RAI Console in order to view the worksheet.
When you share a worksheet, the other user will be able to make changes to your data. To run the worksheet, the user will need to select an engine and a database from their respective pop-up menus.
Changes made to a worksheet by different users are saved for all users.
Deleting Worksheets
To delete your worksheet:
- Click the three dots … in the Editor and choose Delete.
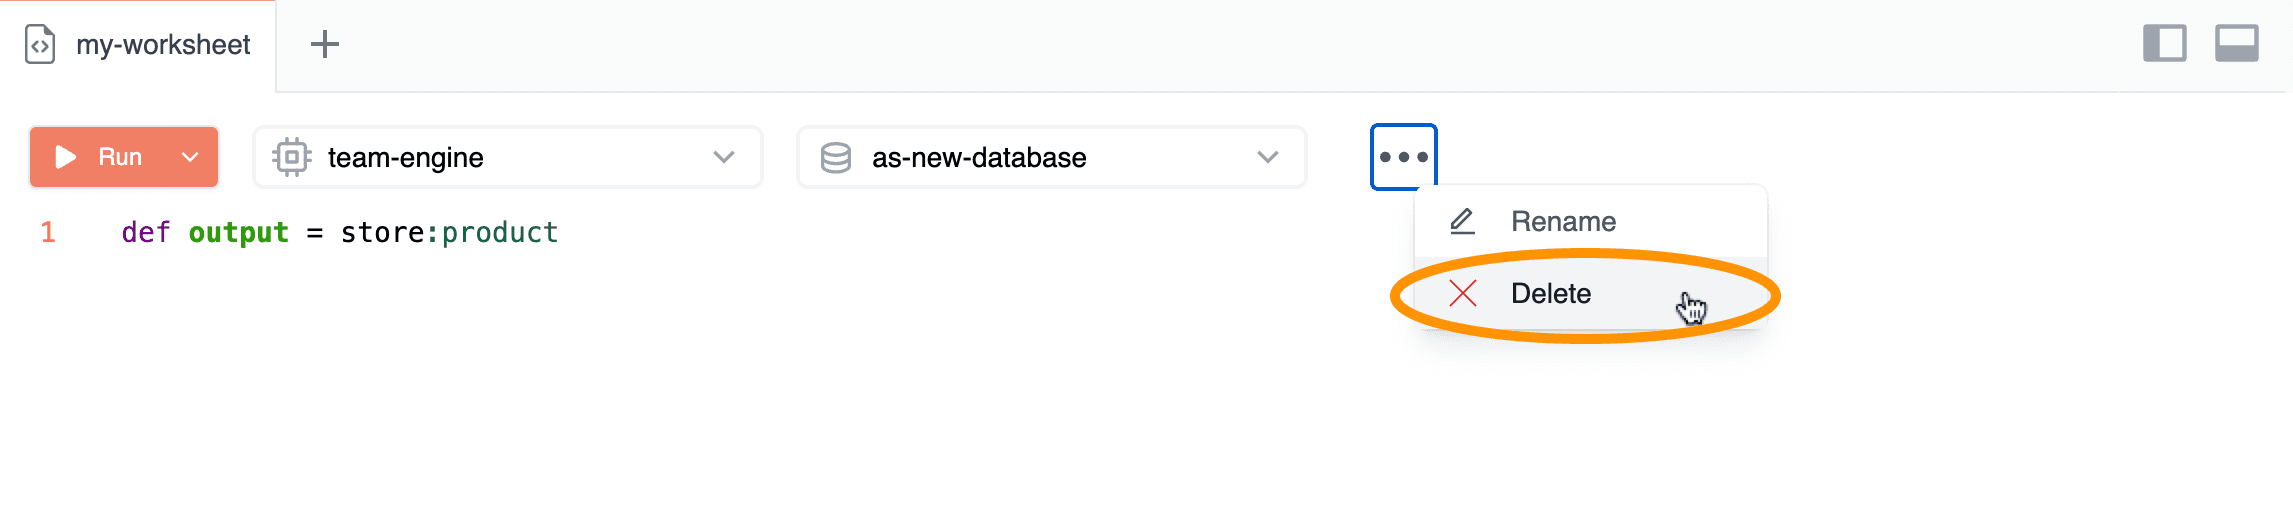
- In the Confirmation window that opens, click Delete.
Editor Tips and Tricks
The Editor has features that facilitate using and editing worksheets. This section introduces and explains how to use them.
Using Autocomplete
The Autocomplete feature fills in the rest of a term when you begin typing. Autocomplete includes all Library relations as well as special Unicode characters, such as mathematical operation symbols, relation operation symbols, and Greek letters.
To use Autocomplete:
- Begin typing, for example
parse. - Press Control+Space (PC) or Command+Esc (Mac). A pull-down menu opens with Autocomplete suggestions.
- Select the desired text by either clicking it with the pointer or selecting it using the down/up arrows and pressing Enter or Tab.
For example, if you type parse and press Control+Space, Autocomplete offers a list of options: parse_date, parse_datetime, parse_decimal, and so on.
To choose parse_datetime, for example, select parse_datetime from the pull-down menu.
To add special Unicode characters:
- Type
\and press Control+Space (PC) or Command+Esc (Mac). - Select the desired character from the pull-down menu.
For example, to add subset of (⊂):
- Type
\. - Press Control+Space (PC) or Command+Esc (Mac).
- Select
\subsetfrom the pull-down menu.
To close Autocomplete, press Esc or click outside the Autocomplete menu.
Commenting Out Worksheet Segments
To comment out part of a worksheet, you can add // to the beginning of a line.
You can also comment out a section of a worksheet by adding /* to the beginning of a section and */ to the end of the section.
For a quick way to comment out a section of code, select some portion of the worksheet with your pointer. Then press Control+/ to comment out the entire selection.
Using Find and Replace
The Find and Replace feature lets you search the current worksheet for a string, and then replace that string.
To use Find and Replace:
- Press Control+F (PC) or Command+F (Mac). A panel opens at the bottom of the Editor:
- Enter a string in the top box and press Enter (PC) or Return (Mac). Search results are highlighted in the Editor.
- Enter a replacement string in the bottom box and click replace or replace all.
Note that if you select text in the Editor and then press Control+F (PC) or Command+F (Mac), the Find field will automatically be populated with the selected text.
Available options are:
| Option | Description |
|---|---|
| match case | Respects case sensitivity. For example, if you enter “Student” into the Find field and select match case, the Console will find “Student” but not “student.” |
| regexp | Uses regular expressions in both Find and Replace fields. |
| by word | Finds only whole words (that is, words enclosed in whitespaces). For example, if you enter “story” into the Find field and select by word, the Console will find “story” but not “history.” |
Navigating Search Results
To select the next search result, click next or press F3 or Control+G (PC) or Command+G (Mac). To select the previous search result, click previous. You can also select all results by clicking all.
Using Regular Expressions
You can use regular expressions in search.
For example, if you want to search for only numerals, type the following into the Find field: [0-9].
Regular expressions make use of special characters: .[{()\^$|?*+.
To search for these characters, you need to escape them with a backslash \.
For example, if you want to find ., type \. into the Find field.
You can also capture and replace groups.
In the Find field, enter parentheses () to indicate a capturing group, such as (.*?).
In the Replace field, you can reference groups with numbers preceded by $, such as $1.
Closing Find and Replace
To close Find and Replace, either click x at the far right of the panel or press Esc.
Using the Bottom Panel
The Bottom panel of the Editor features three tabs:
- The Output tab shows the results of a query.
- The Problems tab shows any errors in the query. Errors are highlighted in the worksheet itself.
- The Transaction Details tab shows information about your query.
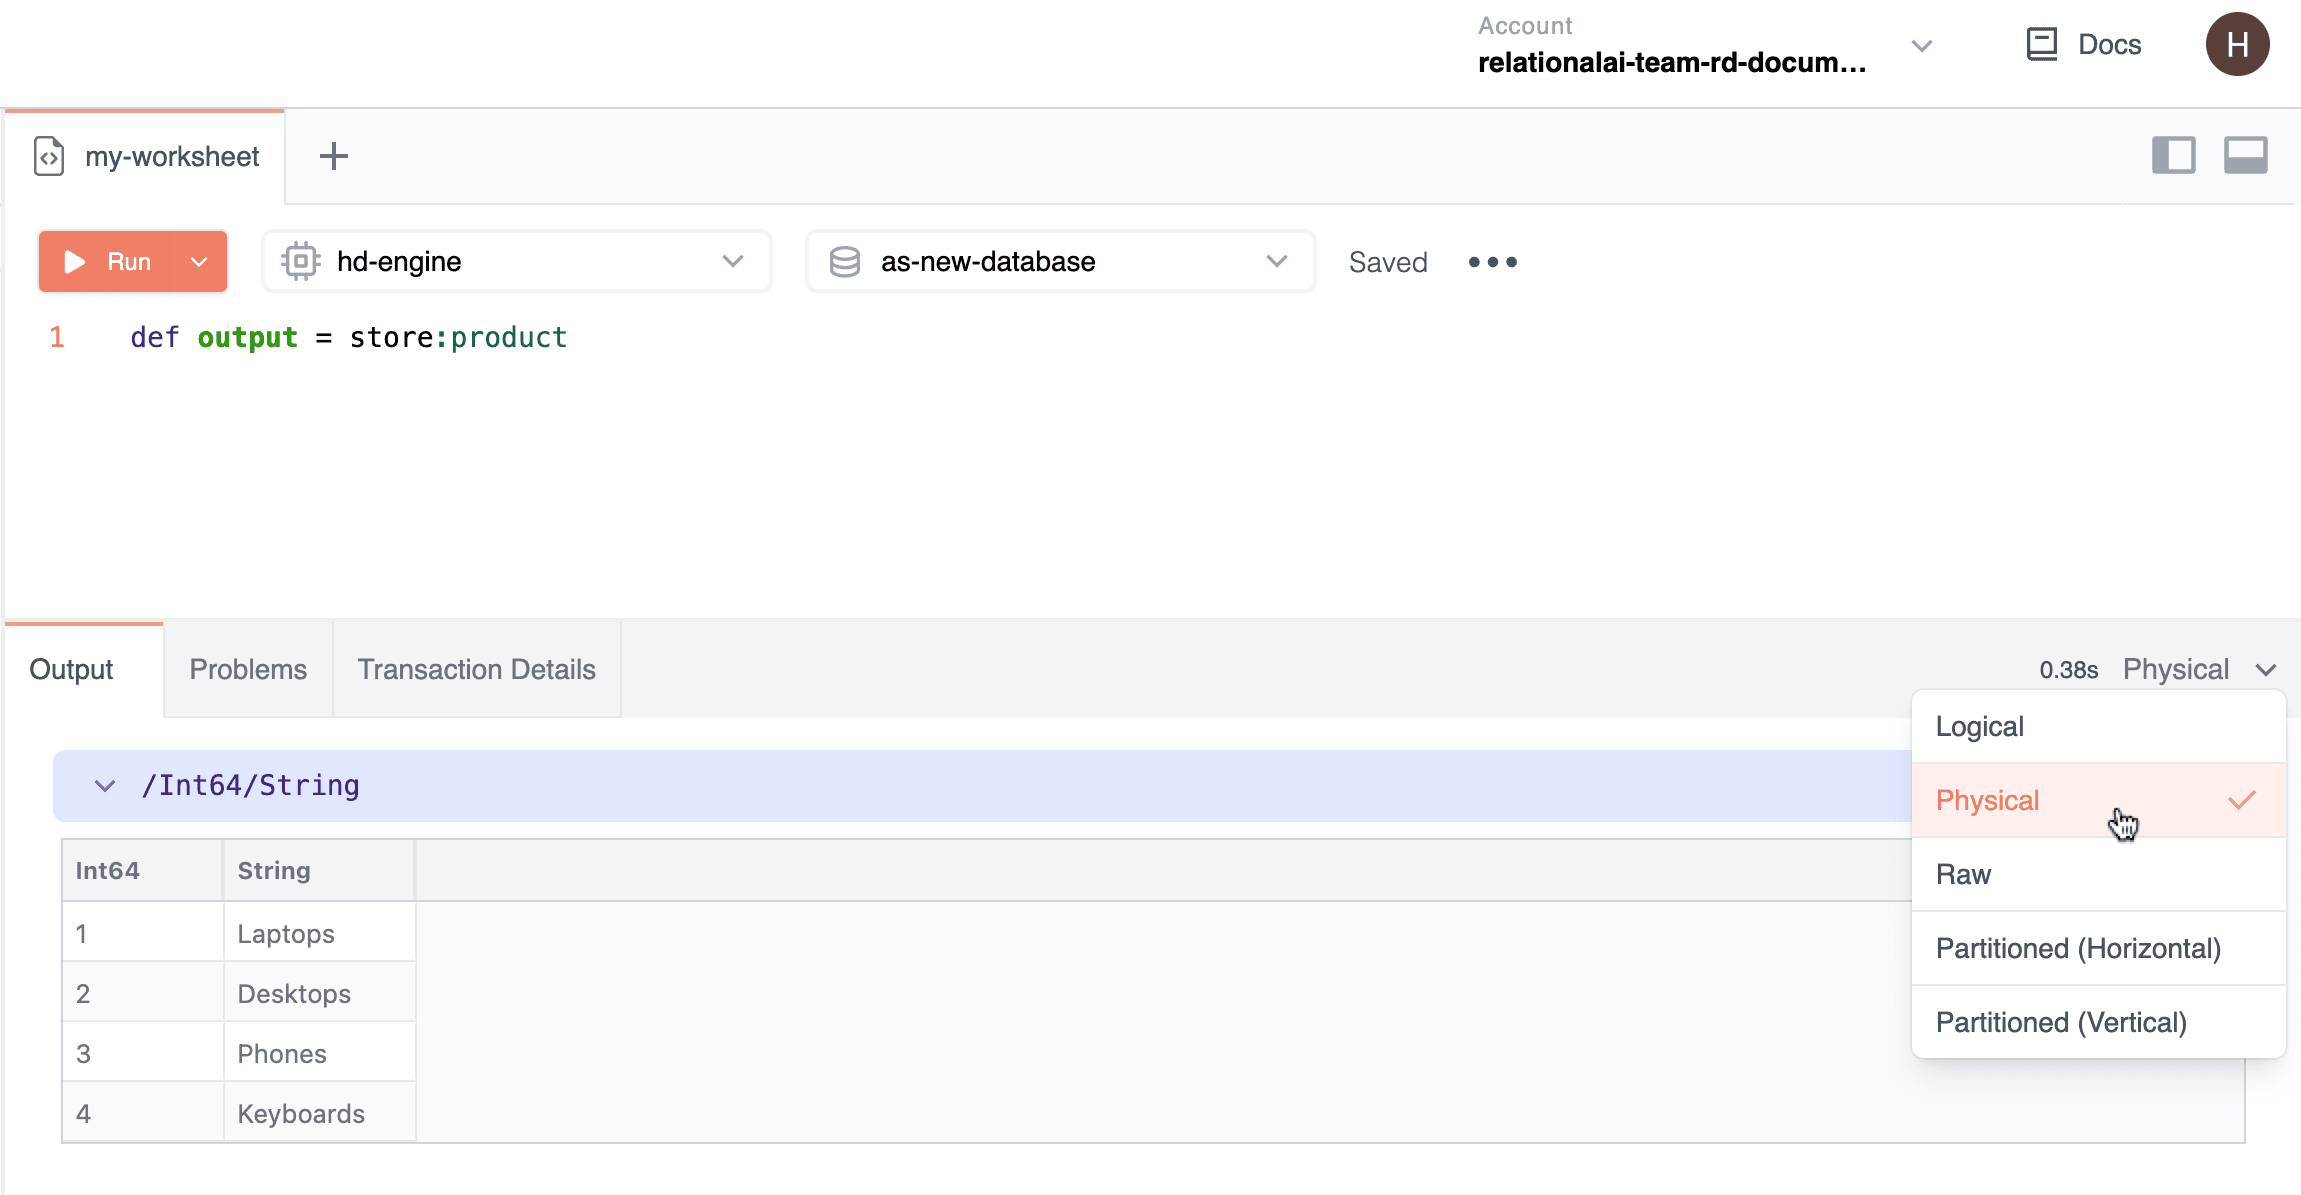
Using the Output Tab
The Output tab shows the results of a query in one of the following modes:
| Mode | Description |
|---|---|
| Logical | Shows results as they appear in Rel. |
| Physical | Shows results as they are stored in the database in table form. |
| Raw | Shows results as they appear on the wire. |
| Partitioned (Horizontal) | Separates results and displays output headers horizontally at the top of the Output window. Click the output header to see its respective results. |
| Partitioned (Vertical) | Separates results and displays output headers vertically at the right-hand side of the Output window. Click the output header to see its respective results. |
To change the view mode of a worksheet’s output:
- Click the down arrow at the far right of the Output window.
- Choose a mode for the output.
With the Bottom panel visible, you can activate the Output tab by pressing Alt+Shift+O (PC) or Option+Shift+O (Mac).
With the Output tab active, you can cycle through view modes by pressing Alt+Shift+V (PC) or Option+Shift+V (Mac).
You can also rearrange columns, rearrange elements in a column, resize columns, and show/hide columns.
Rearranging Columns
To rearrange how the Output window displays columns:
- Hold the pointer over a column header and click the three horizontal lines that appear. A pull-down menu opens.
- Click Pin Column.
- Choose where you want to pin the column.
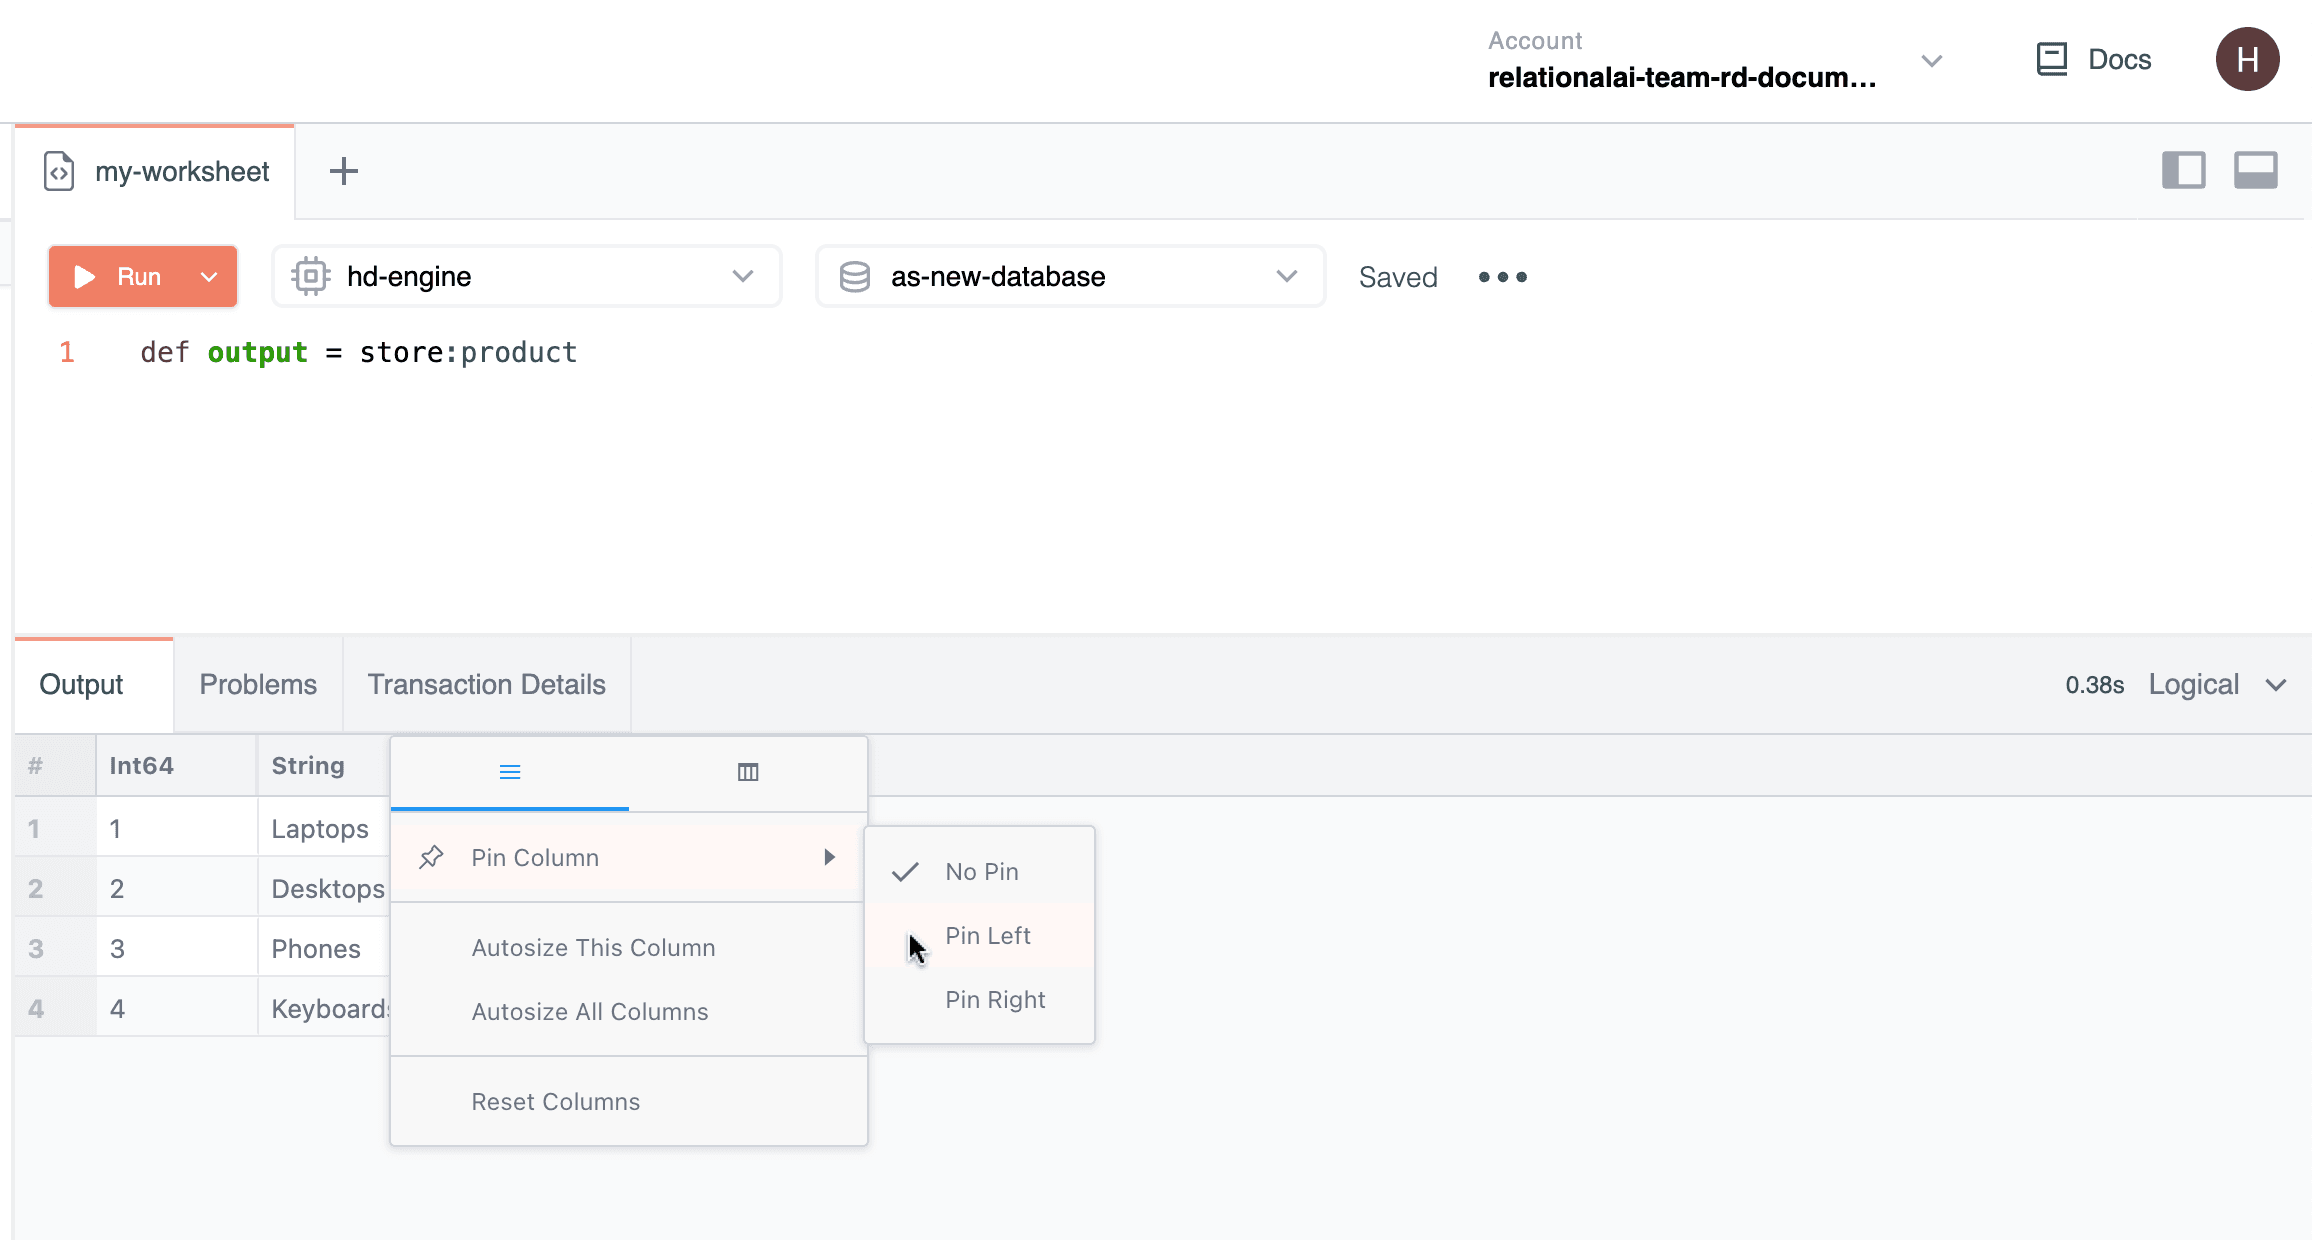
You have three options to pin columns:
| Option | Description |
|---|---|
| No Pin | Fixes column in place originally set in the output table. |
| Pin Left | Moves column to the far left of the output table. |
| Pin Right | Moves column to the far right of the Output window. |
Rearranging Elements in a Column
To rearrange elements in a column:
- Click the column header. An upward arrow appears.
- For columns of type
Int64, click the upward arrow to rearrange elements in ascending order. To sort elements in descending order, click the downward arrow that appears.

Note: Clicking the upward and downward arrows for columns of different types, for example, type String, rearranges the elements in a random order.
Resizing Columns
You can resize columns in two ways: manually and automatically.
To resize a column manually:
- Hold the pointer over the line separating the names of the columns.
- When you see the Resize pointer, drag left or drag right.
To resize a column automatically:
- Hold the pointer over the header of the column you want to resize.
- Click the three horizontal lines that appear. A pull-down menu opens.
- Click Autosize This Column to automatically resize the column.
To resize all columns automatically, either:
- Follow the first two steps above and click Autosize All Columns.
OR
- Right-click anywhere in the Output window. In the pull-down menu that opens, choose Autosize All Columns.
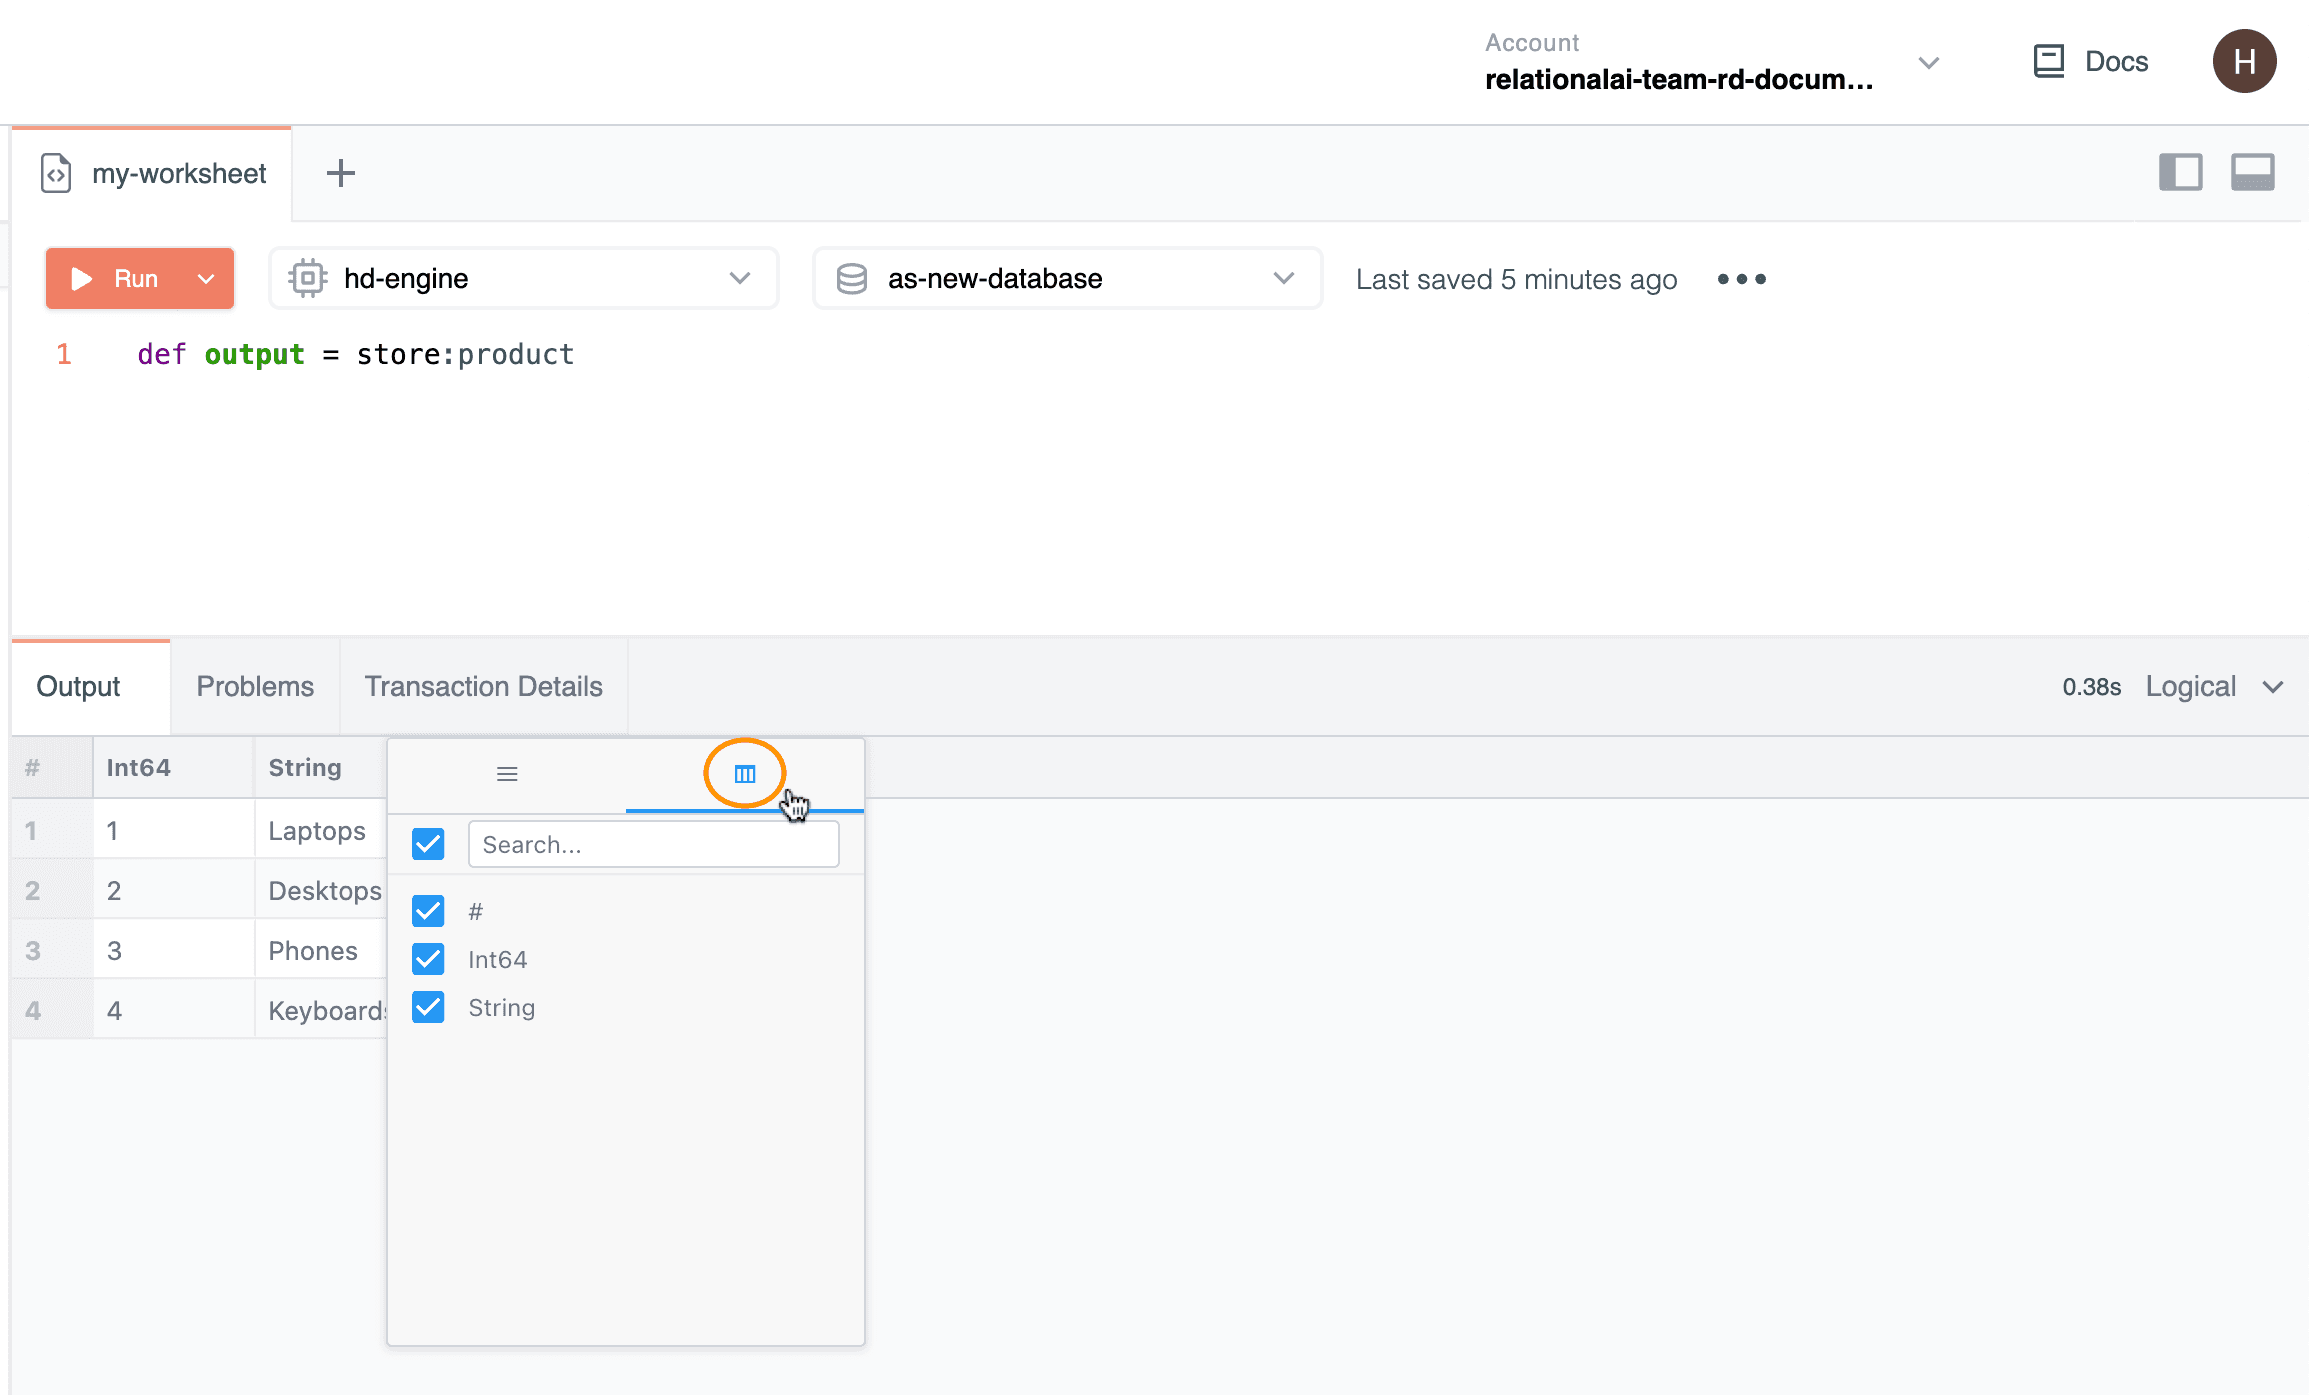
Showing/Hiding Columns
You can choose which columns you want to show/hide in the Output window:
-
Hold the pointer over any column header and click the three horizontal lines that appear. A pull-down menu opens.
-
Click the three vertical lines at the right-hand side of this pull-down menu.
-
Either:
- Type the name of the column header in the Search field.
OR
- Under the Search field, choose which columns you want to show/hide from the given list.
-
To show the column in the output, keep the box checked. To hide the column, uncheck the box.
Note: Unchecking the Search field hides all columns.
To discard all changes you made in the Output window (rearringing columns, rearranging elements in a column, resizing columns, and showing/hiding columns):
- Hold the pointer over any column header and click the three horizontal lines that appear.
- In the pull-down menu that opens, click Reset Columns.
Exporting Results
The Editor allows you to export results shown in the Output window.
Results can be exported to your machine in two formats:
| Format | Description |
|---|---|
| CSV Export | Exports results as a CSV file (.csv). |
| Excel Export | Exports results as an Excel file (.xlsx). |
To export results:
- Right-click anywhere in the Output window.
- In the pull-down menu that opens, click Export. The two suggested formats appear: CSV Export and Excel Export.
- Click the desired export format.
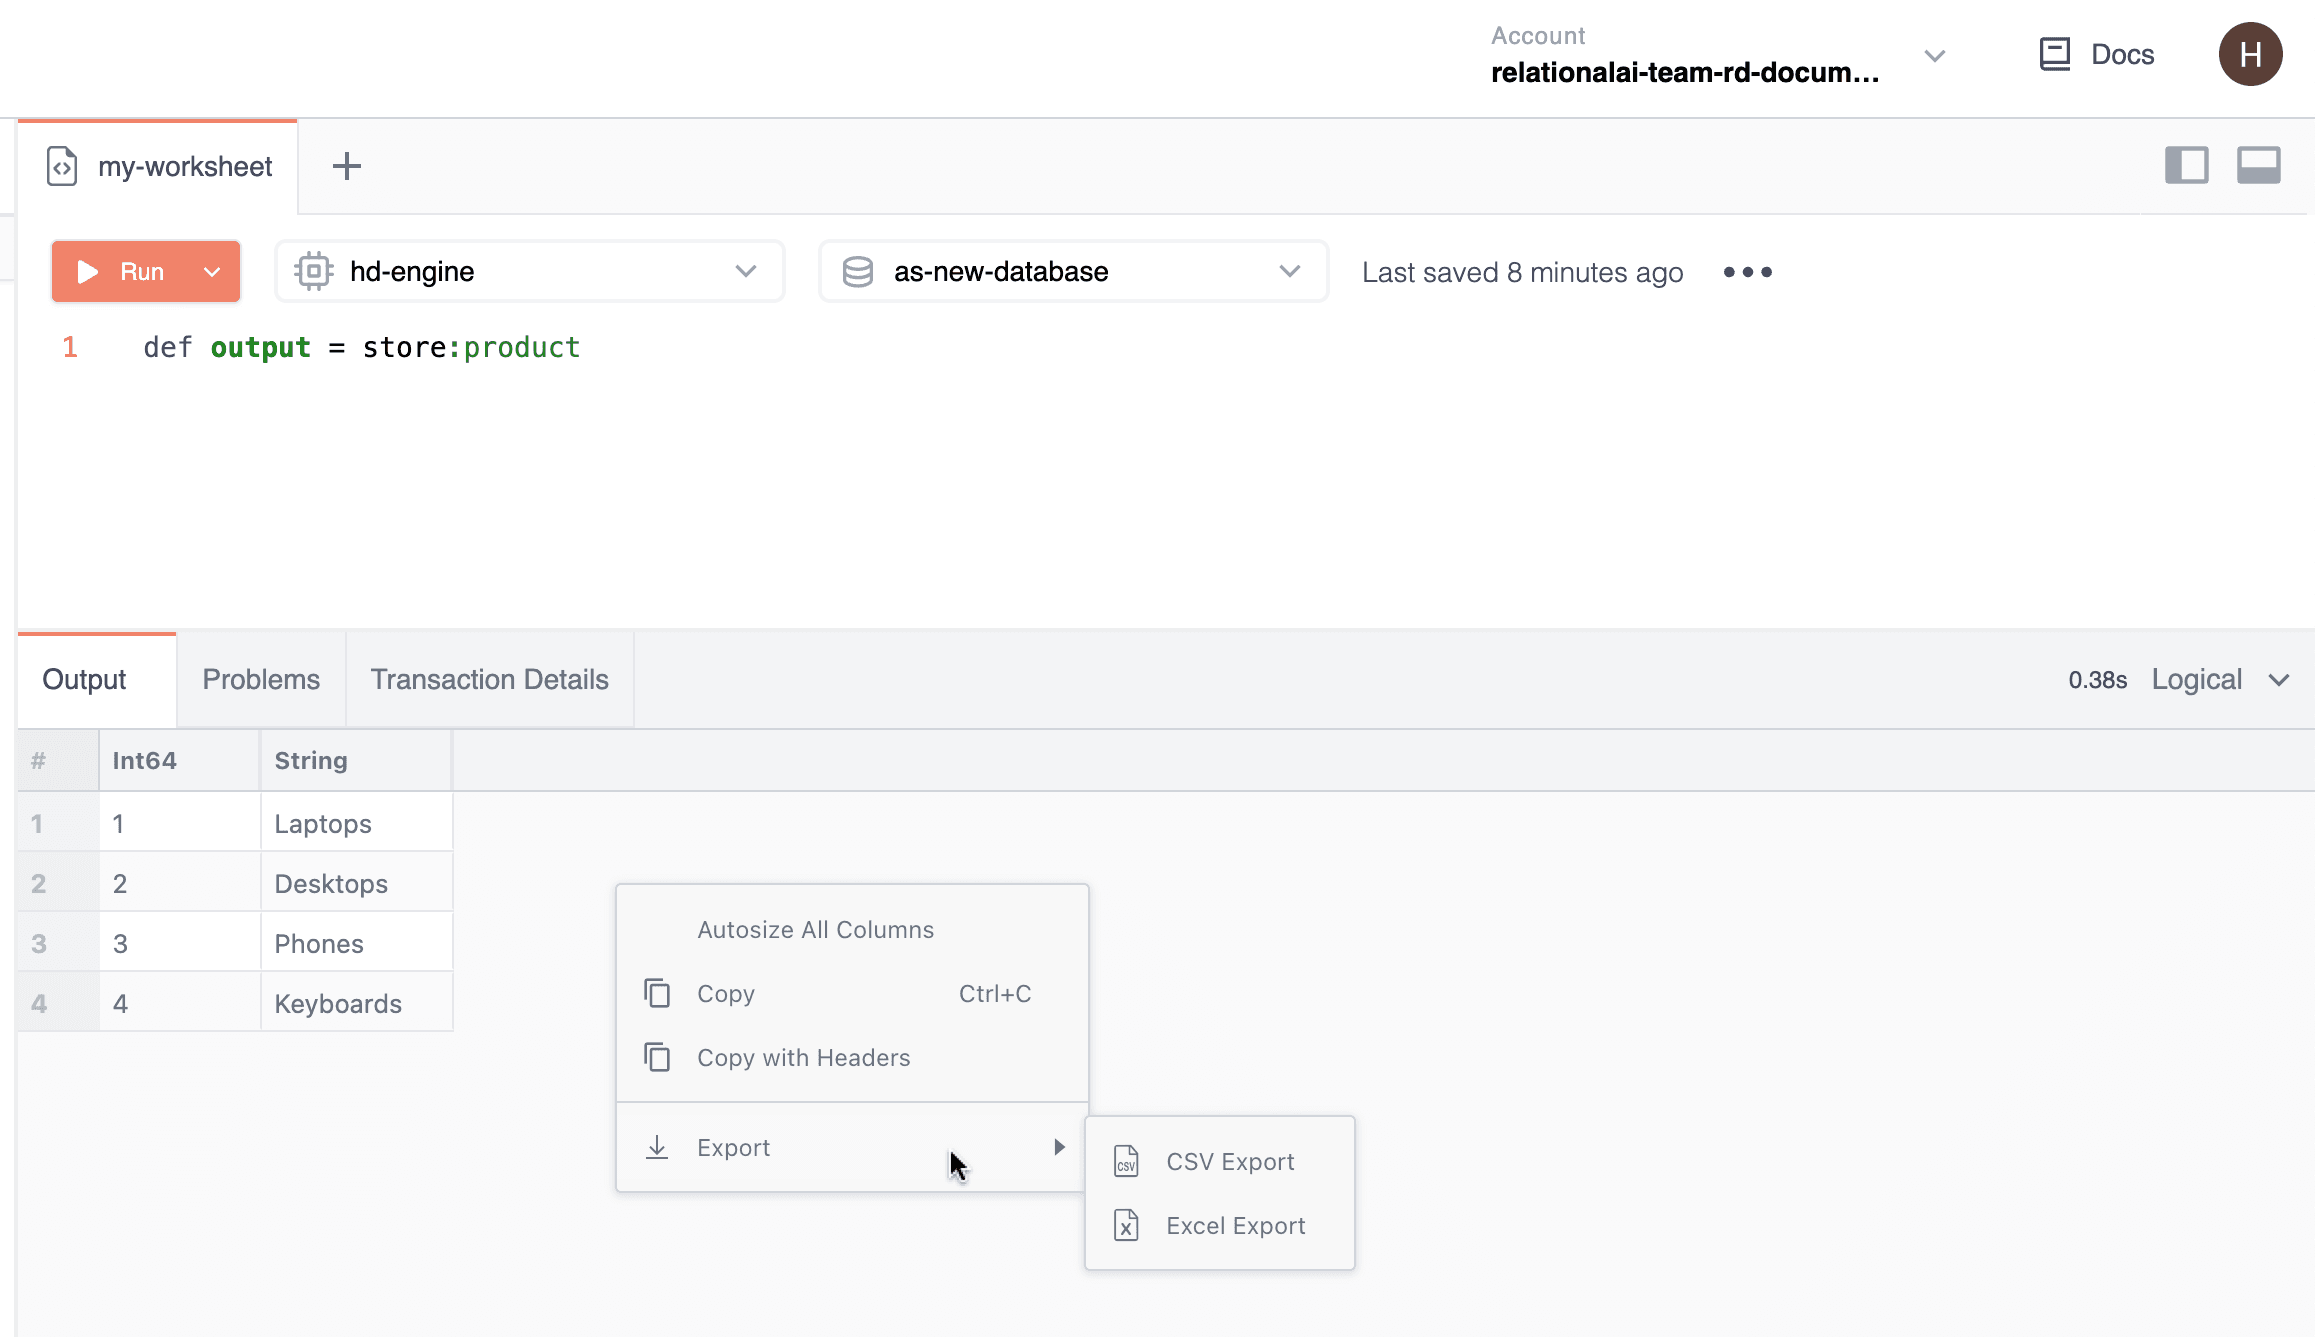
The output file saves in your Downloads folder with the default name export.csv or export.xlsx.
Copying Results
You can copy output results to use elsewhere.
To do so:
- Select the cell or cells you want to copy and right-click.
- In the pull-down menu that opens, choose Copy (press Command+C) or Copy with Headers.
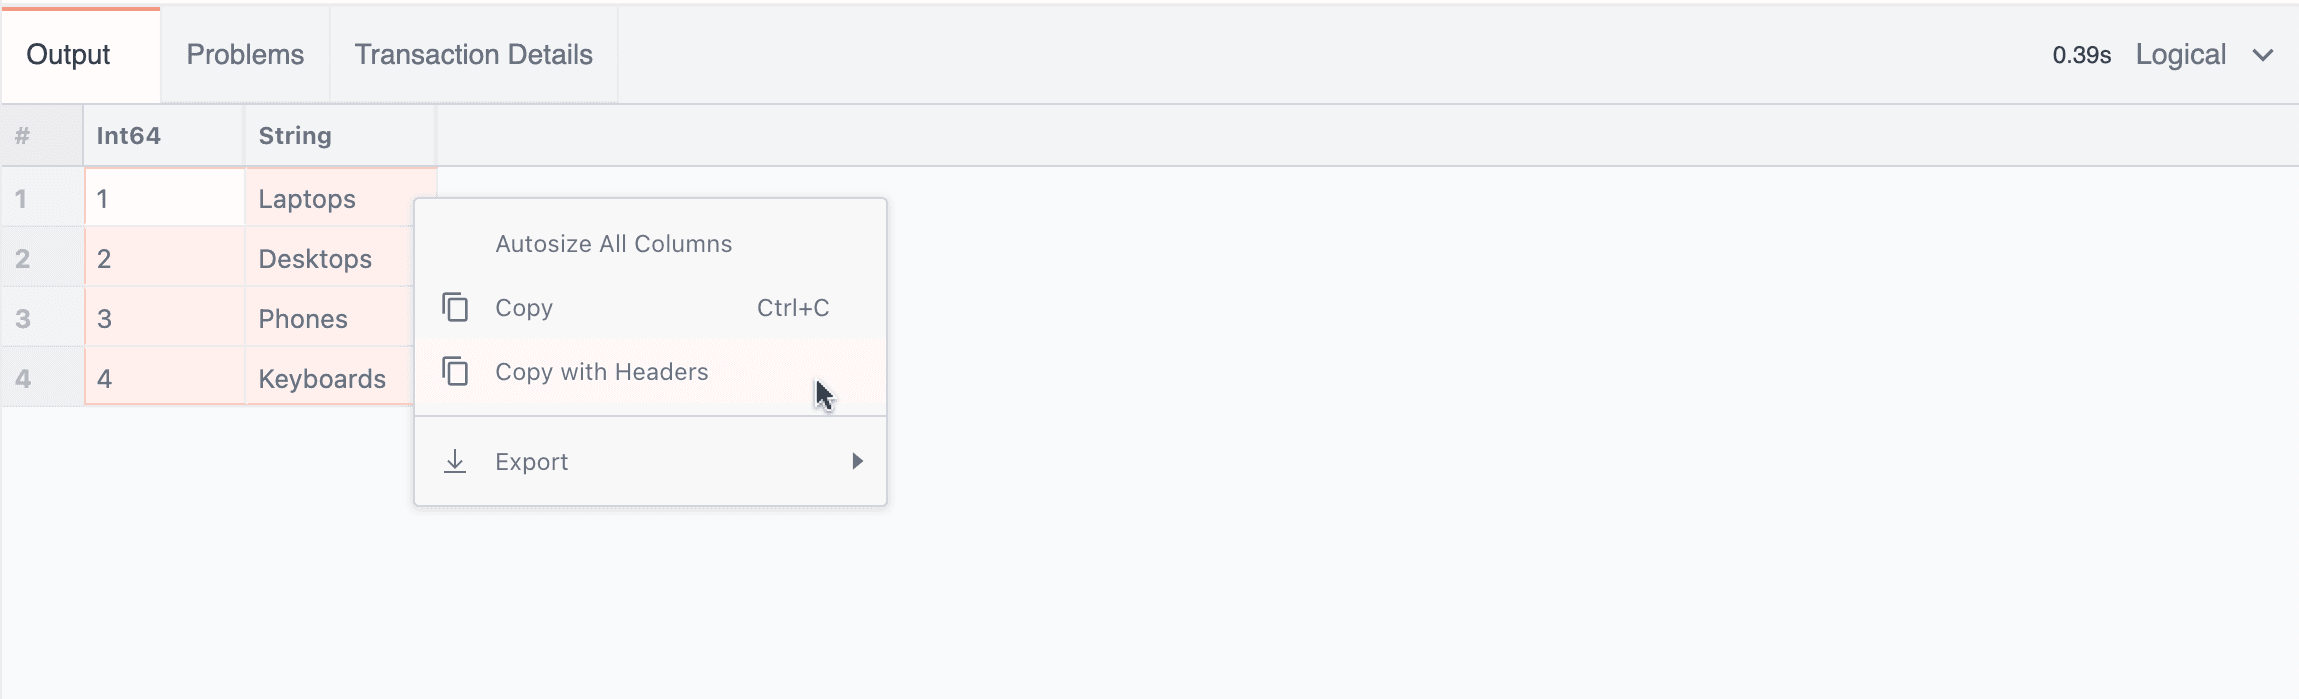
You can then paste your results in the desired location.
Using the Problems Tab
The Problems tab helps you troubleshoot queries, both by providing an error message and highlighting problems in the Editor.
In the image below, for example, def is misspelled as de, which produces the following error:
PARSE ERROR: Invalid token output. (line: 1, character: 4).
Clicking the error highlights the problem line in the Editor.
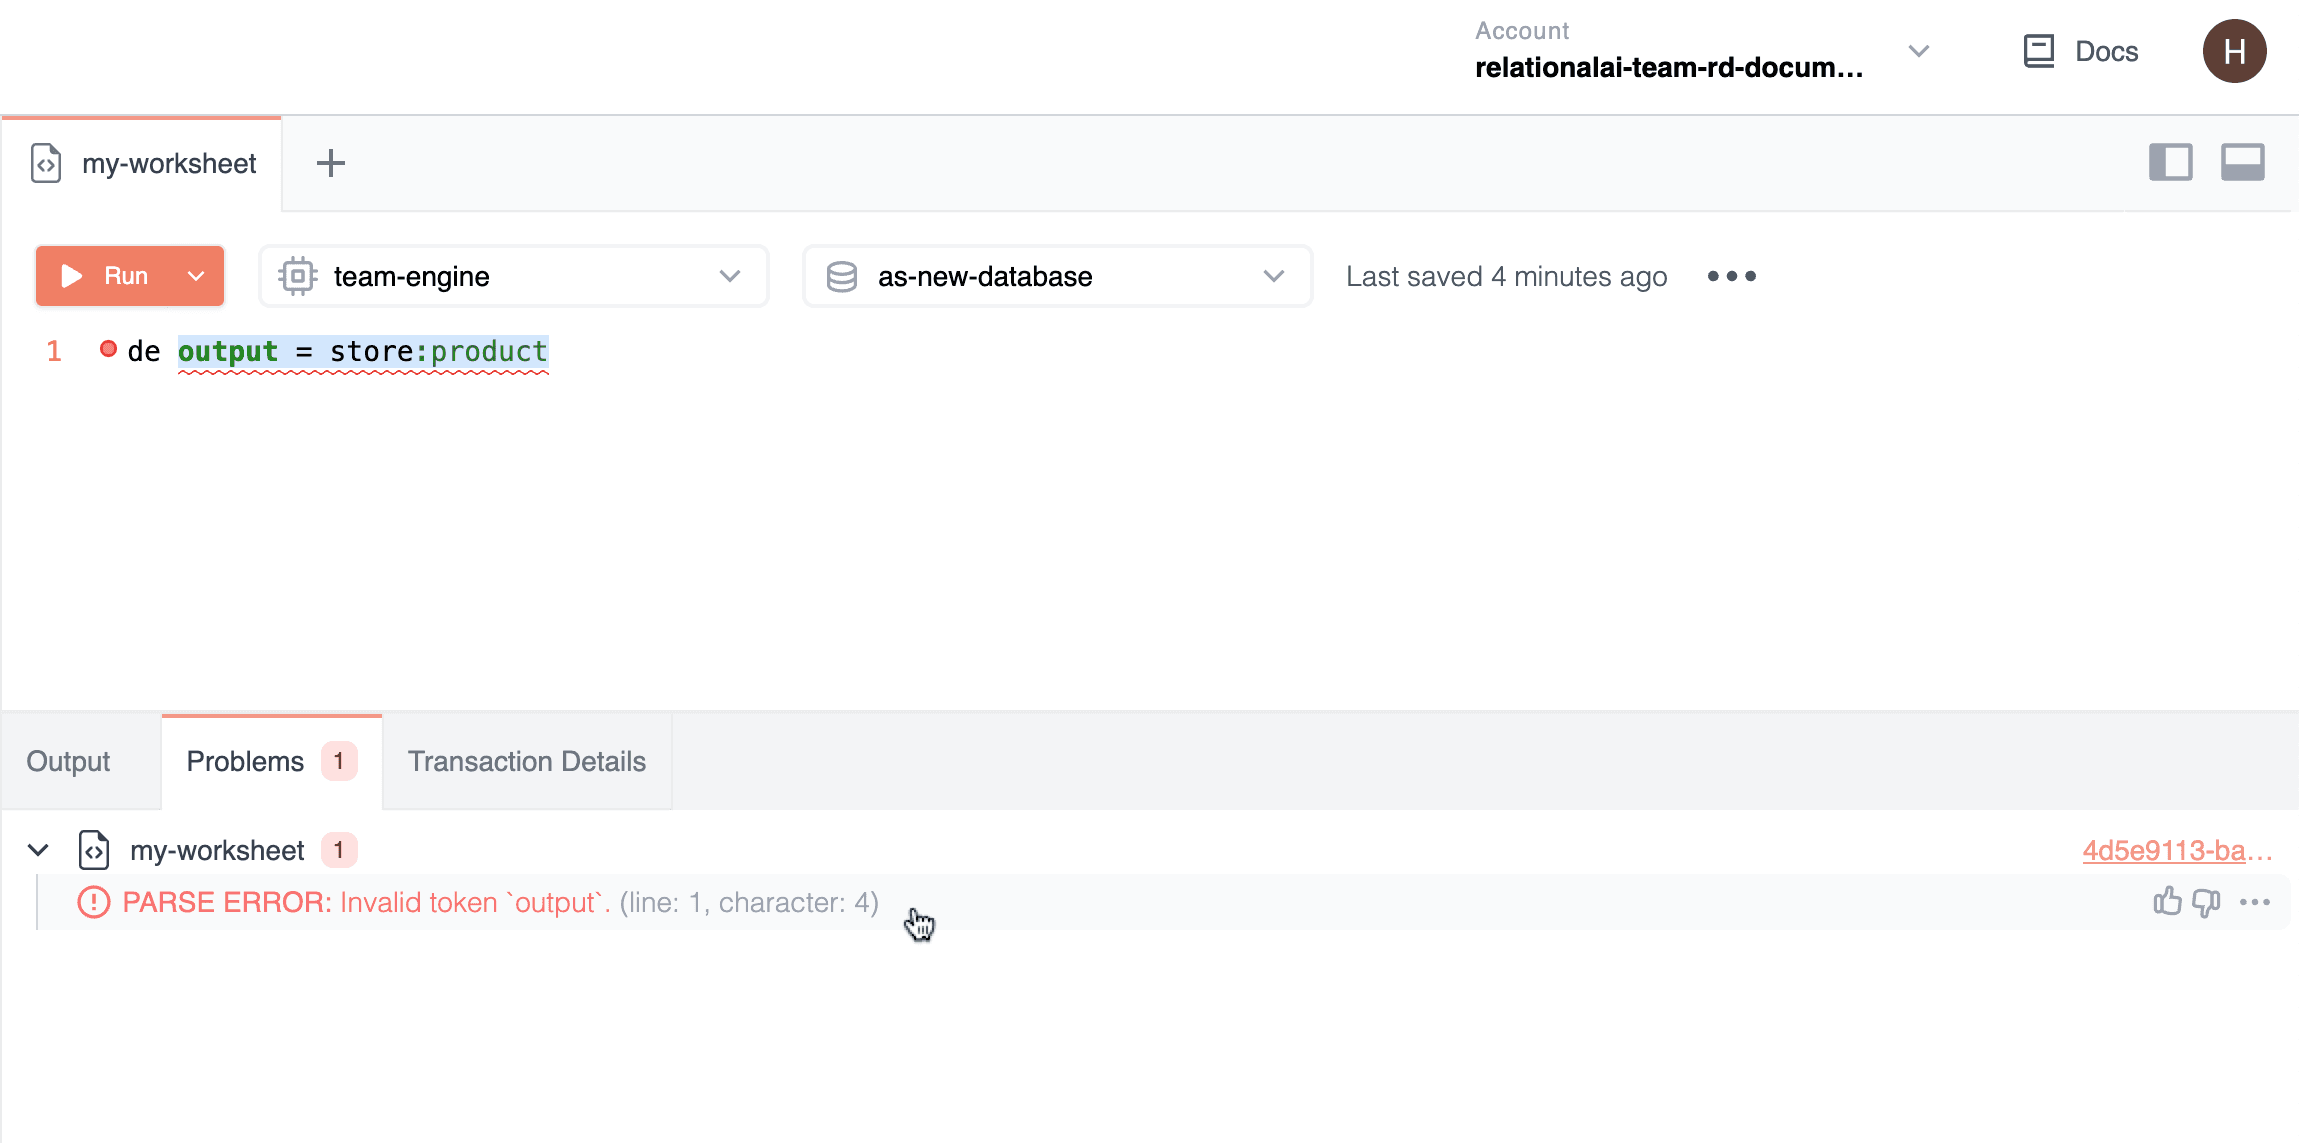
You can also click the partial transaction ID shown in the right-hand corner of the Problems tab to view full transaction details.
With the Bottom panel visible, you can activate the Problems tab by pressing Alt+Shift+P (PC) or Option+Shift+P (Mac).
Using the Transaction Details Tab
The Transaction Details tab shows the following information about your transaction:
| Field | Explanation |
|---|---|
| Status | Current state of the transaction. See Transaction States in Working With Transactions for details. |
| Database | Name of the database in which the transaction ran. |
| Started | Time the transaction was initiated. |
| Format Version | Version of the SDK used. Best practice is to use the latest version of the SDK. |
| Tags | Displays metadata attached to a transaction via the SDKs. |
| Transaction ID | Unique identifier for the transaction. Useful for communicating with RAI support. |
| Engine | Name of the engine on which the transaction ran. |
| Read Only | Whether or not the transaction was read-only. |
| User Agent | Name of the SDK or the browser details when executed via the Console. |
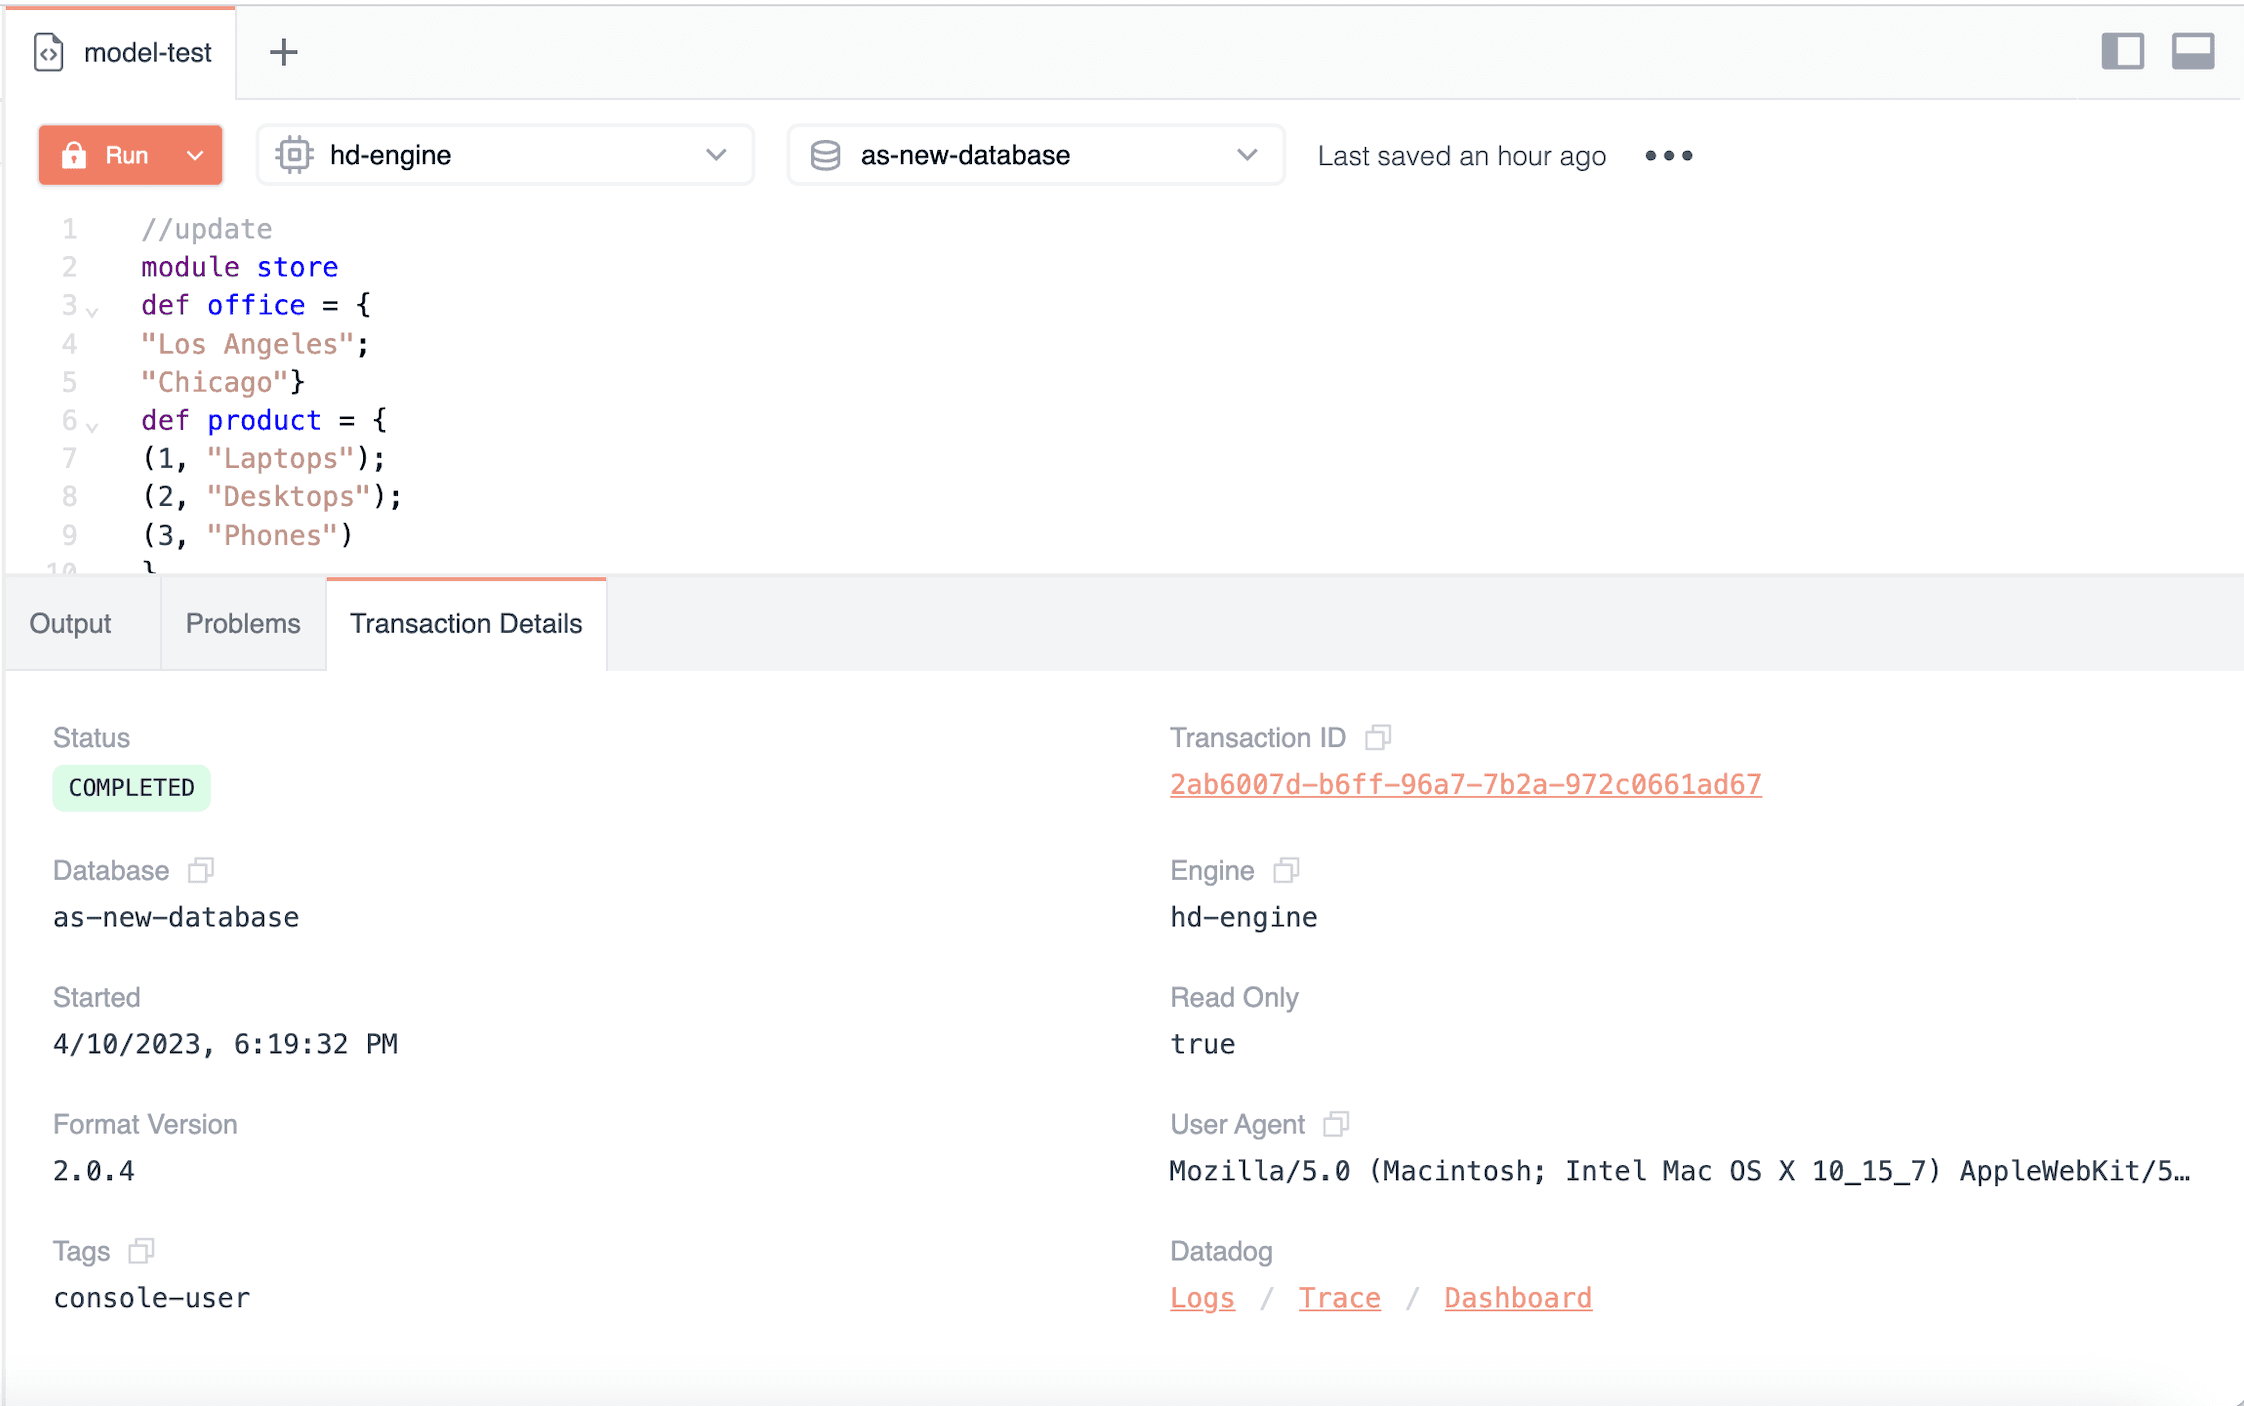
To copy the information under Database, Tags, Transaction ID, Engine, or User Agent, click the Copy icon next to the respective field.
With the Bottom panel visible, you can activate the Transactions tab by pressing Alt+Shift+D (PC) or Option+Shift+D (Mac).
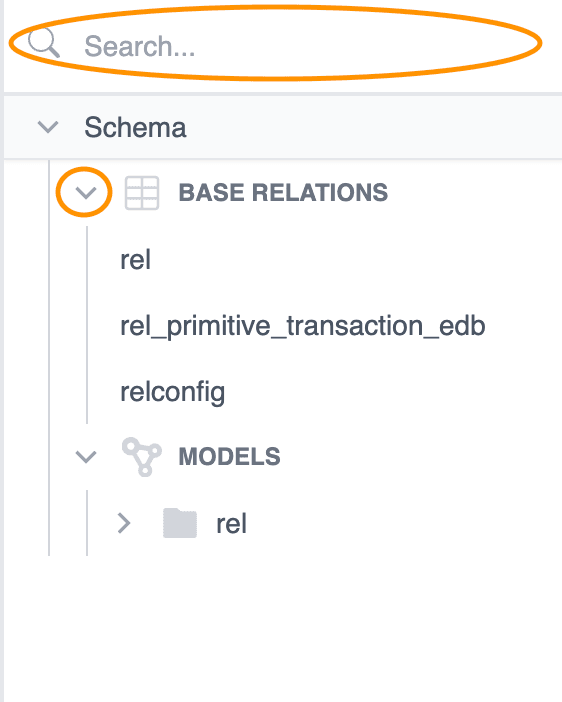
Using the Object Tree
When you open the Editor page and choose a database, the Object Tree lists base relations and models for the database.
To display subobjects in the Object Tree, click to expand the node arrow to the left of the object’s name. You can also use the Search box to search for resources by name. The Search box finds the resources that match in the database.
Working With Base Relation Data
The Editor lets you insert and delete records from a base relation by changing the query mode option to Read/Write.
To change to Read/Write mode:
- Click the Query mode options pop-up menu, attached to the Run button.
- Choose Read/Write.
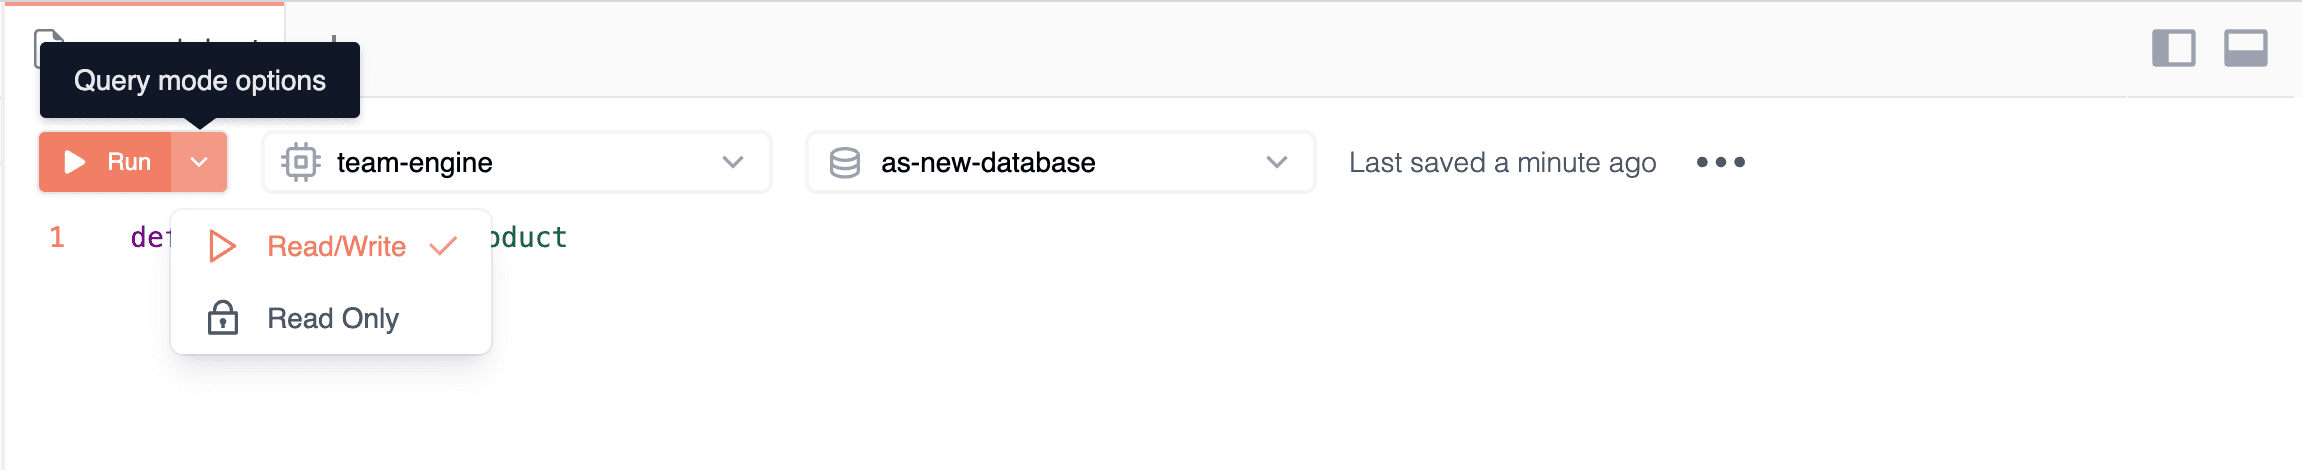
When you choose Read/Write, code entered into the Editor runs directly against stored base relation data. See Updating Data: Working With Base Relations for more details.
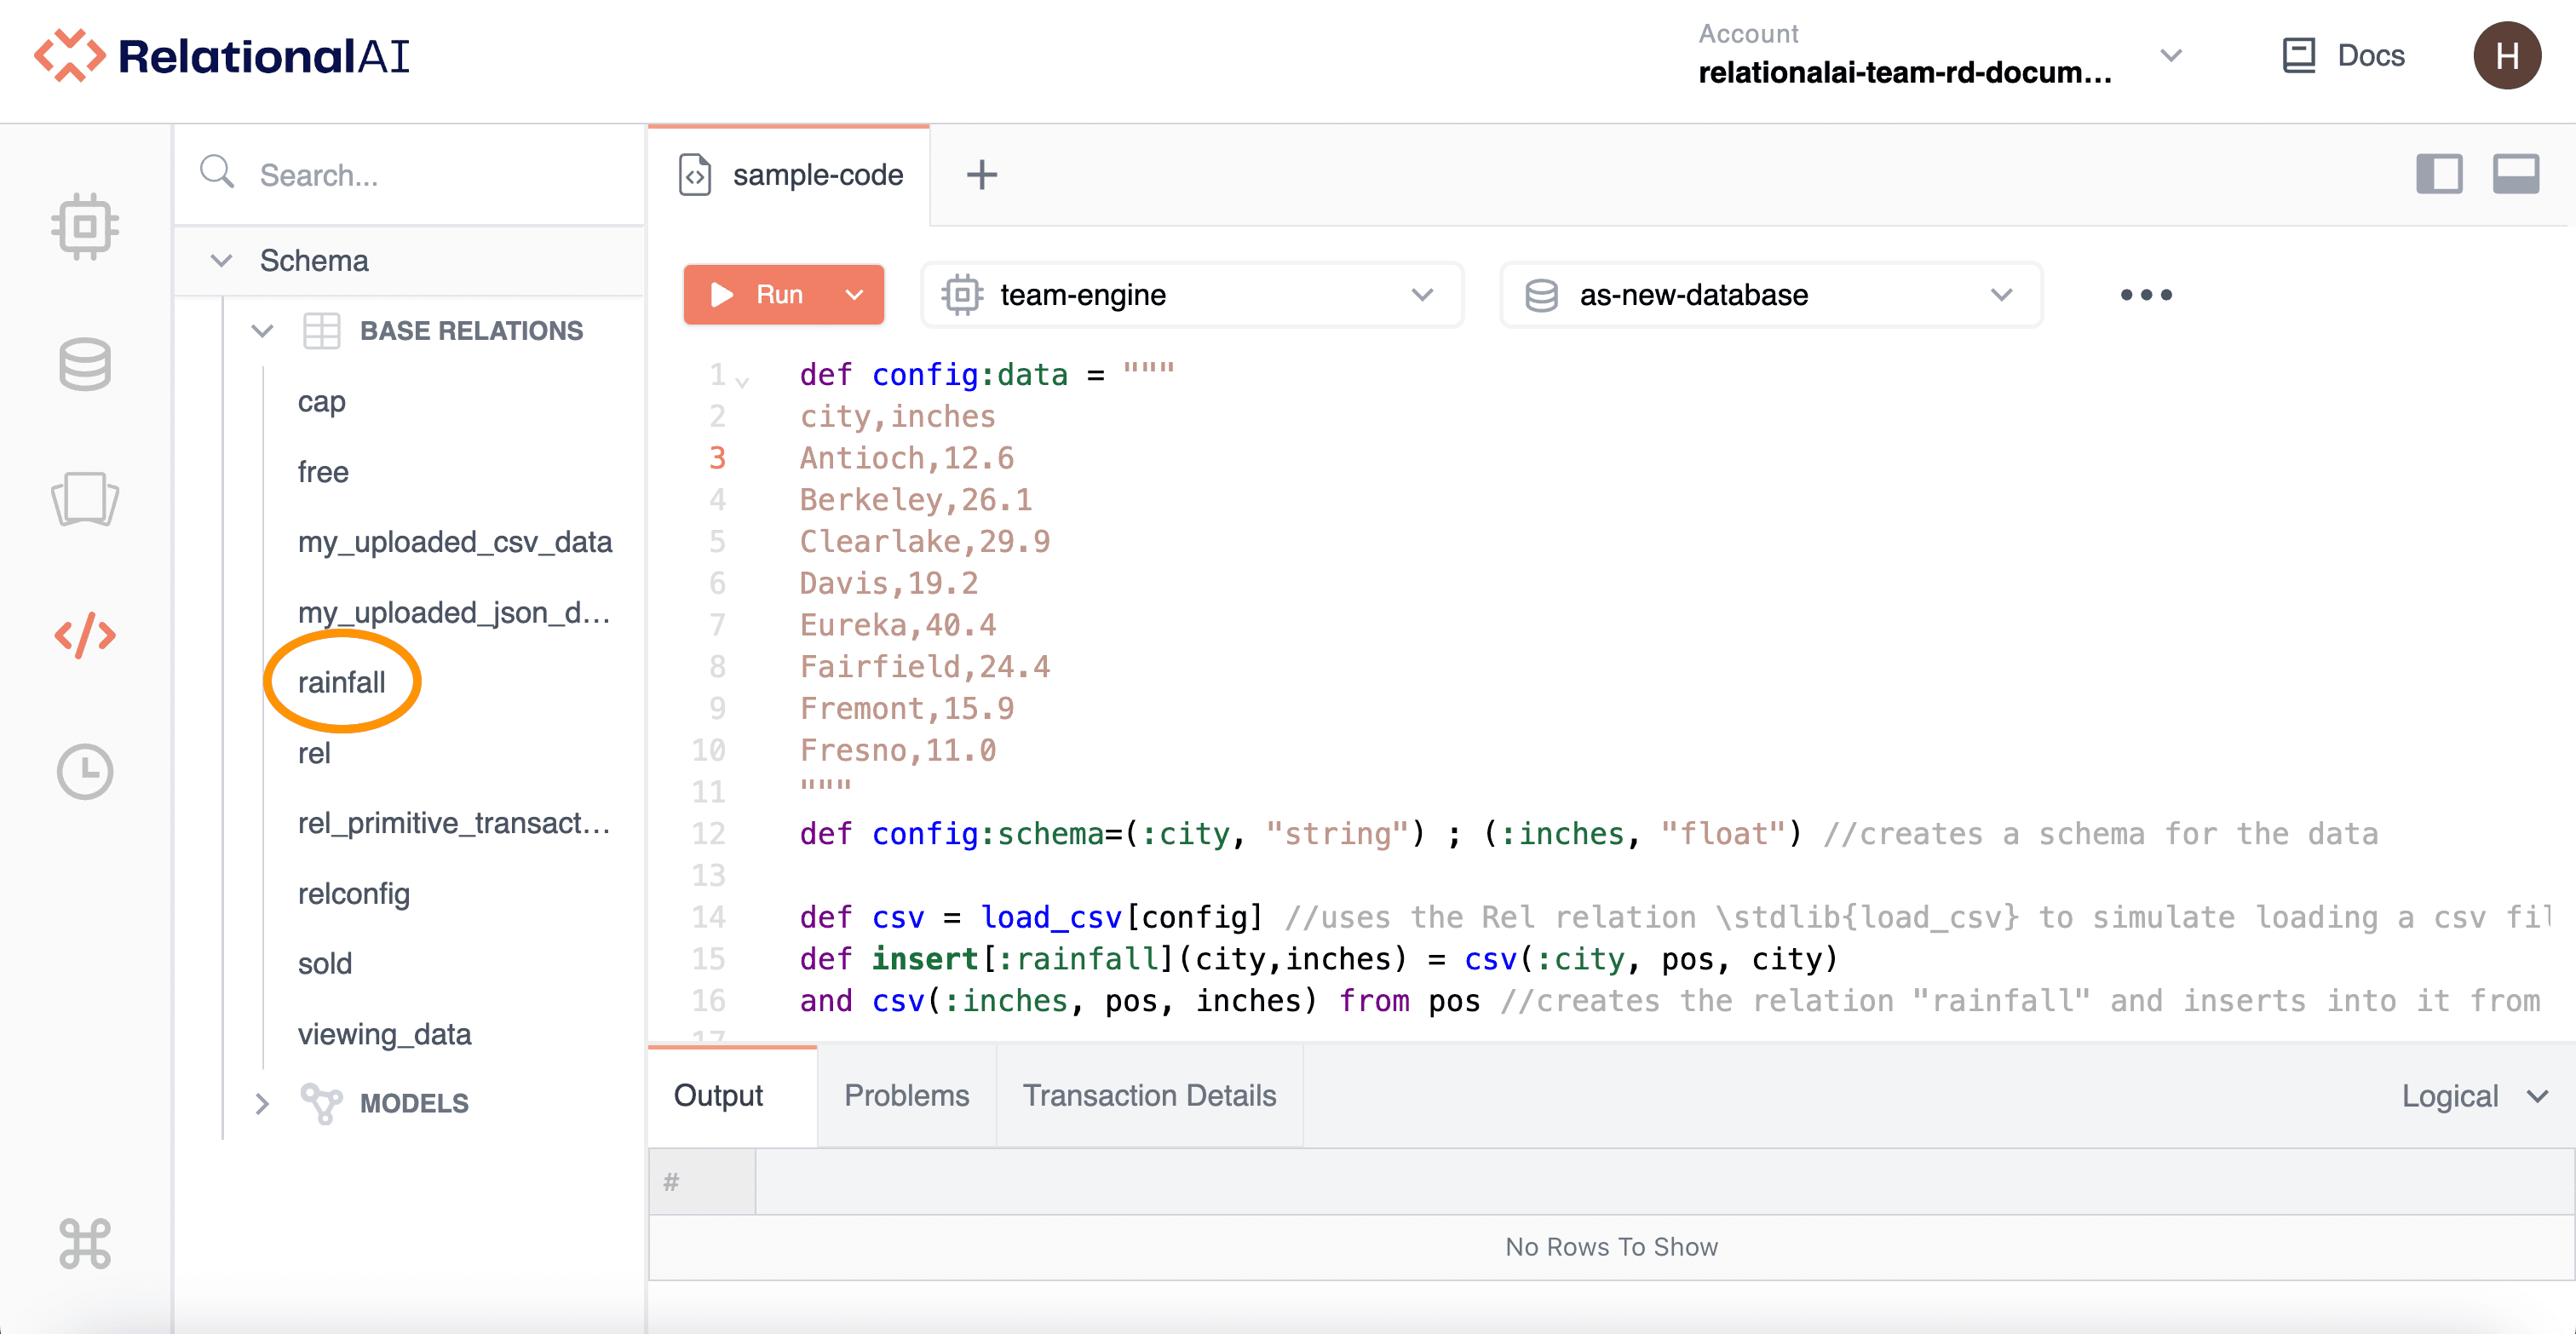
For example, say you have a base relation with the following data on yearly rainfall in California cities (from the US National Centers for Environmental Information (opens in a new tab)):
| city | inches |
|---|---|
| Antioch | 12.6 |
| Berkeley | 26.1 |
| Clearlake | 29.9 |
| Davis | 19.2 |
| Eureka | 40.4 |
| Fairfield | 24.5 |
| Fremont | 15.9 |
| Fresno | 11.0 |
You can create this relation in the Editor by running it in Read/Write mode and entering the code below.
This code uses the Rel relation load_csv to simulate loading the contents of a CSV file into a base relation called rainfall.
The code creates a schema with two columns: :city, "string" and :inches, "float".
For more information on specifying schemas when importing CSV data, see Specifying Column Types (File Schema) in the CSV Import guide.
// write query

def config:data = """
city,inches
Antioch,12.6
Berkeley,26.1
Clearlake,29.9
Davis,19.2
Eureka,40.4
Fairfield,24.4
Fremont,15.9
Fresno,11.0
"""
def config:schema=(:city, "string") ; (:inches, "float") // Creates a schema for the data.

def csv = load_csv[config] // Uses the Rel relation \stdlib{load_csv} to simulate loading a CSV file.
def insert[:rainfall](city,inches) = csv(:city, pos, city)
and csv(:inches, pos, inches) from pos // Creates the relation `rainfall` and inserts into it from the relation `csv`.
When you click Run, the code creates the relation rainfall, which appears in the Object Tree under Schema > Base Relations.
Read Only mode remains deactivated until you select it again from the Query mode options pop-up menu. This means that any new queries will make changes to base relation data until you switch back to Read Only mode.
Note that nothing appears in the Output window. That’s because this code does not return a result.
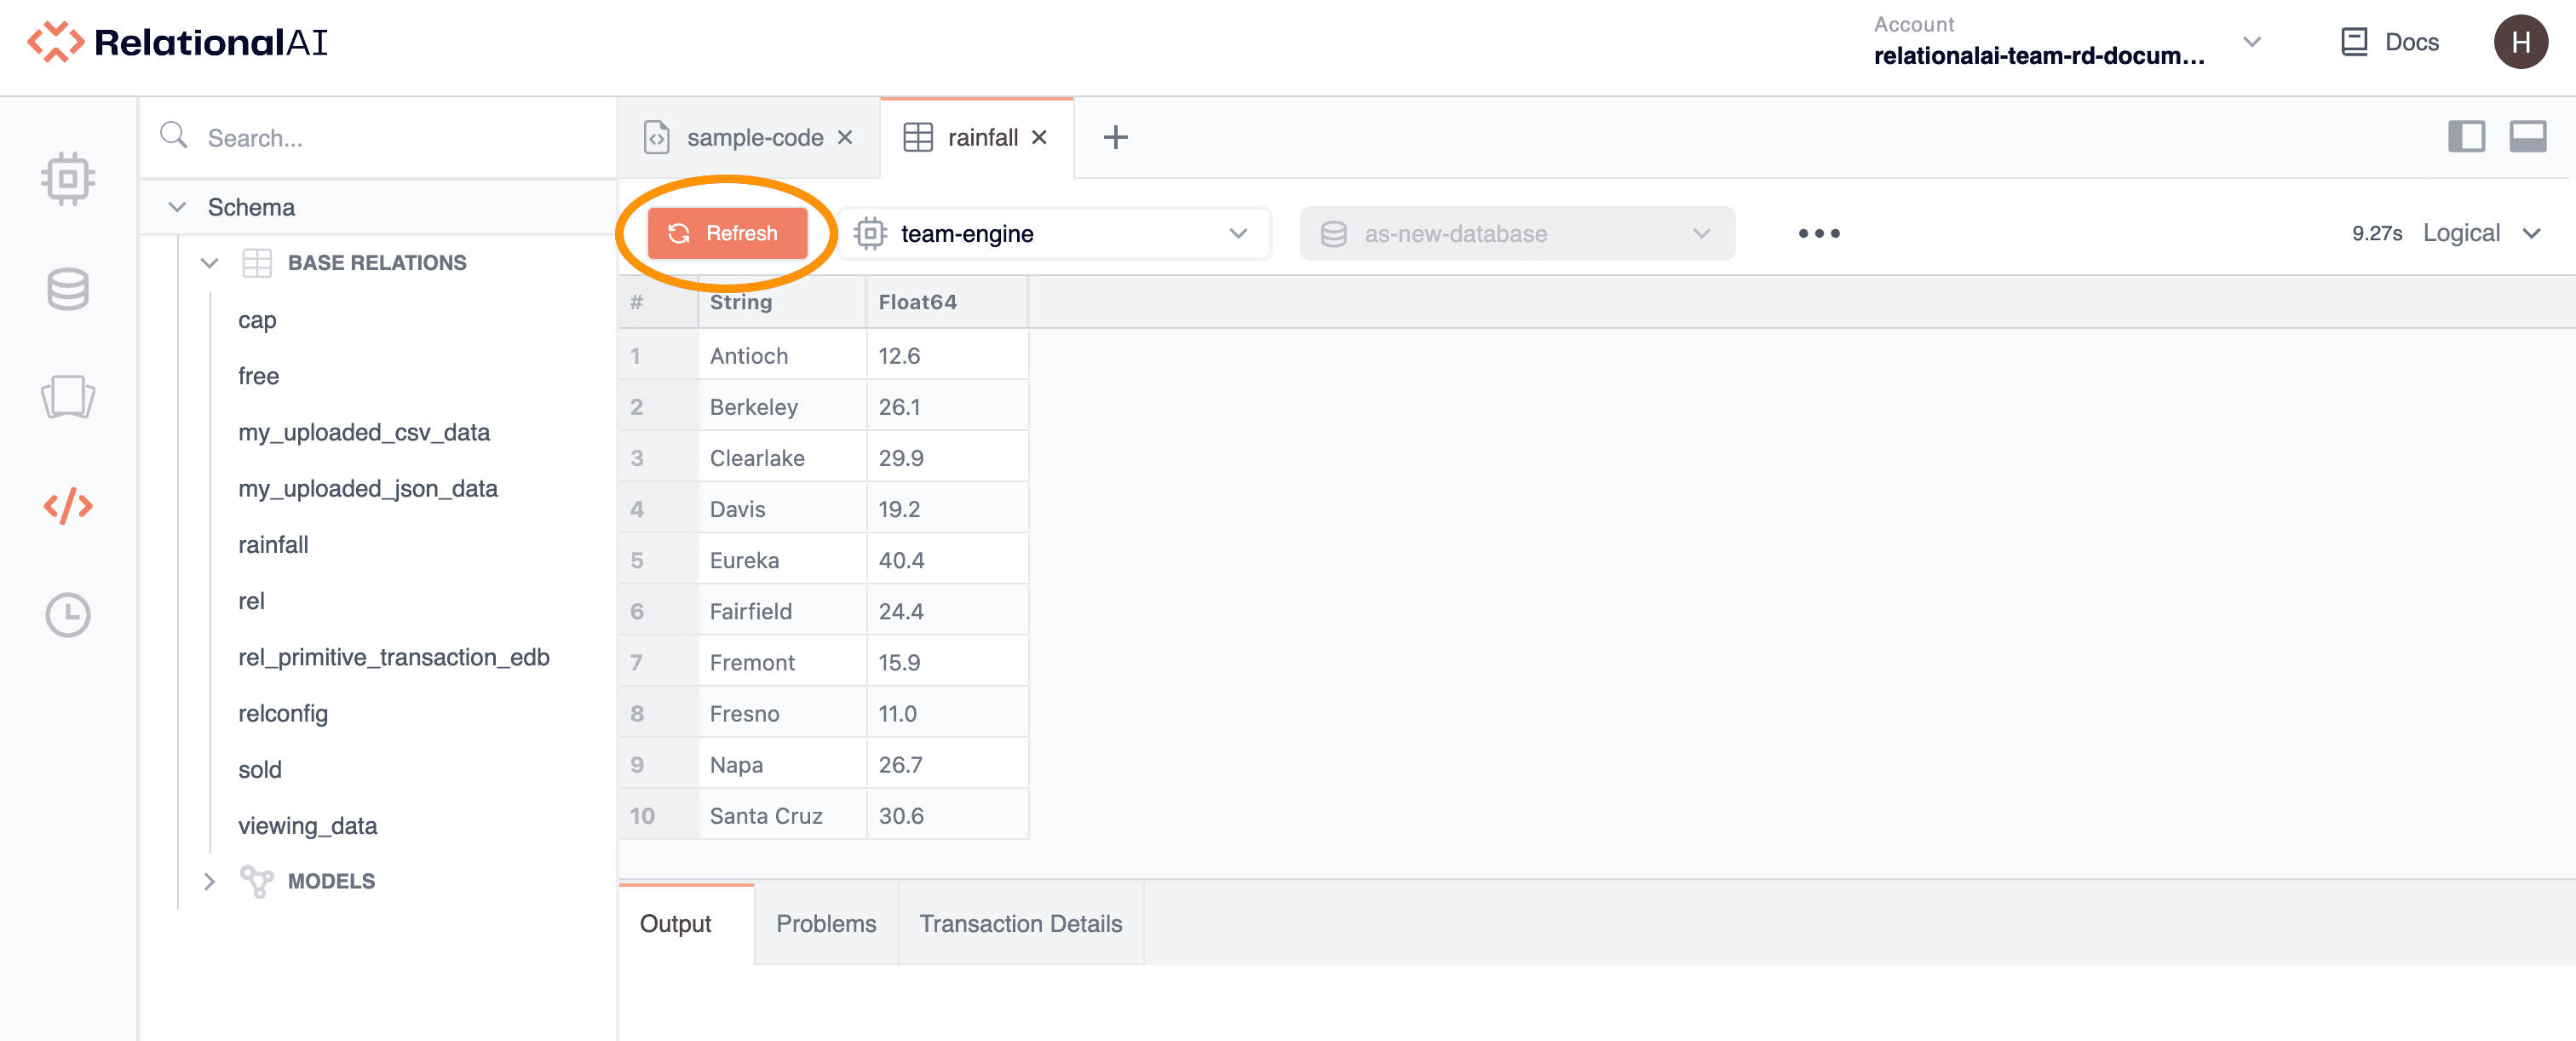
Updating Base Relation Data
When you run queries in Read/Write mode, you can use the Editor to update base relations. You can insert rows into and delete rows from base relations.
For example, to insert a new record into the rainfall relation defined above, you would choose Read/Write and enter code along the following lines:
// write query

def insert[:rainfall] = ("Napa", 26.7)
If you now query rainfall, you’ll see that the data for Napa have been added:
// read query

def output = rainfall
Testing Changes to Base Relation Data
You can also use the Editor to simulate changes to a base relation without changing data.
To do so, incorporate an insert or delete statement into the Editor and query the data using Read Only mode.
You can test this functionality by setting up a simple calculation on the rainfall relation.
The following code determines the average rainfall across cities:
// read query

def output:avg = average[rainfall]
Given the data above, this calculation initially returns an average of 22.91111111111111.
You can modify this code to include a simulated addition to the rainfall relation.
You can use the yearly rainfall for Santa Cruz, a city whose yearly rainfall is slightly higher than the average you just calculated:
// read query

def insert[:rainfall] = ("Santa Cruz", 30.6)
def output:avg = average[rainfall]
When you run this query, the RKGS calculates average[rainfall] with the new row included, returning an average of 23.68.
Viewing Base Relations
The Editor lets you view the ouput of base relations separately from worksheets. To view the output, click the name of the base relation in the Object Tree under Schema > Base Relations.
The Viewer opens in a separate tab in the Editor. Note that you cannot make changes to code using the Viewer. Updates to base relations are made in the worksheet. To view updates made to a base relation since you opened it, click Refresh in the upper left corner of the Viewer.
You can use the Viewer to make changes to the display of the results similarly to how you use the Output panel. See Using the Output Tab for more details.
To discard all changes made in the Viewer, click Refresh.
Note: Changes made in the Viewer are not replicated in the Output panel of the worksheet and vice versa.
Editor Keyboard Shortcuts
To access keyboard shortcuts when using the Console, click the Keyboard Shortcuts icon on the Left Sidebar or press Control+U (PC) or Command+U (Mac).
Here are some shortcuts for using the Editor:
| Shortcut | Description |
|---|---|
| Alt+Shift+T (PC) or Option+Shift+T (Mac) | Adds new tab. |
| Alt+Shift+W (PC) or Option+Shift+W (Mac) | Closes active tab. |
| Shift+Enter (PC) or Shift+Return (Mac) | Saves and runs active tab. |
| Alt+Shift+N (PC) or Option+Shift+N (Mac) | Cycles through tabs. |
| Alt+Shift+V (PC) or Option+Shift+V (Mac) | With Output tab active, cycles through output formats. |
| Alt+Shift+L (PC) or Option+Shift+L (Mac) | Toggles Object Tree. |
| Alt+Shift+B (PC) or Option+Shift+B (Mac) | Toggles Bottom panel. |
| Alt+Shift+O (PC) or Option+Shift+O (Mac) | With Bottom panel visible, activates Output tab. |
| Alt+Shift+P (PC) or Option+Shift+P (Mac) | With Bottom panel visible, activates Problems tab. |
| Alt+Shift+D (PC) or Option+Shift+D (Mac) | With Bottom panel visible, activates Transaction Details tab. |