Managing Users and OAuth Clients in the RAI Console
This guide explains how to manage users and OAuth clients in the RAI Console.
Note that you can also manage users and OAuth clients through the CLI — see Managing Users and Managing OAuth Clients — and the RelationalAI SDKs.
Managing Users
When you log into the RAI Console as a user with admin permissions, a Settings icon appears on the left-hand side of the Console. Clicking the Settings icon opens the Settings page, where you can access the Users page to manage users and the OAuth Clients page to manage OAuth clients.
Using the Users Page
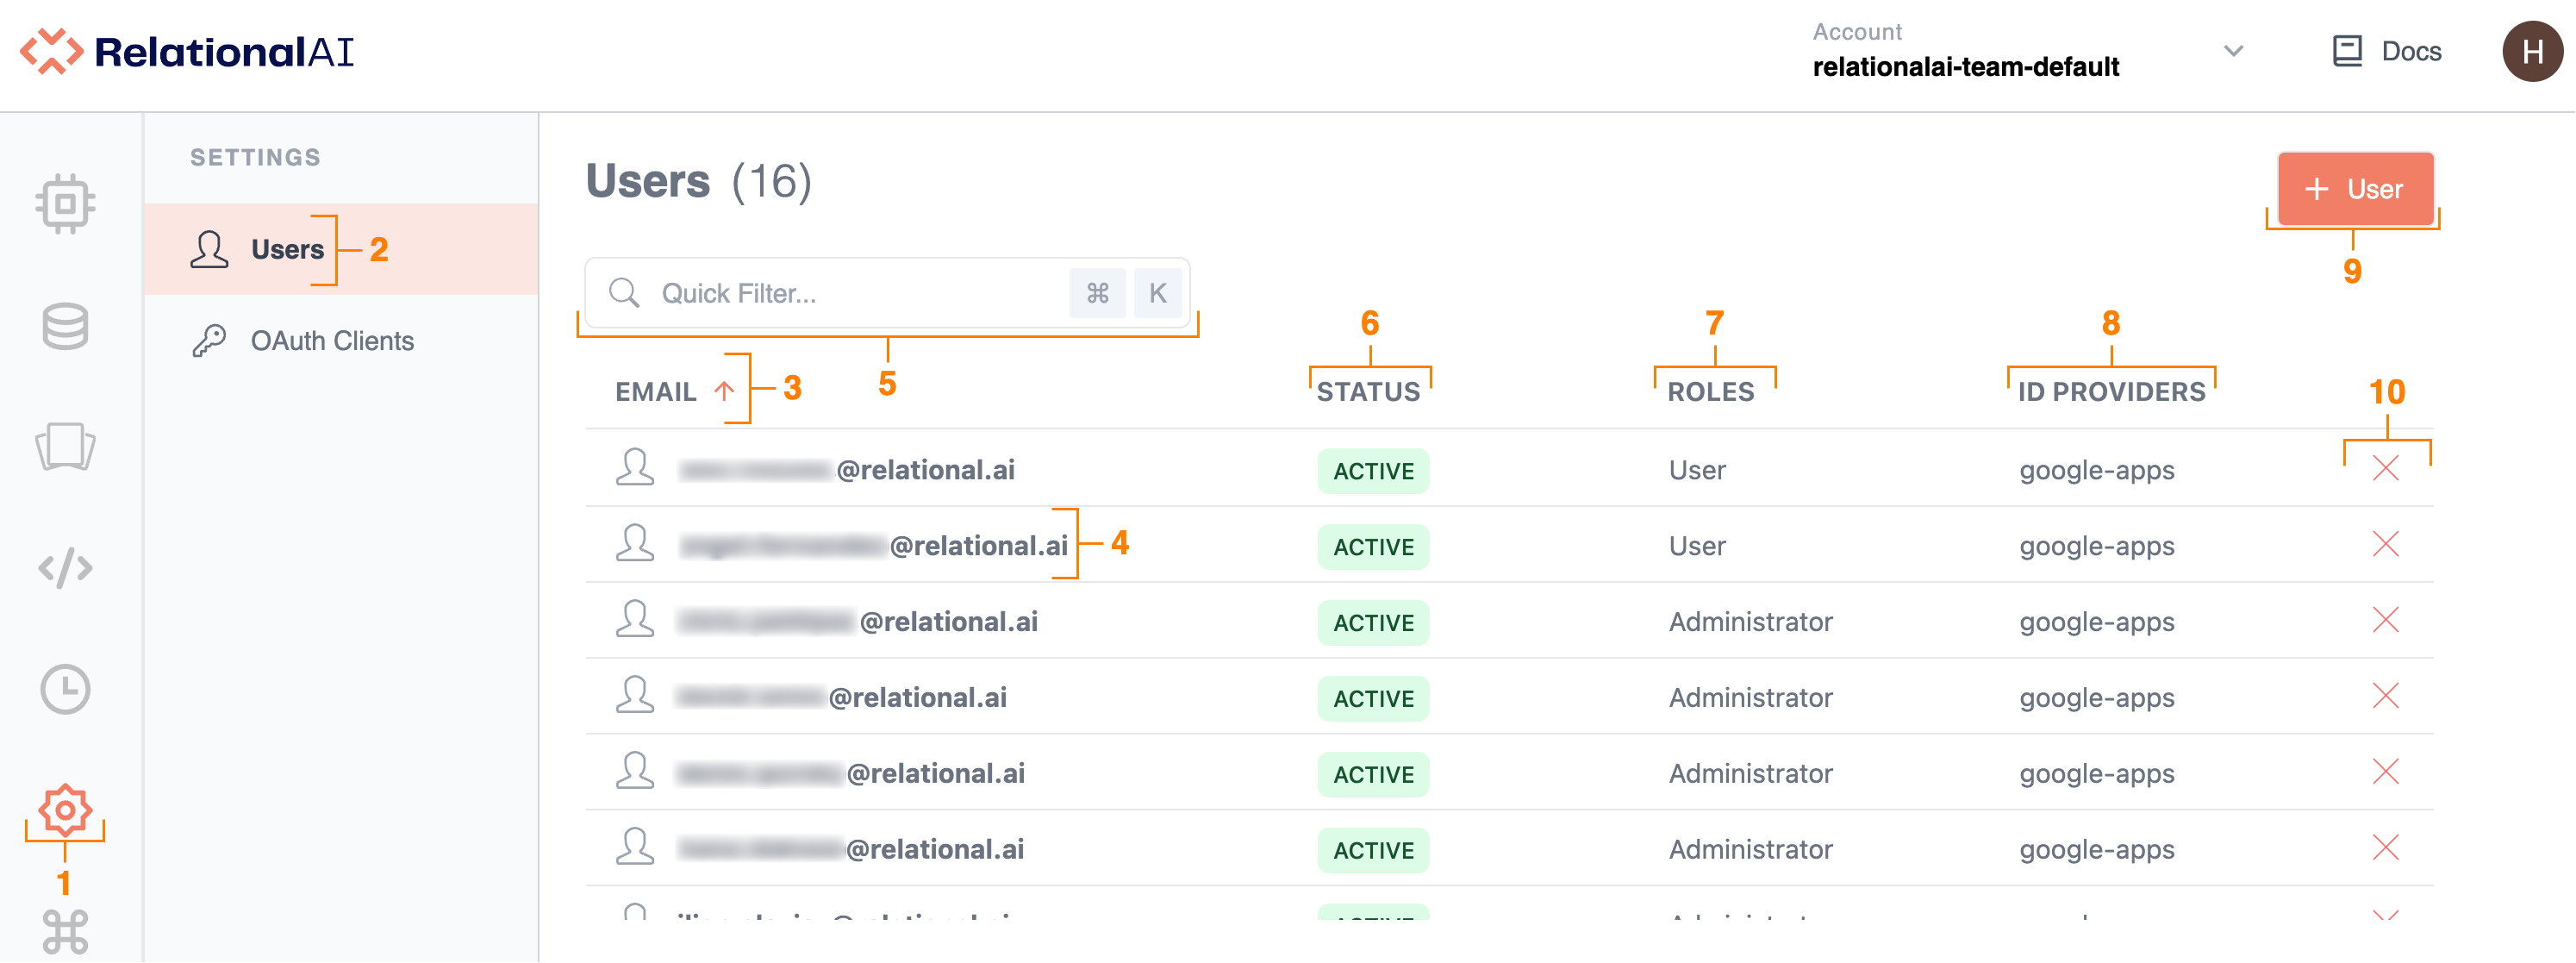
Here’s how to navigate the Users page:
-
To access the Users page, click the Settings icon.
-
You land on the Users page by default. A list of all previously added users appears.
-
To rearrange users in ascending or descending alphabetical order, click the arrow next to the Email field.
-
To see information about users and change their role or status, click the user’s email in the list.
-
To search or filter users, type text or values into the Quick Filter field. Quick Filter conducts a search on all currently listed users and filters through the Email, Status, and Roles columns.
-
To view whether a user is active or inactive, see the respective information under Status. To group users by their status, click Status.
-
To view a user’s role, see the respective information under Role. To group users by their role, click Role.
-
To view a user’s ID provider, see the respective information under ID Provider. By default, all RAI Console users have google-apps as their ID provider.
-
To add a new user:
-
Click + User in the top right-hand corner.
-
In the window that opens, enter the user’s email under Email.
-
Under Role, click the up-down arrow to select a role for the new user. See User Roles for more details.
-
Click Create.
The new user’s email now appears in the list. For more details on how new users can log in and get started with the RAI Console, see Quick Start.
-
-
To delete a user:
-
Click X next to the user you want to delete.
-
In the Confirmation window that opens, click Delete. The user’s email then disappears from the list.
-
User Roles
The RAI Console supports three user roles: Admin, User, and Read only user.
| User Role | Description |
|---|---|
| User | RAI Console users with the User role can manage engines, databases, models, worksheets, and transactions. |
| Admin | RAI Console users with the Admin role can do all of the above, as well as manage users and OAuth clients. OAuth client authorizations are needed when using SDKs. |
| Read only user | RAI Console users with the Read only user role can only use existing engines and databases (not create or delete them), run read-only worksheets, and view transaction details. They can also view base relations and models, but not create them. |
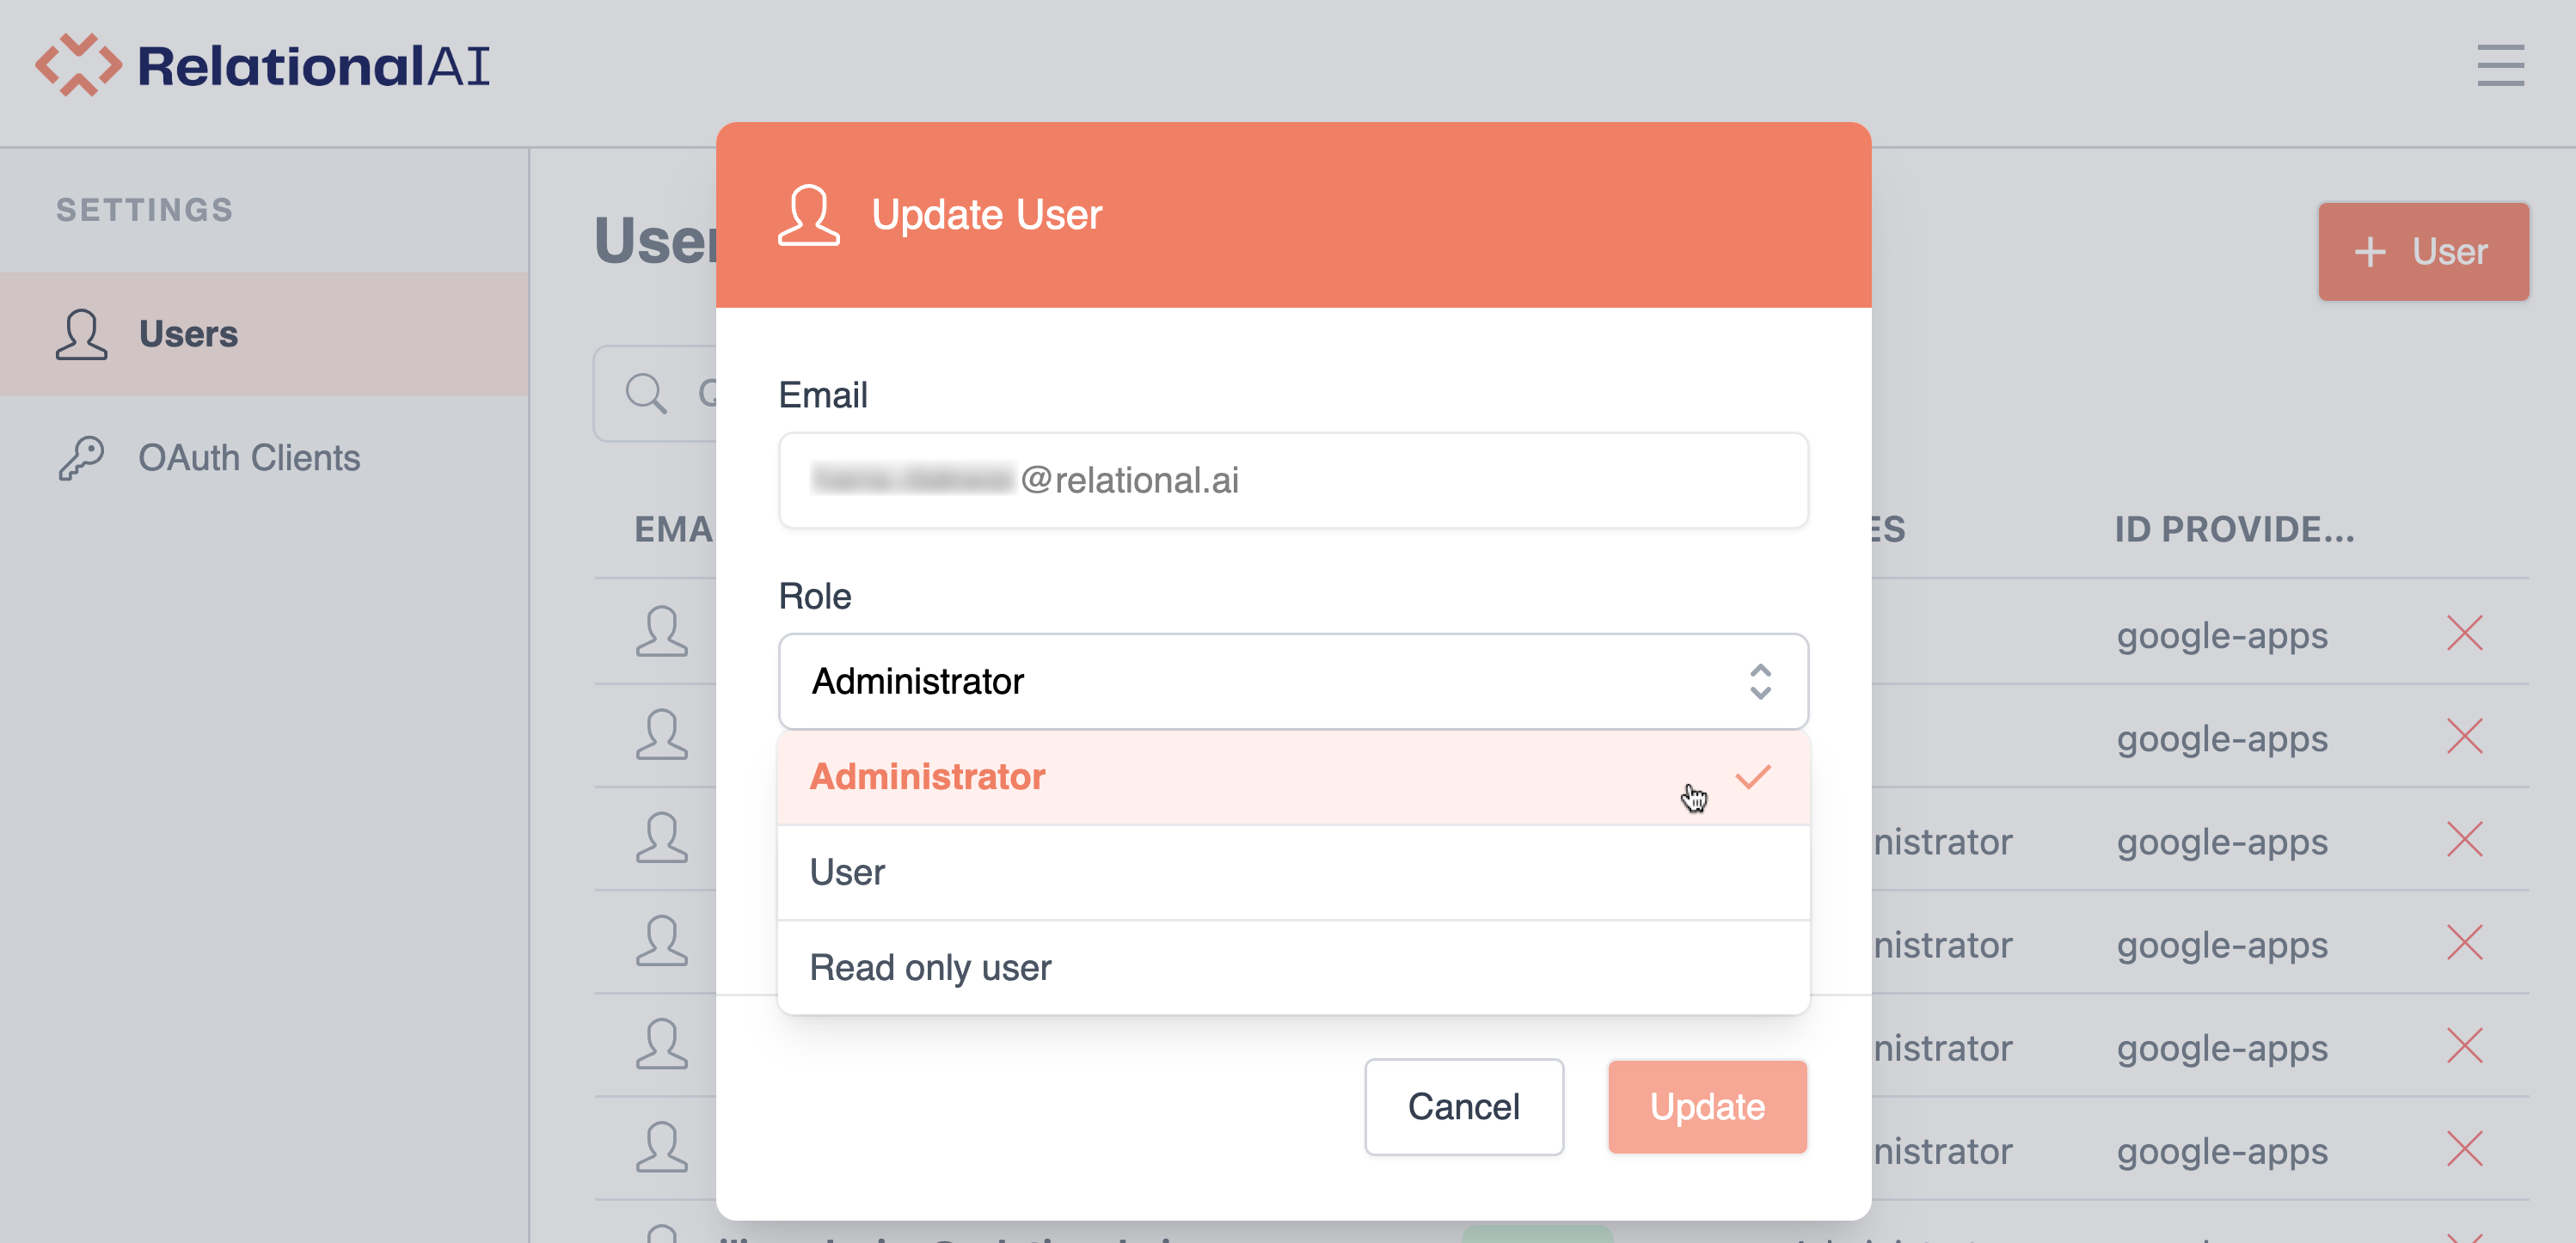
Changing User Roles
With admin permissions, you can change other users’ roles.
To do so:
- On the Users page, click the user whose role you want to change.
- In the window that opens, click the up-down arrow under the Role field and select a new role.
- Click Update.
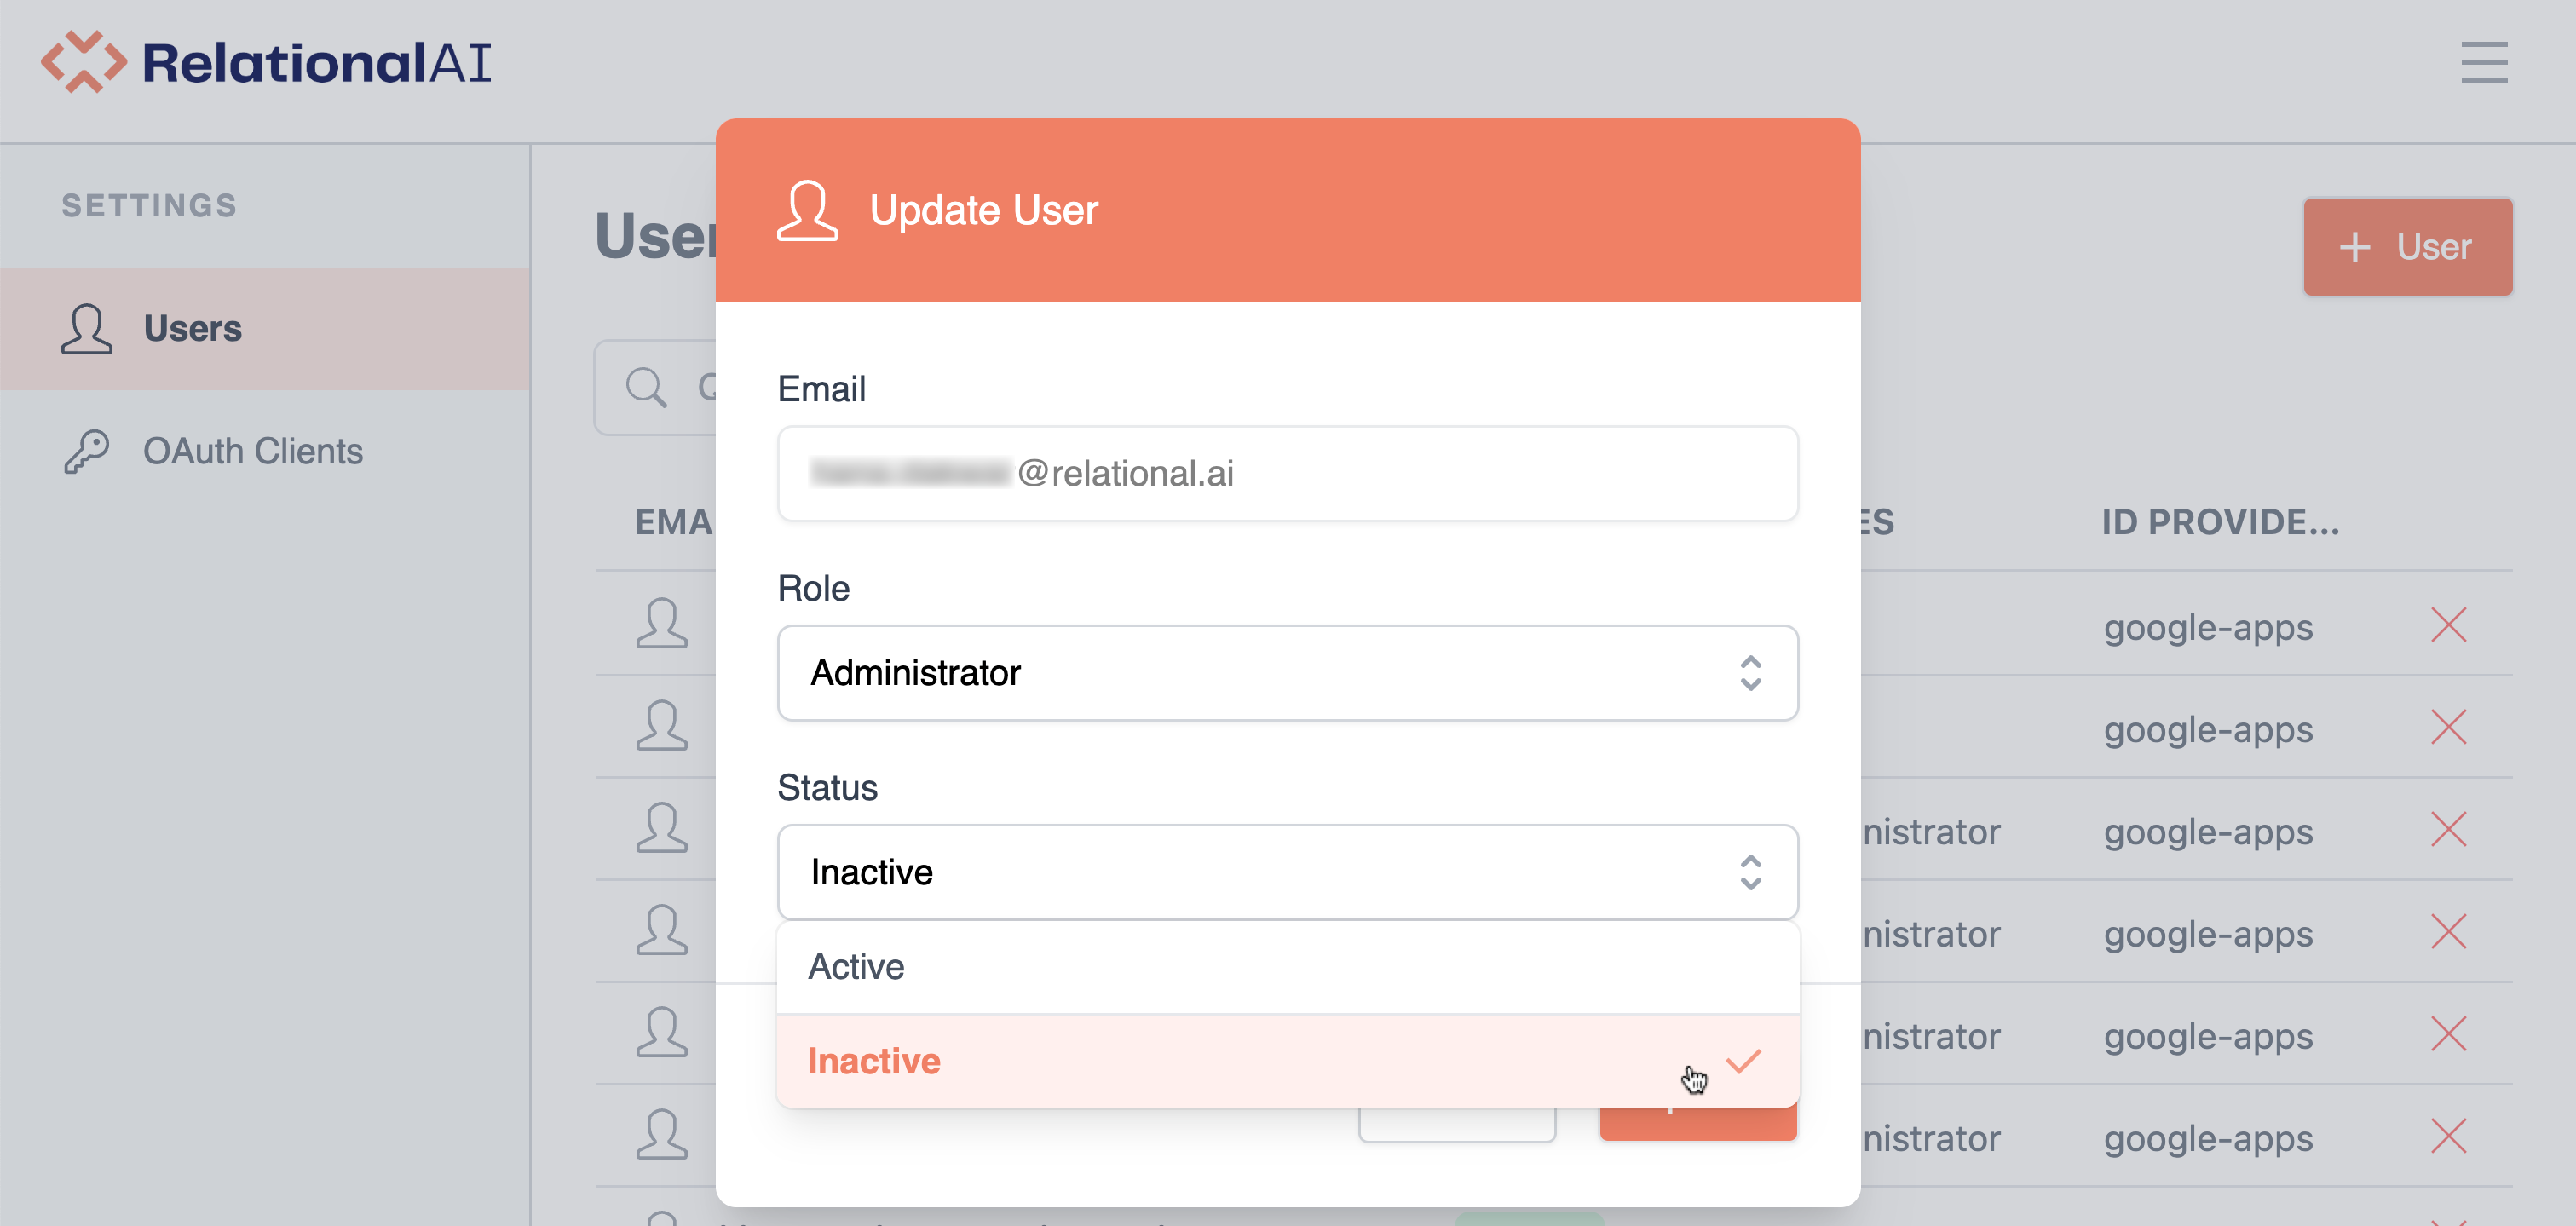
Making a User Inactive
You can make users inactive, which prevents them from accessing the RAI Console.
To make a user inactive:
- On the Users page, click the user whose status you want to change.
- In the window that opens, click the up-down arrow under the Status field and choose Inactive.
- Click Update.
Managing OAuth Clients
Adding an OAuth Client
To manage OAuth clients, you need to access the OAuth Clients page.
Using the OAuth Clients Page
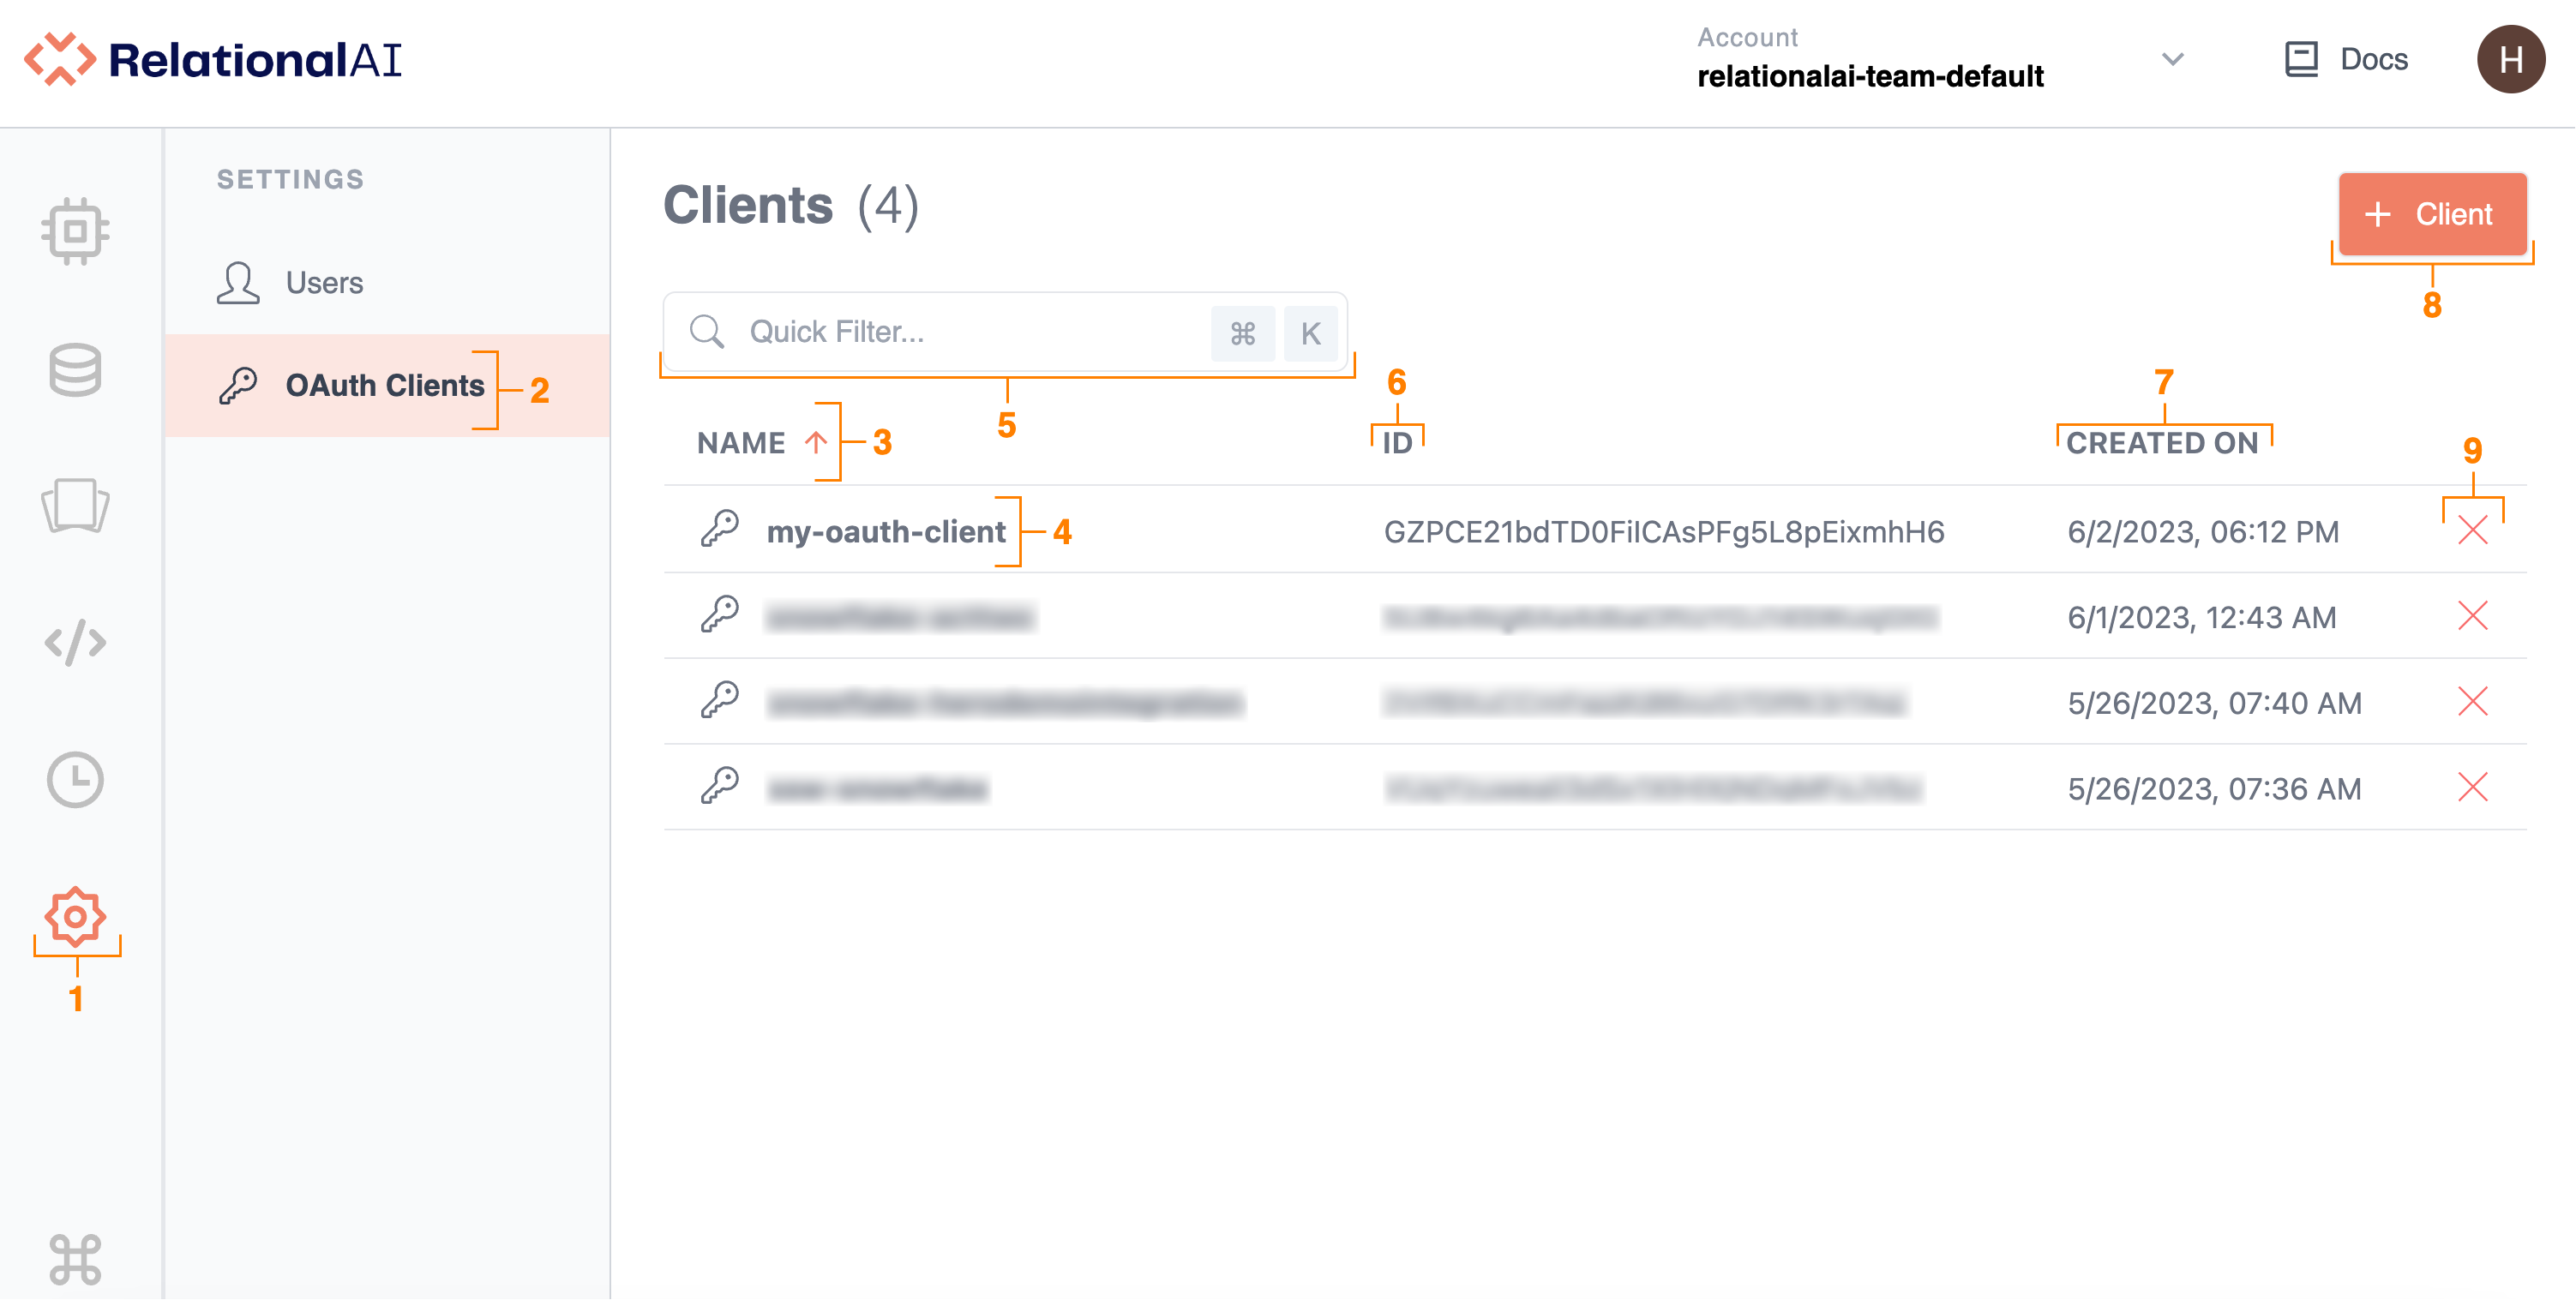
Here’s how to access and navigate the OAuth Clients page:
-
To access the OAuth Clients page, click the Settings icon.
-
You land on the Users page by default. To access the OAuth Clients page, click OAuth Clients under Settings. A list of all previously added OAuth clients appears.
-
To rearrange OAuth clients in ascending or descending alphabetical order, click the arrow next to the Name field.
-
To view an OAuth client’s information, click the OAuth client’s name in the list. This redirects you to the Client page where you can view the client’s details, rotate secrets, and manage permissions.
🔎To return to the list of OAuth clients, click the back arrow at the top of the page or click OAuth Clients under Settings.
-
To search or filter OAuth clients, type text or values into the Quick Filter field. Quick Filter conducts a search on all currently listed OAuth clients and filters through the Name, ID, and Created On columns.
-
To view an OAuth client’s ID, see the respective information under ID. To rearrange OAuth clients in ascending or descending order of their ID number, click ID.
-
To view the date and time an OAuth Client was created, see the respective information under Created On. Note that you can see the full details of when an OAuth client was created by holding your pointer over the date. To rearrange OAuth clients by the date they were created, click Created On.
-
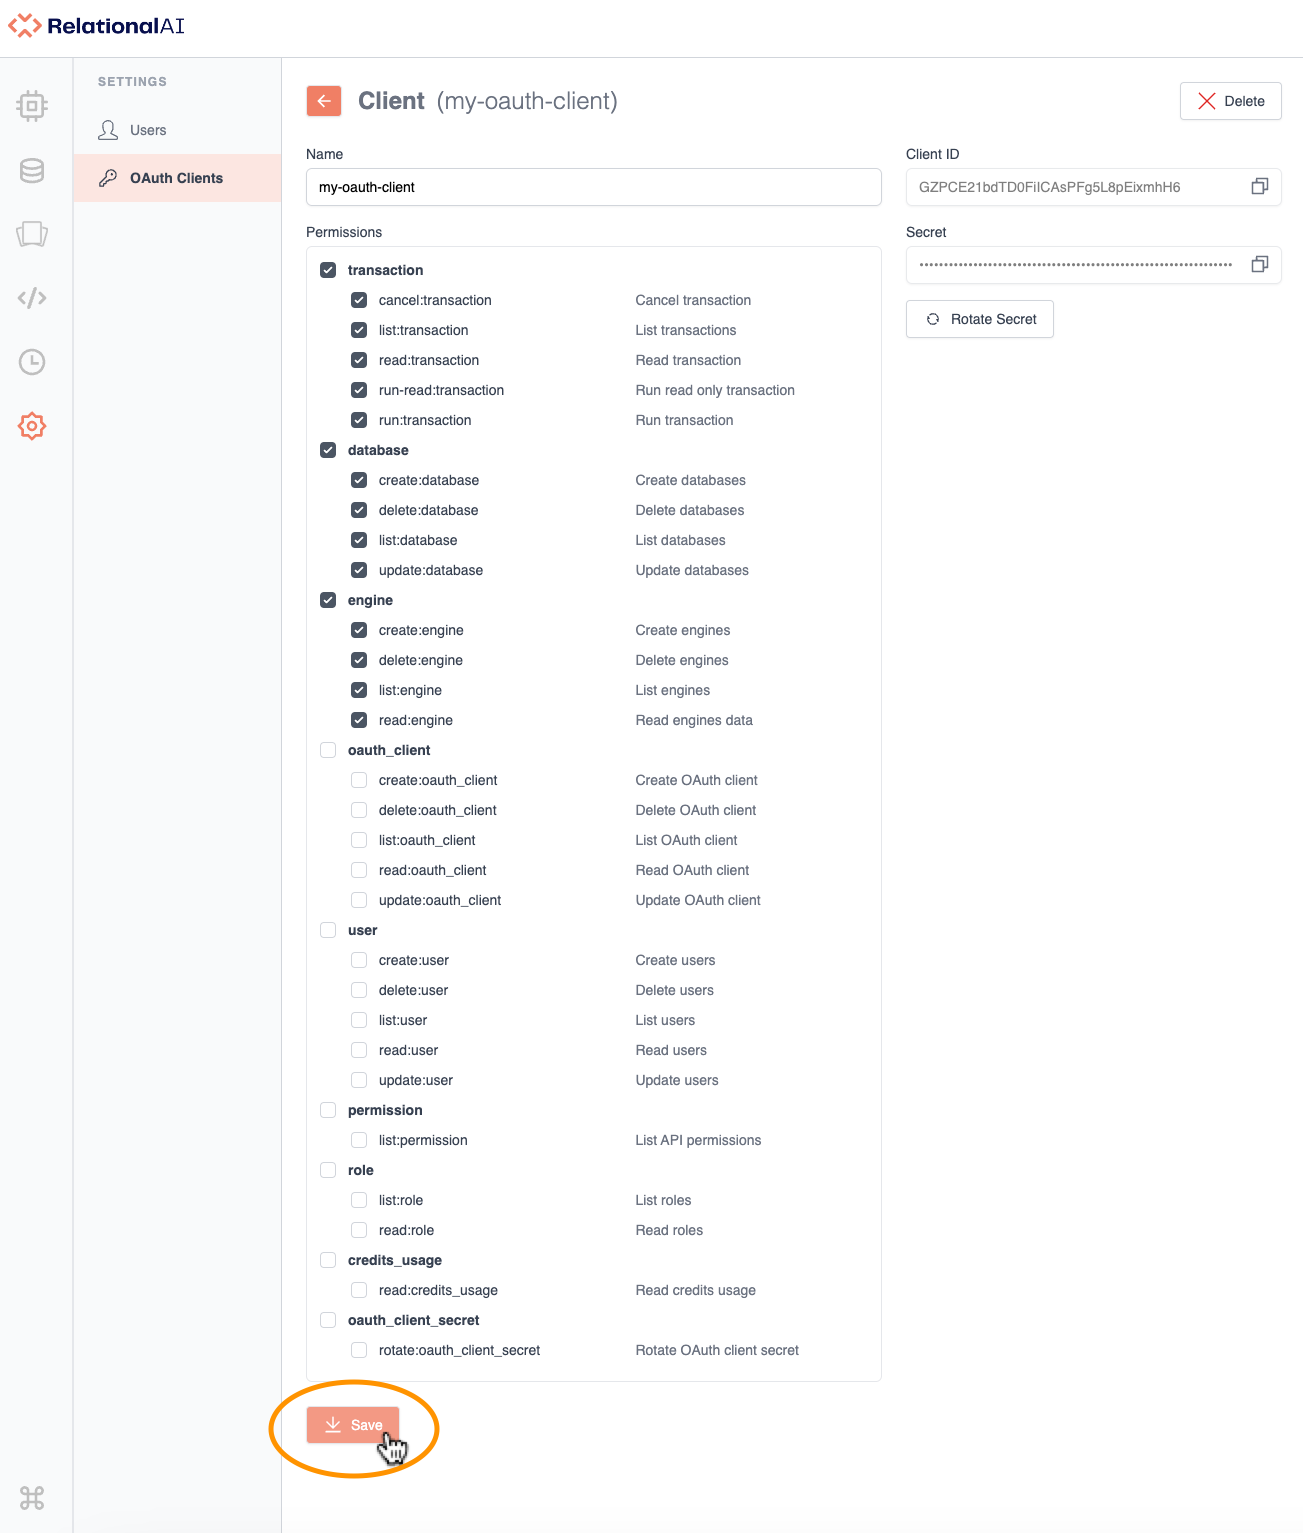
To create a new OAuth client:
- Click + Client in the top right-hand corner. This redirects you to a new page.
- Under Name, enter a name for the OAuth client. The OAuth client name is a public identifier for your application. You should use a meaningful name that you can remember.
- Under Permissions, select the permissions you want to grant to the OAuth client by checking the respective boxes. You can also restrict permissions for OAuth clients. For example, you can allow OAuth clients to list engines or list databases, but not delete them.
- Click Save to create the OAuth client.
The new OAuth client now appears in the list.
-
To delete an OAuth client:
- Click X next to the OAuth client you want to delete.
- In the Confirmation window that opens, click Delete. The OAuth client then disappears from the list.
You can also delete an OAuth Client from the Client page. See Deleting an OAuth Client.
Sharing OAuth Credentials
To share OAuth credentials:
- In the OAuth Clients page, click the name of the OAuth client for which you want to share credentials. This redirects you to the Client page.
- Click the Copy icon for both Client ID and Secret.
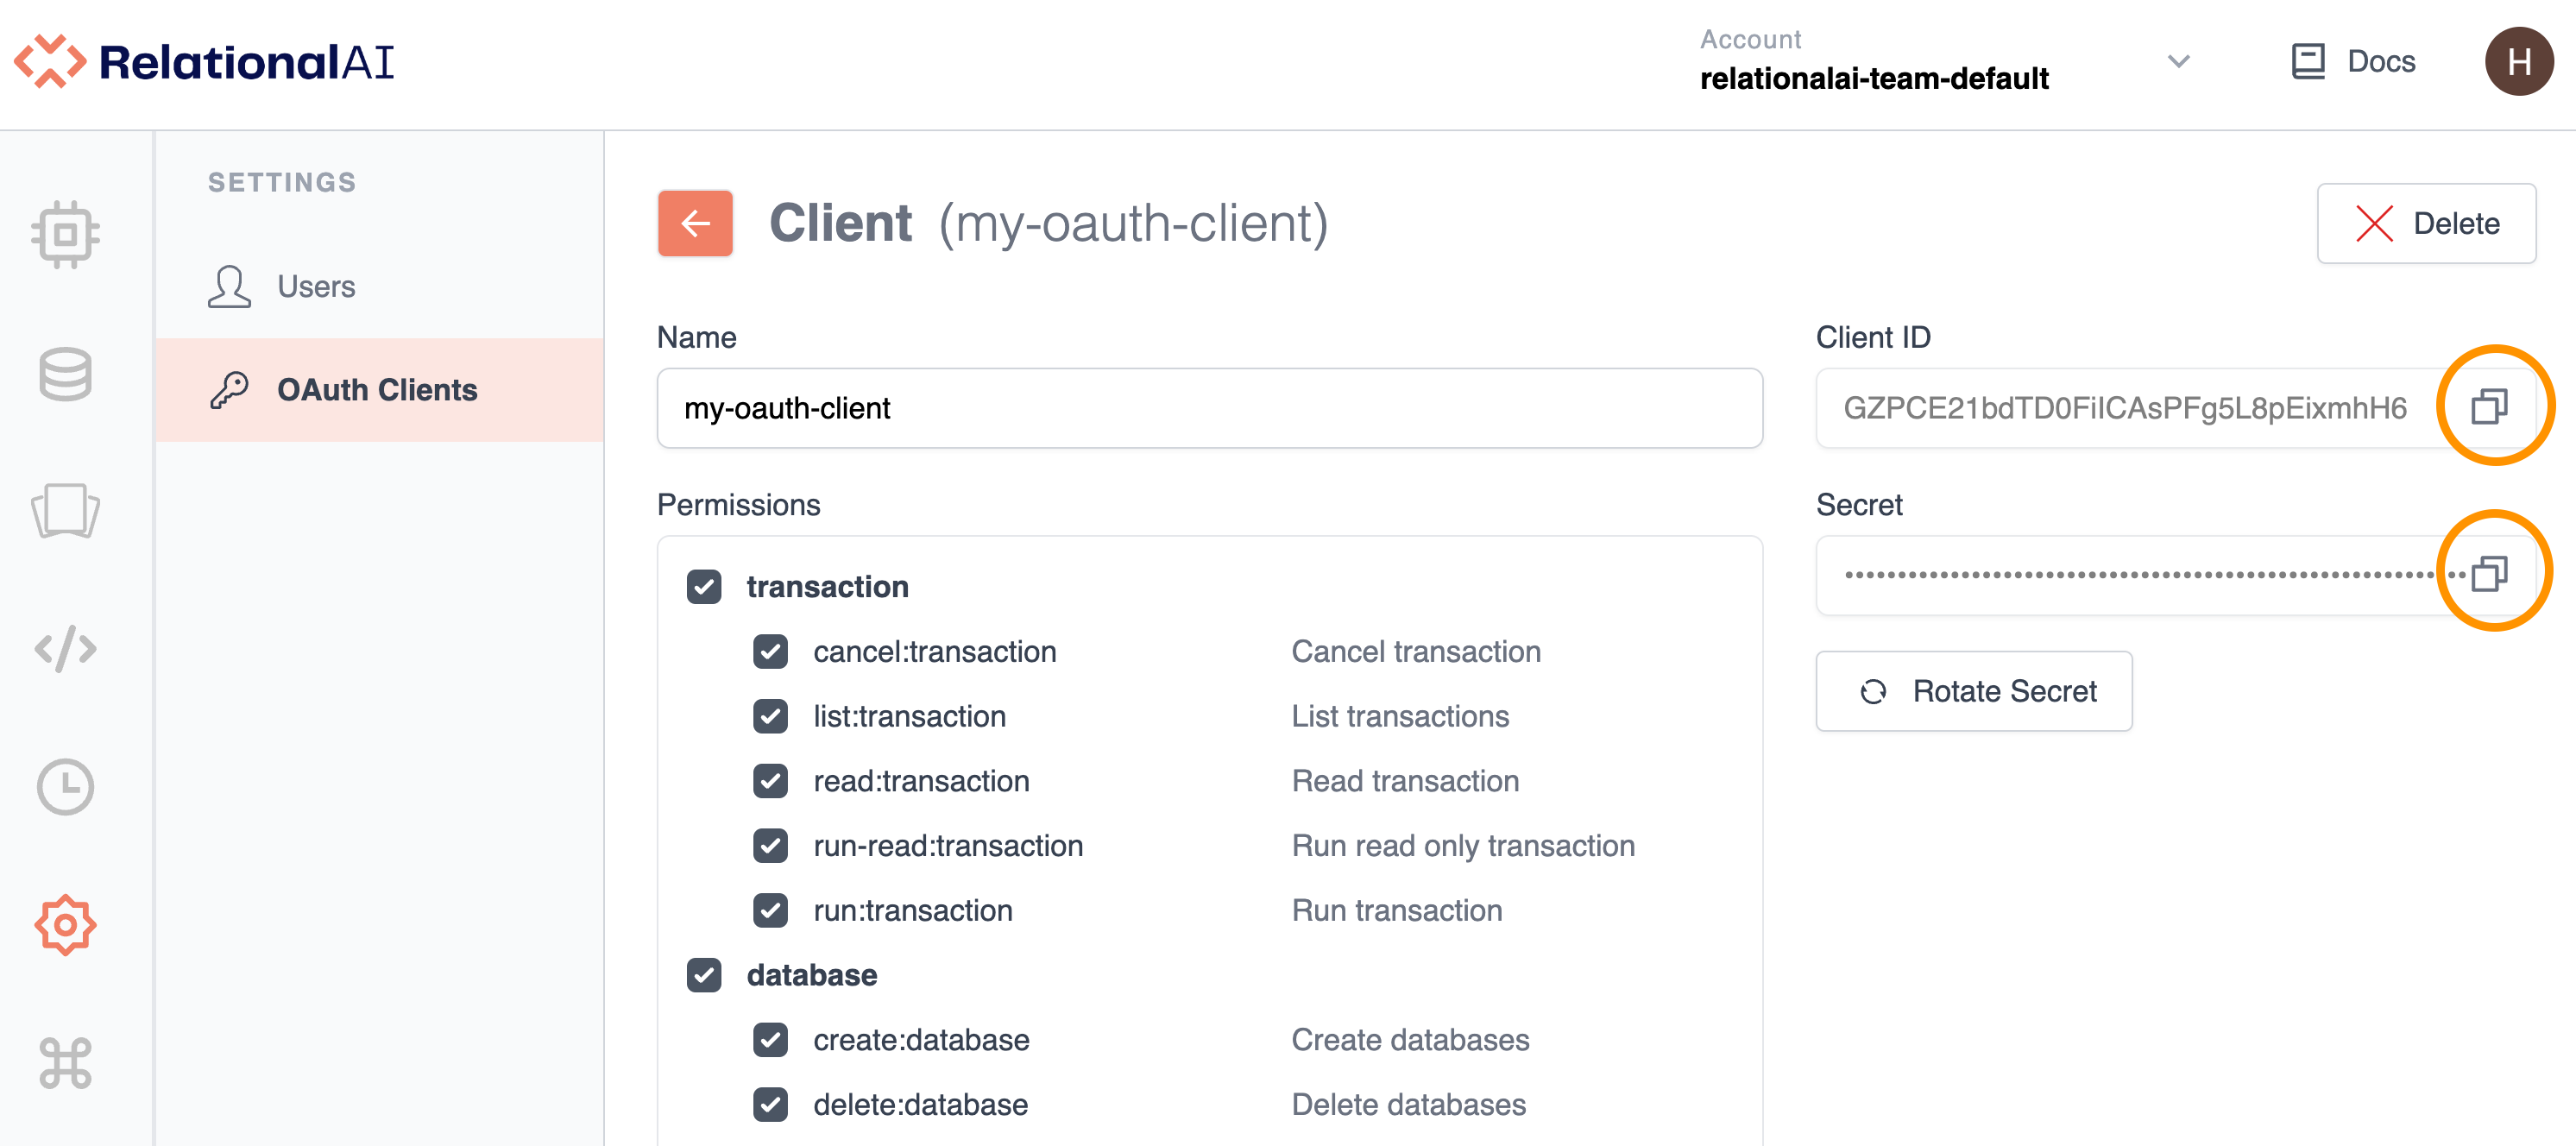
- Copy the client ID and secret to a text file and share the credentials in a secure manner.
The client secret is confidential and should only be used to authenticate your application and make requests through the SDK. You should not share the secret anywhere that is potentially unsecured, such as email, public code repositories, or web server files that can be viewed externally.
It’s also advisable to rotate the client secret regularly. See Rotationg OAuth Secrets.
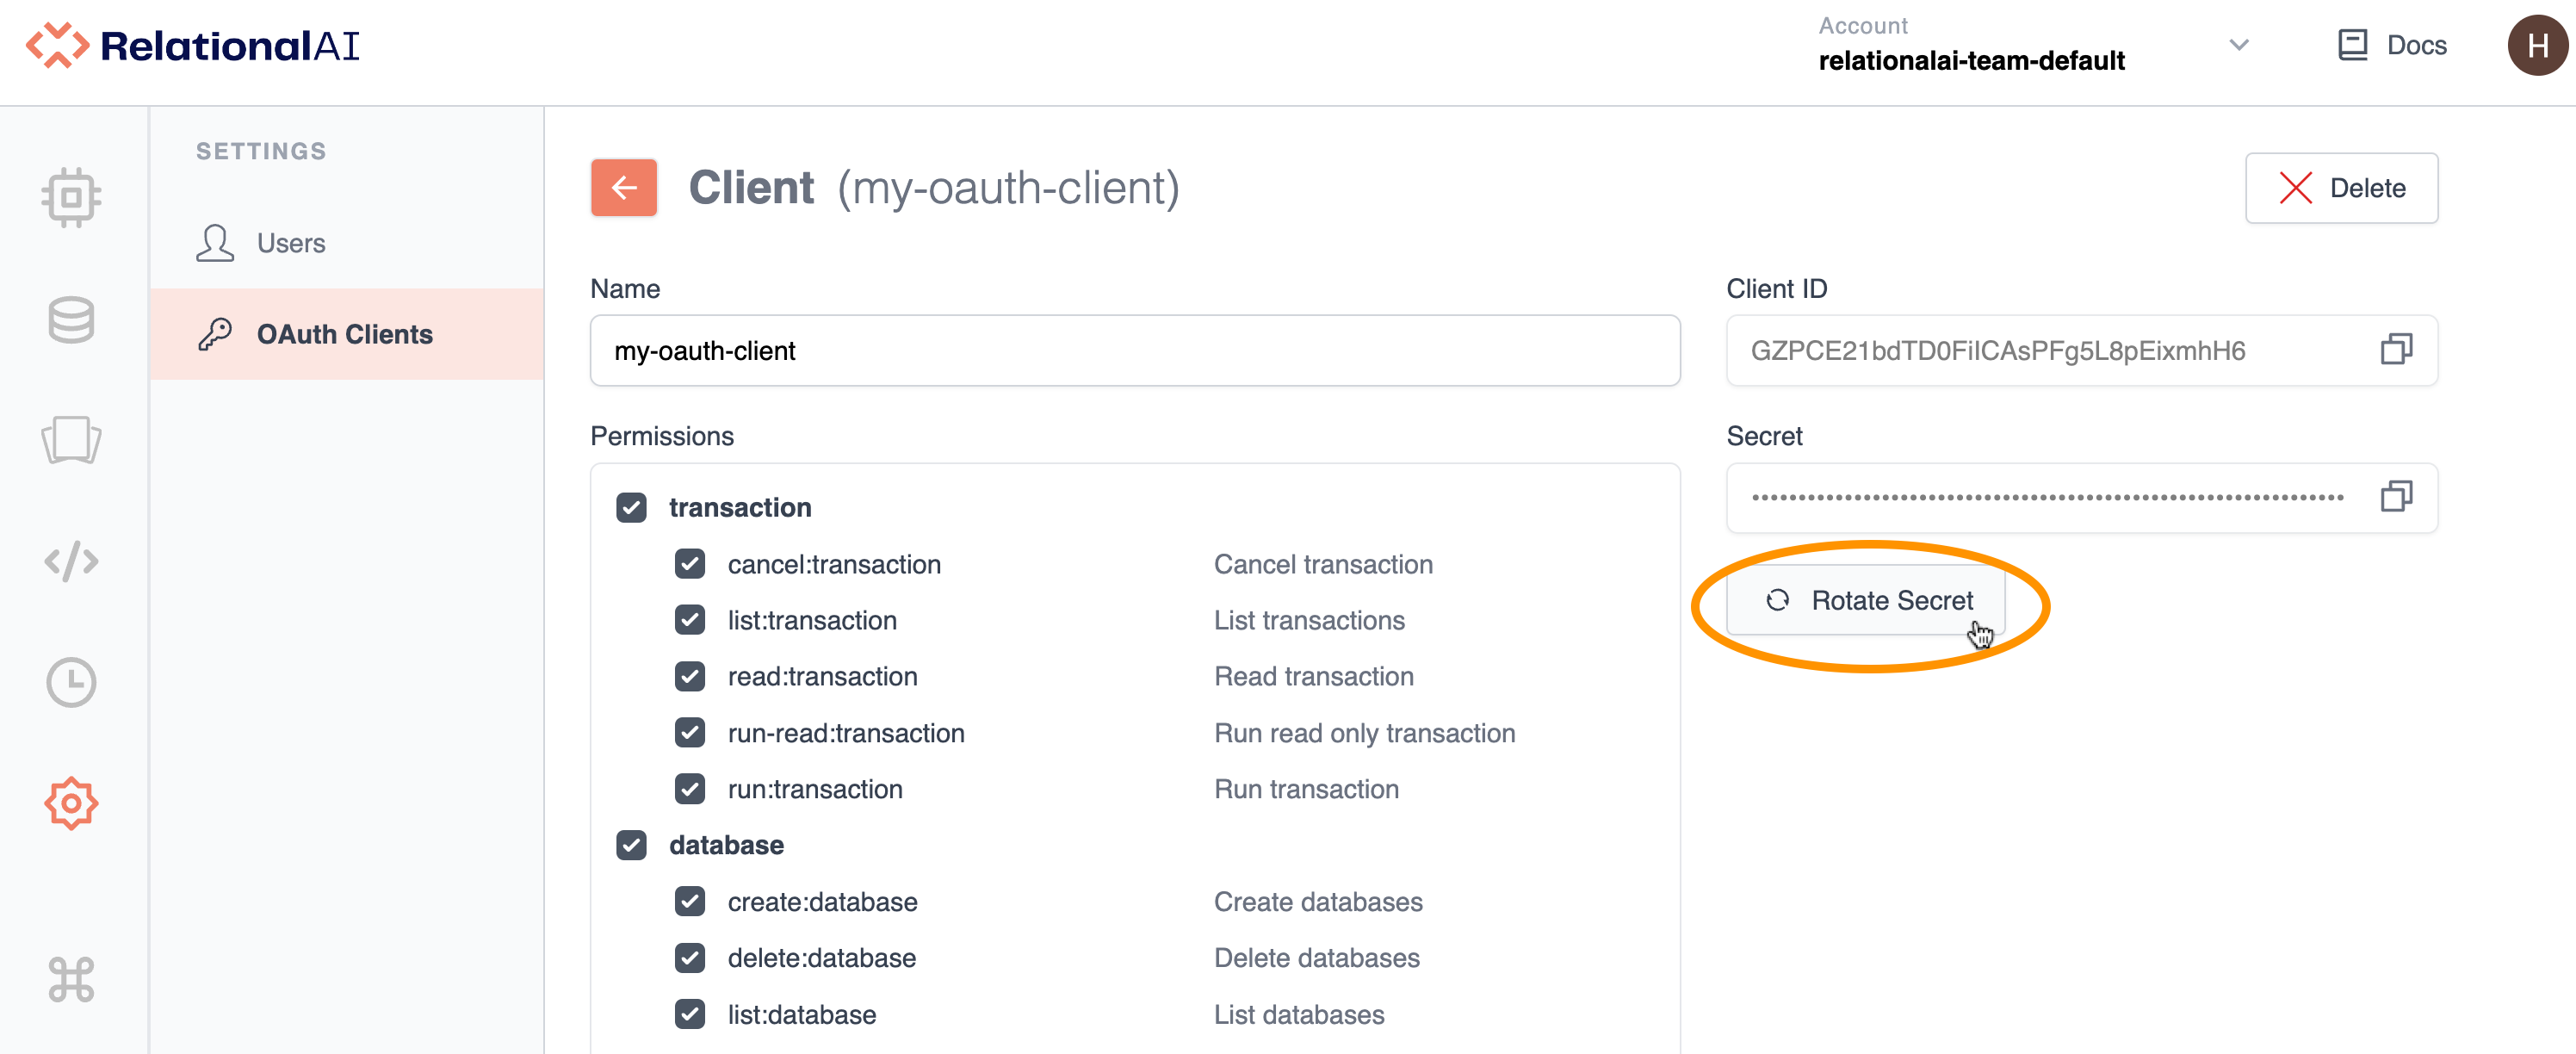
Rotating OAuth Secrets
To rotate the secret for an OAuth client:
- In the OAuth Clients page, click the OAuth client for which you want to rotate the secret. This redirects you to the Client page.
- Click Rotate Secret.
- Use the Copy icon to the right of the Secret field to copy the secret to your SDK’s client configuration.
Permissions for OAuth Clients
You can set the following permissions for OAuth clients:
| Area | Permission Name | Explanation |
|---|---|---|
| Transaction | cancel:transaction | Cancel transactions. |
| Transaction | list:transaction | List transactions. |
| Transaction | read:transaction | View details about transactions. |
| Transaction | run-read:transaction | Run only read-only transactions. |
| Transaction | run:transaction | Run write and read-only transactions. |
| Database | create:database | Create databases. |
| Database | delete:database | Delete databases. |
| Database | list:database | List databases. |
| Database | update:database | Update databases. |
| Engine | create:engine | Create engines. |
| Engine | delete:engine | Delete engine. |
| Engine | list:engine | List engines. |
| Engine | read:engine | View details about engines. |
| OAuth client | create:oauth_client | Create OAuth clients. |
| OAuth client | delete:oauth_client | Delete OAuth clients. |
| OAuth client | list:oauth_client | List OAuth clients. |
| OAuth client | read:oauth_client | View details about OAuth clients. |
| OAuth client | update:oauth_client | Update OAuth clients. |
| User | create:user | Create users. |
| User | delete:user | Delete users. |
| User | list:user | List users. |
| User | read:user | View details about users. |
| User | update:user | Update users. |
| Permission | list:permission | List API permissions. |
| Role | list:role | List roles. |
| Role | read:role | View details about roles. |
| Credits Usage | read:credits_usage | View details about credits usage. |
| OAuth client - Secret | rotate:oauth_client_secret | Rotate OAuth client secrets. |
Changing Permissions for an OAuth Client
You can change an OAuth client’s permissions at any time.
To do so:
- In the OAuth Clients page, click the OAuth client for which you want to change permissions. This redirects you to the Client page.
- Change permissions as needed by checking or unchecking the respective boxes.
- Click Save.
Configuring OAuth Clients for SDKs
In order to use OAuth, you need to create a configuration file on the machine on which you’re running your SDK.
To do so:
- Create a file called
~/.rai/config. - Enter the following information in the file:
[default]
region = us-east
host = azure.relationalai.com
port = 443
client_id = qvG73z47SKxQV5sxMUMLSOCIGSDVe70u
client_secret = <your secret goes here>| Parameter | Brief Explanation |
|---|---|
| region | Engine region — currently always us-east. |
| host | Host for RelationalAI — currently always azure.relationalai.com. |
| port | Port for RelationalAI — currently always 443. |
| client_id | Your OAuth client ID. |
| client_secret | Your OAuth secret. |
Deleting an OAuth Client
In addition to deleting an OAuth client from the OAuth Clients page, you can delete an OAuth client from the Client page:
- In the OAuth Clients page, click the OAuth client you want to delete. This redirects you to the Client page.
- Click X Delete in the top right-hand corner.
- In the Confirmation window that opens, click Delete.
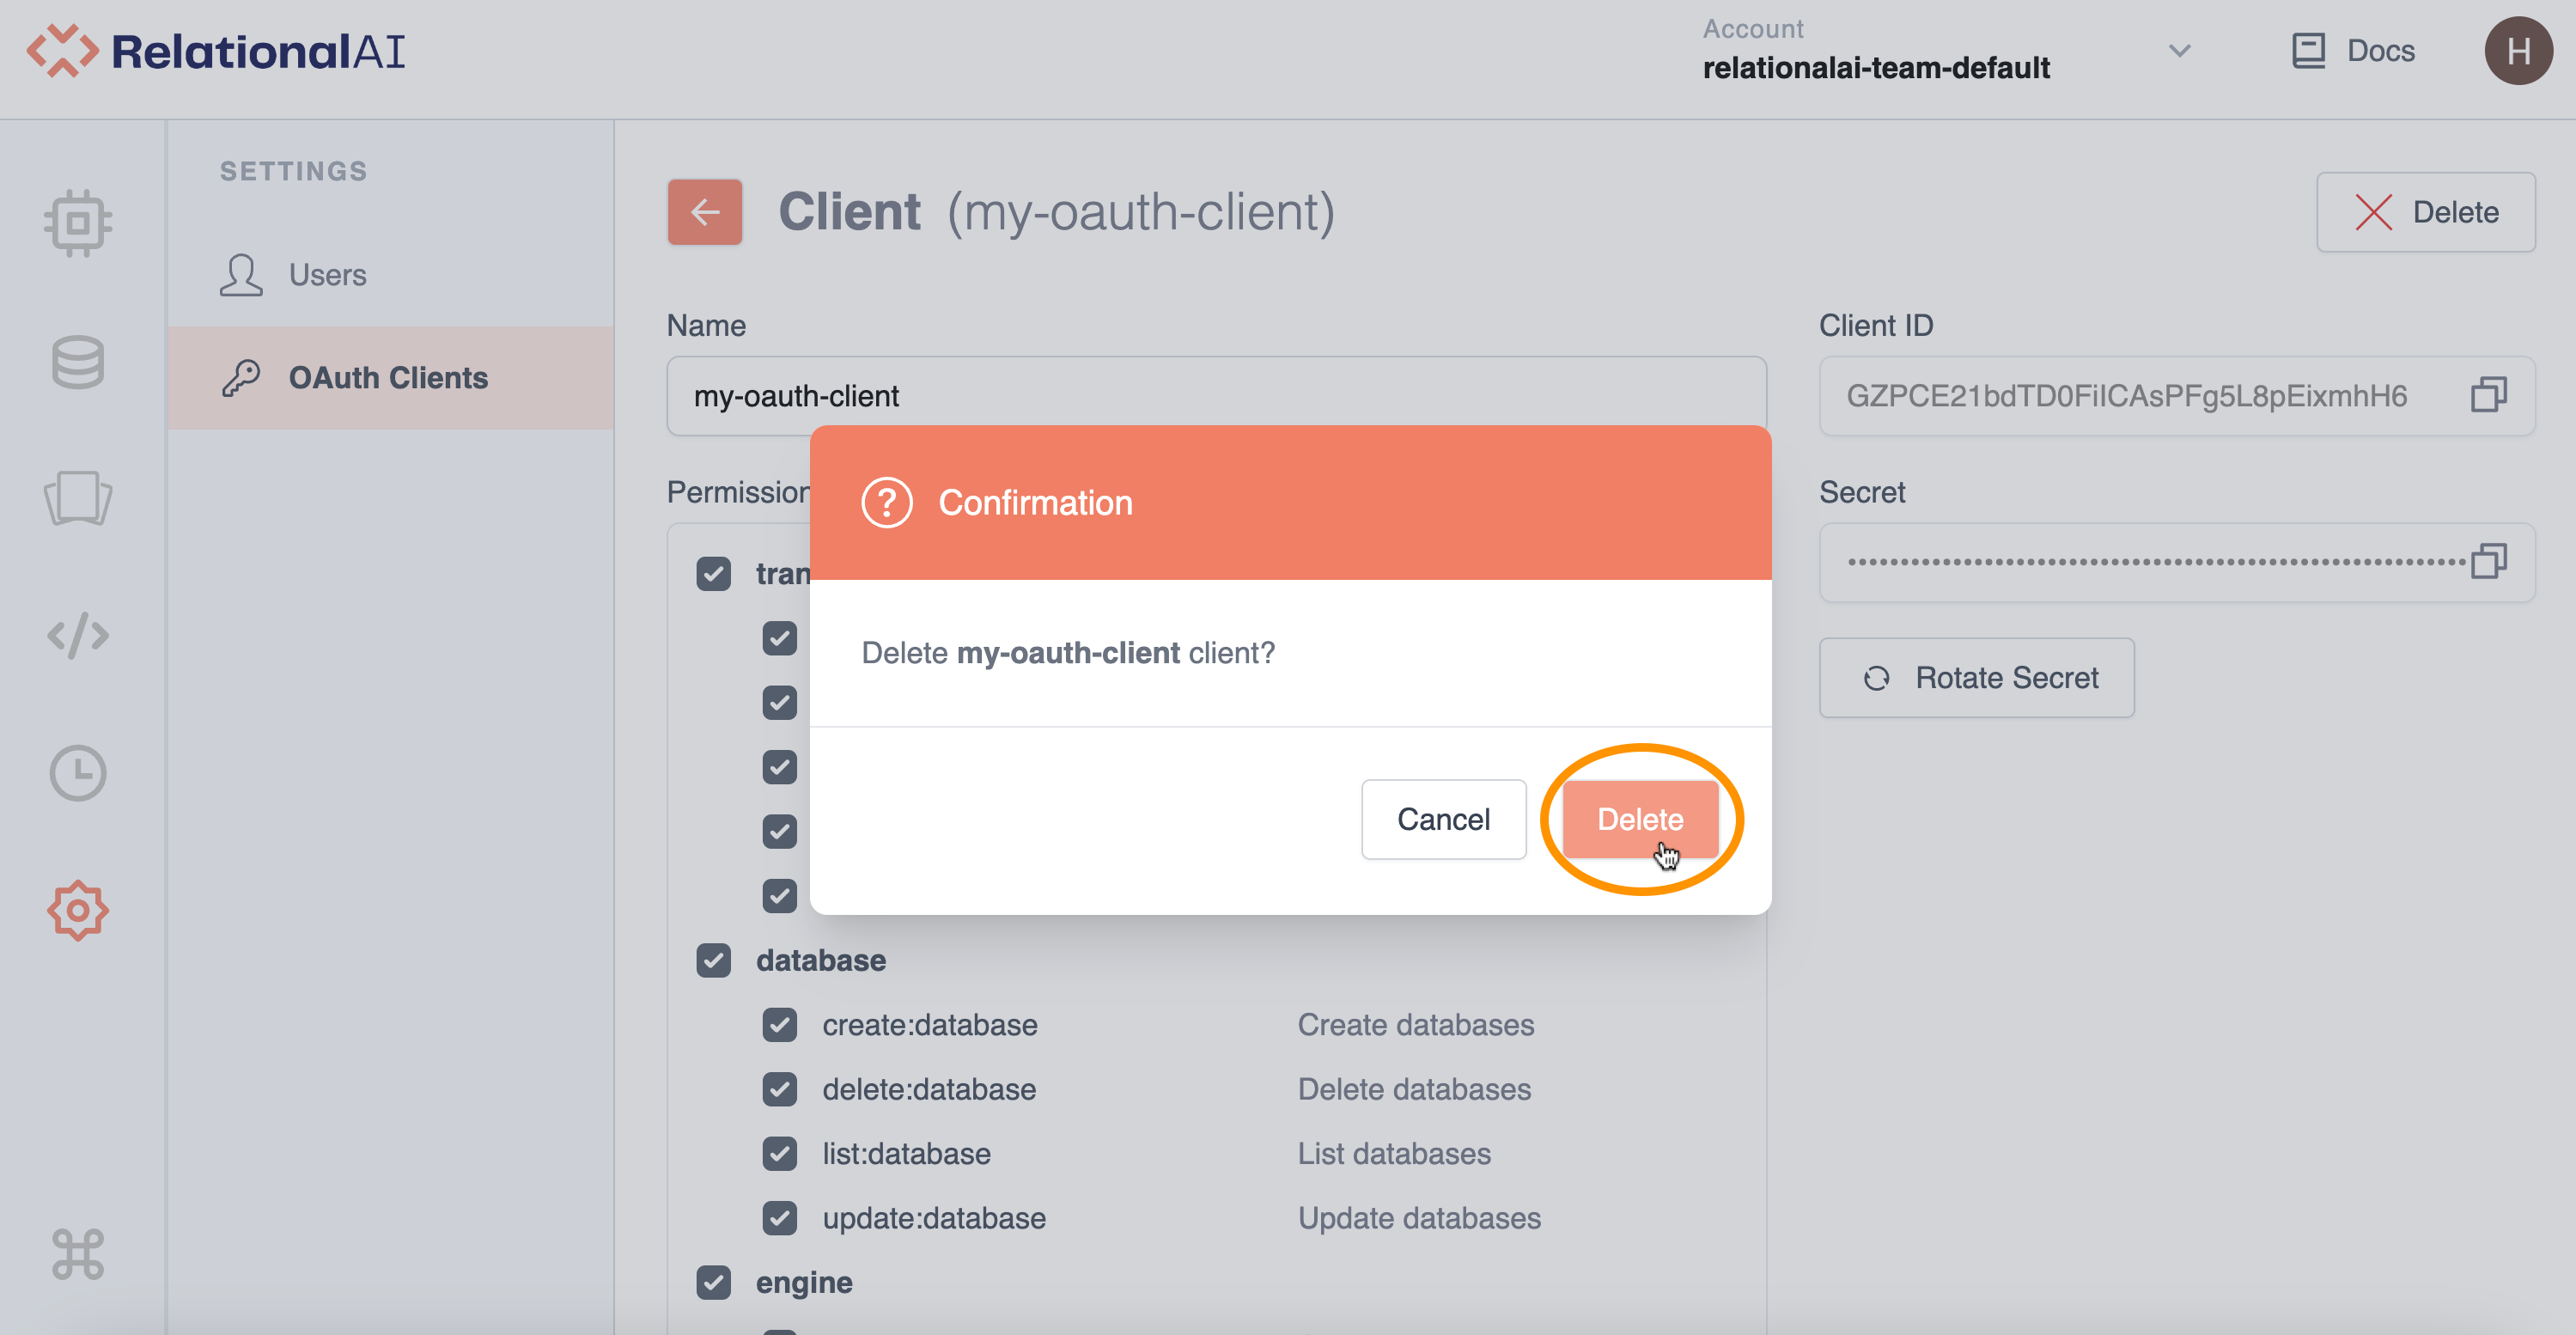
The OAuth client then disappears from the list in the OAuth Clients page.